|
|
||
|---|---|---|
| .. | ||
| app | ||
| gradle/wrapper | ||
| images | ||
| .gitignore | ||
| README.en.md | ||
| README.md | ||
| build.gradle | ||
| gradle.properties | ||
| gradlew | ||
| gradlew.bat | ||
| settings.gradle | ||
README.en.md
MindSpore Lite Skeleton Detection Demo (Android)
This sample application demonstrates how to use the MindSpore Lite API and skeleton detection model to perform inference on the device, detect the content captured by the device camera, and display the continuous objective detection result on the image preview screen of the app.
Running Dependencies
- Android Studio 3.2 or later (Android 4.0 or later is recommended.)
Building and Running
-
Load the sample source code to Android Studio.
Start Android Studio, click
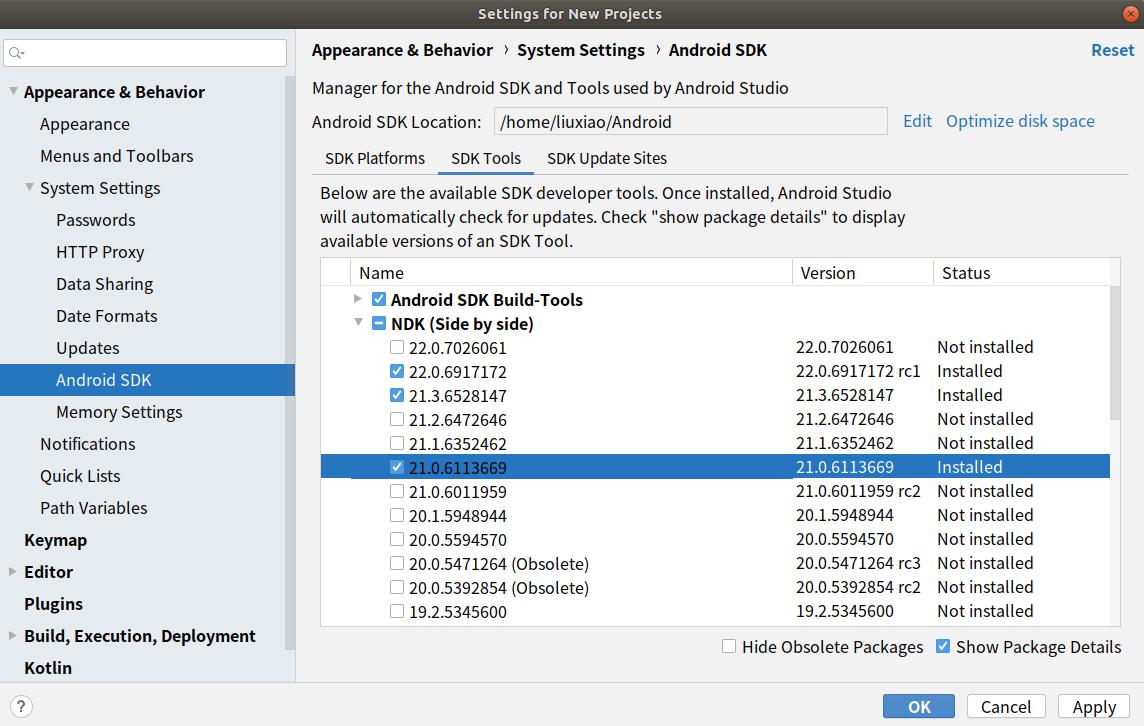
File > Settings > System Settings > Android SDK, and select the correspondingSDK Tools. As shown in the following figure, select an SDK and clickOK. Android Studio automatically installs the SDK.Android SDK Tools is the default installation. You can see this by unchecking the
Hide Obsolete Packagesbox.If you have any Android Studio configuration problem when trying this demo, please refer to item 4 to resolve it.
-
Connect to an Android device and runs this application.
Connect to the Android device through a USB cable for debugging. Click
Run 'app'to run the sample project on your device.Android Studio will automatically download MindSpore Lite, model files and other dependencies during the compilation process. Please be patient during this process.
For details about how to connect the Android Studio to a device for debugging, see https://developer.android.com/studio/run/device?hl=zh-cn.
The mobile phone needs to be turn on "USB debugging mode" before Android Studio can recognize the mobile phone. Huawei mobile phones generally turn on "USB debugging model" in Settings -> system and update -> developer Options -> USB debugging.
-
Continue the installation on the Android device. After the installation is complete, you can view the content captured by a camera and the inference result.
-
The solutions of configuration problems:
4.1 Problems of NDK, CMake, JDK Tools:
If the tools installed in Android Studio are not recognized, you can re-download and install them from the corresponding official website, and configure the path.
4.2 NDK version does not match:
Open
Android SDK, clickShow Package Details, and select the appropriate NDK version according to the error message.
4.3 Problem of Android Studio version:
Update the Android Studio version in
Toolbar - Help - Checkout for Updates.4.4 Gradle dependencies installed too slowly:
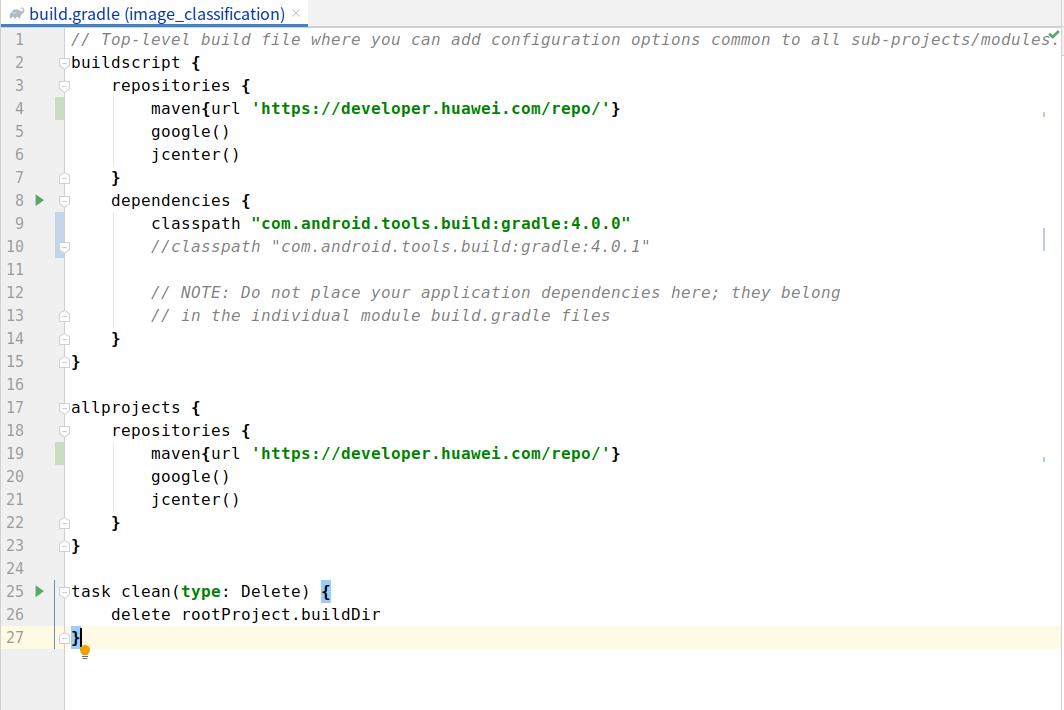
As shown in the picture, open the Demo root directory
build. Gradlefile, then add huawei mirror source address:maven {url 'https://developer.huawei.com/repo/'}, modify the classpath to 4.0.0 and clicksync. Once the download is complete, restore the classpath version and synchronize it again.
Detailed Description of the Sample Application
The skeleton detection sample application on the Android device uses the Android Camera 2 API to enable a camera to obtain image frames and process images, as well as using runtime to complete model inference.
Sample Application Structure
├── app
│   ├── build.gradle # Other Android configuration file.
│   ├── download.gradle # During app building, the .gradle file automatically downloads the dependent library files and model files from the Huawei server.
│   ├── proguard-rules.pro
│   └── src
│       ├── main
│       │   ├── AndroidManifest.xml # Android configuration file.
│       │   ├── java # Application code at the Java layer.
│       │   │   └── com
│       │   │       └── mindspore
│       │   │           └── posenetdemo # Image processing and inference process implementation.
│       │   │               ├── CameraDataDealListener.java
│       │   │               ├── ImageUtils.java
│       │   │               ├── MainActivity.java
│       │   │               ├── PoseNetFragment.java
│       │   │               ├── Posenet.java #
│       │   │               └── TestActivity.java
│       │   └── res # Resource files related to Android.
│       └── test
└── ...
Downloading and Deploying the Model File
Download the model file from MindSpore Model Hub. The objective detection model file used in this sample application is posenet_model.ms, which is automatically downloaded during app building using the download.gradle script and stored in the app/src/main/assets project directory.
If the download fails, manually download the model file posenet_model.ms
Writing On-Device Inference Code
In the skeleton detection demo, the Java API is used to implement on-device inference. Compared with the C++ API, the Java API can be directly called in the Java Class and does not need to implement the related code at the JNI layer. Therefore, the Java API is more convenient.
-
The following example identifies body features such as nose and eyes, obtains their locations, and calculates the confidence score to implement bone detection.
public enum BodyPart {
    NOSE,
    LEFT_EYE,
    RIGHT_EYE,
    LEFT_EAR,
    RIGHT_EAR,
    LEFT_SHOULDER,
    RIGHT_SHOULDER,
    LEFT_ELBOW,
    RIGHT_ELBOW,
    LEFT_WRIST,
    RIGHT_WRIST,
    LEFT_HIP,
    RIGHT_HIP,
    LEFT_KNEE,
    RIGHT_KNEE,
    LEFT_ANKLE,
    RIGHT_ANKLE
}

public class Position {
    int x;
    int y;
}

public class KeyPoint {
    BodyPart bodyPart = BodyPart.NOSE;
    Position position = new Position();
    float score = 0.0f;
}

public class Person {
    List<KeyPoint> keyPoints;
    float score = 0.0f;
}
The inference code process of bone detection demo is as follows. For details about the complete code, see src/main/java/com/mindspore/posenetdemo/Posenet.java.
-
Load the MindSpore Lite model file and build the context, session, and computational graph for inference.
-
Loading a model: Read a MindSpore Lite model from the file system and parse it.
// Load the .ms model. model = new Model(); if (!model.loadModel(mContext, "posenet_model.ms")) { Log.e("MS_LITE", "Load Model failed"); return false; } -
Creating a configuration context: Create the configuration context
MSConfigand save some basic configuration parameters required by the session for guiding graph building and execution.// Create and init config. msConfig = new MSConfig(); if (!msConfig.init(DeviceType.DT_CPU, NUM_THREADS, CpuBindMode.MID_CPU)) { Log.e("MS_LITE", "Init context failed"); return false; } -
Creating a session: Create
LiteSessionand call theinitmethod to configure theMSConfigobtained in the previous step to the session.// Create the MindSpore lite session. session = new LiteSession(); if (!session.init(msConfig)) { Log.e("MS_LITE", "Create session failed"); msConfig.free(); return false; } msConfig.free(); -
Load the model file and build a computational graph for inference.
// Compile graph.
if (!session.compileGraph(model)) {
    Log.e("MS_LITE", "Compile graph failed");
    model.freeBuffer();
    return false;
}

// Note: when use model.freeBuffer(), the model can not be compile graph again.
model.freeBuffer();
-
-
Input data. Currently, Java supports two types of data:
byte[]andByteBuffer. Set the data of the input tensor.-
Before data is input, the bitmap that stores image information needs to be interpreted, analyzed, and converted.
 /**
  * Scale the image to a byteBuffer of [-1,1] values.
  */
 private ByteBuffer initInputArray(Bitmap bitmap) {
     final int bytesPerChannel = 4;
     final int inputChannels = 3;
     final int batchSize = 1;
     ByteBuffer inputBuffer = ByteBuffer.allocateDirect(
             batchSize * bytesPerChannel * bitmap.getHeight() * bitmap.getWidth() * inputChannels
     );
     inputBuffer.order(ByteOrder.nativeOrder());
     inputBuffer.rewind();

     final float mean = 128.0f;
     final float std = 128.0f;
     int[] intValues = new int[bitmap.getWidth() * bitmap.getHeight()];
     bitmap.getPixels(intValues, 0, bitmap.getWidth(), 0, 0, bitmap.getWidth(), bitmap.getHeight());
int pixel = 0; for (int y = 0; y < bitmap.getHeight(); y++) { for (int x = 0; x < bitmap.getWidth(); x++) { int value = intValues[pixel++]; inputBuffer.putFloat(((float) (value >> 16 & 0xFF) - mean) / std); inputBuffer.putFloat(((float) (value >> 8 & 0xFF) - mean) / std); inputBuffer.putFloat(((float) (value & 0xFF) - mean) / std); } } return inputBuffer; } -
Input data through
ByteBuffer.long estimationStartTimeNanos = SystemClock.elapsedRealtimeNanos(); ByteBuffer inputArray = this.initInputArray(bitmap); List<MSTensor> inputs = session.getInputs(); if (inputs.size() != 1) { return null; } Log.i("posenet", String.format("Scaling to [-1,1] took %.2f ms", 1.0f * (SystemClock.elapsedRealtimeNanos() - estimationStartTimeNanos) / 1_000_000)); MSTensor inTensor = inputs.get(0); inTensor.setData(inputArray); long inferenceStartTimeNanos = SystemClock.elapsedRealtimeNanos();
-
-
Perform inference on the input tensor based on the model, obtain the output tensor, and perform post-processing.
-
Use
runGraphfor model inference.// Run graph to infer results. if (!session.runGraph()) { Log.e("MS_LITE", "Run graph failed"); return null; } lastInferenceTimeNanos = SystemClock.elapsedRealtimeNanos() - inferenceStartTimeNanos; Log.i( "posenet", String.format("Interpreter took %.2f ms", 1.0f * lastInferenceTimeNanos / 1_000_000) ); -
Obtain the inference result by the output tensor.
// Get output tensor values. List<MSTensor> heatmaps_list = session.getOutputsByNodeName("Conv2D-27"); if (heatmaps_list == null) { return null; } MSTensor heatmaps_tensors = heatmaps_list.get(0); float[] heatmaps_results = heatmaps_tensors.getFloatData(); int[] heatmapsShape = heatmaps_tensors.getShape(); //1, 9, 9 ,17 float[][][][] heatmaps = new float[heatmapsShape[0]][][][]; for (int x = 0; x < heatmapsShape[0]; x++) { // heatmapsShape[0] =1 float[][][] arrayThree = new float[heatmapsShape[1]][][]; for (int y = 0; y < heatmapsShape[1]; y++) { // heatmapsShape[1] = 9 float[][] arrayTwo = new float[heatmapsShape[2]][]; for (int z = 0; z < heatmapsShape[2]; z++) { //heatmapsShape[2] = 9 float[] arrayOne = new float[heatmapsShape[3]]; //heatmapsShape[3] = 17 for (int i = 0; i < heatmapsShape[3]; i++) { int n = i + z * heatmapsShape[3] + y * heatmapsShape[2] * heatmapsShape[3] + x * heatmapsShape[1] * heatmapsShape[2] * heatmapsShape[3]; arrayOne[i] = heatmaps_results[n]; //1*9*9*17 ?? } arrayTwo[z] = arrayOne; } arrayThree[y] = arrayTwo; } heatmaps[x] = arrayThree; }List<MSTensor> offsets_list = session.getOutputsByNodeName("Conv2D-28"); if (offsets_list == null) { return null; } MSTensor offsets_tensors = offsets_list.get(0); float[] offsets_results = offsets_tensors.getFloatData(); int[] offsetsShapes = offsets_tensors.getShape(); float[][][][] offsets = new float[offsetsShapes[0]][][][]; for (int x = 0; x < offsetsShapes[0]; x++) { float[][][] offsets_arrayThree = new float[offsetsShapes[1]][][]; for (int y = 0; y < offsetsShapes[1]; y++) { float[][] offsets_arrayTwo = new float[offsetsShapes[2]][]; for (int z = 0; z < offsetsShapes[2]; z++) { float[] offsets_arrayOne = new float[offsetsShapes[3]]; for (int i = 0; i < offsetsShapes[3]; i++) { int n = i + z * offsetsShapes[3] + y * offsetsShapes[2] * offsetsShapes[3] + x * offsetsShapes[1] * offsetsShapes[2] * offsetsShapes[3]; offsets_arrayOne[i] = offsets_results[n]; } offsets_arrayTwo[z] = offsets_arrayOne; } offsets_arrayThree[y] = offsets_arrayTwo; } offsets[x] = offsets_arrayThree; } -
Process the output node data, and obtain the return value
personof the skeleton detection demo to implement the function.In
Conv2D-27, theheight,weight, andnumKeypointsparameters stored inheatmapscan be used to obtain thekeypointPositioninformation.In
Conv2D-28,offsetindicates the position coordinate offset, which can be used together withkeypointPositionto obtainconfidenceScoresand determine the model inference result.Use
keypointPositionandconfidenceScoresto obtainperson.keyPointsandperson.scoreto obtain the model's return valueperson.int height = ((Object[]) heatmaps[0]).length; //9 int width = ((Object[]) heatmaps[0][0]).length; //9 int numKeypoints = heatmaps[0][0][0].length; //17 // Finds the (row, col) locations of where the keypoints are most likely to be. Pair[] keypointPositions = new Pair[numKeypoints]; for (int i = 0; i < numKeypoints; i++) { keypointPositions[i] = new Pair(0, 0); } for (int keypoint = 0; keypoint < numKeypoints; keypoint++) { float maxVal = heatmaps[0][0][0][keypoint]; int maxRow = 0; int maxCol = 0; for (int row = 0; row < height; row++) { for (int col = 0; col < width; col++) { if (heatmaps[0][row][col][keypoint] > maxVal) { maxVal = heatmaps[0][row][col][keypoint]; maxRow = row; maxCol = col; } } } keypointPositions[keypoint] = new Pair(maxRow, maxCol); } // Calculating the x and y coordinates of the keypoints with offset adjustment. int[] xCoords = new int[numKeypoints]; int[] yCoords = new int[numKeypoints]; float[] confidenceScores = new float[numKeypoints]; for (int i = 0; i < keypointPositions.length; i++) { Pair position = keypointPositions[i]; int positionY = (int) position.first; int positionX = (int) position.second; yCoords[i] = (int) ((float) positionY / (float) (height - 1) * bitmap.getHeight() + offsets[0][positionY][positionX][i]); xCoords[i] = (int) ((float) positionX / (float) (width - 1) * bitmap.getWidth() + offsets[0][positionY][positionX][i + numKeypoints]); confidenceScores[i] = sigmoid(heatmaps[0][positionY][positionX][i]); } Person person = new Person(); KeyPoint[] keypointList = new KeyPoint[numKeypoints]; for (int i = 0; i < numKeypoints; i++) { keypointList[i] = new KeyPoint(); } float totalScore = 0.0f; for (int i = 0; i < keypointList.length; i++) { keypointList[i].position.x = xCoords[i]; keypointList[i].position.y = yCoords[i]; keypointList[i].score = confidenceScores[i]; totalScore += confidenceScores[i]; } person.keyPoints = Arrays.asList(keypointList); person.score = totalScore / numKeypoints; return person;
-


