forked from Gitlink/gitlink_help_center
Compare commits
5 Commits
| Author | SHA1 | Date |
|---|---|---|
 caishi caishi
|
5f0e1c86e5 | |
|
caishi
|
1937923cd0 | |
|
caishi
|
eae6afc139 | |
|
caishi
|
1c6fa53351 | |
|
caishi
|
fa6bbf212c |
|
|
@ -1,63 +0,0 @@
|
|||
version: 2
|
||||
name: demo
|
||||
description: ""
|
||||
global:
|
||||
concurrent: 1
|
||||
trigger:
|
||||
webhook: gitlink@1.0.0
|
||||
event:
|
||||
- ref: pr
|
||||
ruleset-operator: AND
|
||||
workflow:
|
||||
- ref: start
|
||||
name: 开始
|
||||
task: start
|
||||
- ref: git_clone_0
|
||||
name: git clone
|
||||
task: git_clone@1.2.9
|
||||
input:
|
||||
username: ((qinxinqi.gitlink_qinxinqi_username))
|
||||
password: ((qinxinqi.qinxinqi_passwd))
|
||||
remote_url: '"https://gitlink.org.cn/lirenqiu/gitlink_help_center.git"'
|
||||
ref: '"refs/heads/master"'
|
||||
commit_id: '""'
|
||||
depth: 1
|
||||
needs:
|
||||
- start
|
||||
- ref: end
|
||||
name: 结束
|
||||
task: end
|
||||
needs:
|
||||
- ssh_cmd_0
|
||||
- ref: docker_image_build_0
|
||||
name: docker镜像构建
|
||||
task: docker_image_build@1.6.0
|
||||
input:
|
||||
docker_username: ((qinxinqi.aliyun_username))
|
||||
docker_password: ((qinxinqi.aliyun_passwd))
|
||||
image_name: '"crpi-ztziizjrn1v9ynub.cn-hangzhou.personal.cr.aliyuncs.com/qinxinqi22/group_03"'
|
||||
image_tag: '"latest"'
|
||||
registry_address: '"crpi-ztziizjrn1v9ynub.cn-hangzhou.personal.cr.aliyuncs.com"'
|
||||
docker_file: '"Dockerfile"'
|
||||
docker_build_path: '"."'
|
||||
workspace: git_clone_0.git_path
|
||||
image_push: true
|
||||
build_args: '""'
|
||||
needs:
|
||||
- git_clone_0
|
||||
- ref: ssh_cmd_0
|
||||
name: ssh执行命令
|
||||
task: ssh_cmd@1.1.1
|
||||
input:
|
||||
ssh_pass: ((qinxinqi.ssh_passwd))
|
||||
ssh_ip: '"114.55.175.219"'
|
||||
ssh_port: '"22"'
|
||||
ssh_user: '"root"'
|
||||
ssh_cmd: '"docker stop group_03 || true && docker rm group_03 || true && docker
|
||||
pull
|
||||
crpi-ztziizjrn1v9ynub.cn-hangzhou.personal.cr.aliyuncs.com/qinxinqi22/group_03:latest;
|
||||
docker run -d -p 3000:3000 --name group_03
|
||||
crpi-ztziizjrn1v9ynub.cn-hangzhou.personal.cr.aliyuncs.com/qinxinqi22/group_03:latest"'
|
||||
needs:
|
||||
- docker_image_build_0
|
||||
|
||||
|
|
@ -1,5 +1,5 @@
|
|||
version: 2
|
||||
name: 测试实验一
|
||||
name: 未命名项目
|
||||
description: ""
|
||||
global:
|
||||
concurrent: 1
|
||||
|
|
@ -12,13 +12,25 @@ workflow:
|
|||
- ref: start
|
||||
name: 开始
|
||||
task: start
|
||||
- ref: git_clone_0
|
||||
name: git clone
|
||||
task: git_clone@1.2.9
|
||||
input:
|
||||
username: ((ganshihao21.ganshihao21_user))
|
||||
password: ((ganshihao21.ganshihao21))
|
||||
remote_url: '"https://gitlink.org.cn/ganshihao21/reposync.git"'
|
||||
ref: '"refs/heads/master"'
|
||||
commit_id: '""'
|
||||
depth: 1
|
||||
needs:
|
||||
- start
|
||||
- ref: docker_image_build_0
|
||||
name: docker镜像构建
|
||||
task: docker_image_build@1.6.0
|
||||
input:
|
||||
docker_username: ((nudt_devops.nudt_devops))
|
||||
docker_password: ((nudt_devops.nudt_devops))
|
||||
image_name: '"registry.cn-guangzhou.aliyuncs.com/nudt_devops/gitlink_help_center_group5"'
|
||||
image_name: '"registry.cn-guangzhou.aliyuncs.com/nudt_devops/reposync_group5"'
|
||||
image_tag: '"latest"'
|
||||
registry_address: '"registry.cn-guangzhou.aliyuncs.com"'
|
||||
docker_file: '"Dockerfile"'
|
||||
|
|
@ -28,18 +40,6 @@ workflow:
|
|||
build_args: '""'
|
||||
needs:
|
||||
- git_clone_0
|
||||
- ref: git_clone_0
|
||||
name: git clone
|
||||
task: git_clone@1.2.9
|
||||
input:
|
||||
username: ((ganshihao21.ganshihao21_user))
|
||||
password: ((ganshihao21.ganshihao21))
|
||||
remote_url: '"https://gitlink.org.cn/shuaihao/gitlink_help_center.git"'
|
||||
ref: '"refs/heads/master"'
|
||||
commit_id: '""'
|
||||
depth: 1
|
||||
needs:
|
||||
- start
|
||||
- ref: ssh_cmd_0
|
||||
name: ssh执行命令
|
||||
task: ssh_cmd@1.1.1
|
||||
|
|
@ -48,14 +48,15 @@ workflow:
|
|||
ssh_ip: '"47.96.164.145"'
|
||||
ssh_port: '"22"'
|
||||
ssh_user: '"root"'
|
||||
ssh_cmd: '"docker stop ghc_group5 && docker rm ghc_group5 && docker pull
|
||||
registry.cn-guangzhou.aliyuncs.com/nudt_devops/gitlink_help_center_group5:latest
|
||||
&& docker run -d -p 3000:3000 --name ghc_group5
|
||||
registry.cn-guangzhou.aliyuncs.com/nudt_devops/gitlink_help_center_group5:latest"'
|
||||
ssh_cmd: '"docker stop abc_group5 && docker rm abc_group5 && docker pull
|
||||
registry.cn-guangzhou.aliyuncs.com/nudt_devops/reposync_group5:latest &&
|
||||
docker run -d -p 3000:3000 --name abc_group5
|
||||
registry.cn-guangzhou.aliyuncs.com/nudt_devops/reposync_group5:latest"'
|
||||
needs:
|
||||
- docker_image_build_0
|
||||
- ref: end
|
||||
name: 结束
|
||||
task: end
|
||||
needs:
|
||||
- ssh_cmd_0
|
||||
- ssh_cmd_0
|
||||
|
||||
|
|
@ -1,183 +0,0 @@
|
|||
version: 2
|
||||
name: 流水线zhangyang
|
||||
description: ""
|
||||
global:
|
||||
concurrent: 1
|
||||
trigger:
|
||||
webhook: gitlink@1.0.0
|
||||
event:
|
||||
- ref: push
|
||||
ruleset-operator: AND
|
||||
workflow:
|
||||
- ref: start
|
||||
name: 开始
|
||||
task: start
|
||||
- ref: end
|
||||
name: 结束
|
||||
task: end
|
||||
needs:
|
||||
- shell_0
|
||||
- ref: shell_0
|
||||
name: shell
|
||||
image: docker.jianmuhub.com/library/ubuntu:22.04
|
||||
script:
|
||||
- "#!/bin/bash"
|
||||
- ""
|
||||
- "# 配置信息(已更新为你的服务器信息)"
|
||||
- 'REPO_URL="https://gitlink.org.cn/lirenqiu/gitlink_help_center.git" #
|
||||
替换为你的代码仓库URL'
|
||||
- LOCAL_BUILD_DIR="/tmp/your-project-build"
|
||||
- WEB_ROOT="/var/www/html"
|
||||
- NGINX_CONFIG="/etc/nginx/sites-available/default"
|
||||
- 'REMOTE_SERVER="root@114.55.175.219" # 使用你的服务器IP'
|
||||
- LOG_FILE="/var/log/frontend_deploy.log"
|
||||
- ""
|
||||
- "# 日志函数"
|
||||
- log() {
|
||||
- " local level=$1"
|
||||
- " local message=$2"
|
||||
- " echo \"[$(date '+%Y-%m-%d %H:%M:%S')] [$level] $message\" | tee -a
|
||||
$LOG_FILE"
|
||||
- "}"
|
||||
- ""
|
||||
- "# 错误处理函数"
|
||||
- handle_error() {
|
||||
- ' log "ERROR" "执行命令失败: $BASH_COMMAND"'
|
||||
- ' log "ERROR" "错误代码: $?"'
|
||||
- " exit 1"
|
||||
- "}"
|
||||
- ""
|
||||
- "# 设置错误捕获"
|
||||
- trap 'handle_error' ERR
|
||||
- ""
|
||||
- "# 检查是否以root用户运行"
|
||||
- check_root() {
|
||||
- " if [[ $EUID -ne 0 ]]; then"
|
||||
- ' log "ERROR" "此脚本需要以root用户运行"'
|
||||
- " exit 1"
|
||||
- " fi"
|
||||
- "}"
|
||||
- ""
|
||||
- "# 安装本地依赖"
|
||||
- install_local_dependencies() {
|
||||
- ' log "INFO" "开始安装本地依赖..."'
|
||||
- " "
|
||||
- " # 检测系统类型"
|
||||
- " if [[ -f /etc/debian_version ]]; then"
|
||||
- ' log "INFO" "检测到Debian/Ubuntu系统"'
|
||||
- " apt-get update -y"
|
||||
- " apt-get install -y git curl gnupg sshpass"
|
||||
- " elif [[ -f /etc/redhat-release ]]; then"
|
||||
- ' log "INFO" "检测到CentOS/RHEL系统"'
|
||||
- " yum update -y"
|
||||
- " yum install -y git curl gnupg sshpass"
|
||||
- " else"
|
||||
- ' log "ERROR" "不支持的操作系统"'
|
||||
- " exit 1"
|
||||
- " fi"
|
||||
- " "
|
||||
- " # 安装Node.js和Yarn"
|
||||
- " curl -sL https://deb.nodesource.com/setup_16.x | bash -"
|
||||
- " apt-get install -y nodejs"
|
||||
- " npm install -g yarn"
|
||||
- " "
|
||||
- ' log "INFO" "本地依赖安装完成"'
|
||||
- "}"
|
||||
- ""
|
||||
- "# 克隆代码并构建"
|
||||
- build_project() {
|
||||
- ' log "INFO" "开始克隆代码并构建项目..."'
|
||||
- " "
|
||||
- " # 创建构建目录"
|
||||
- " mkdir -p $LOCAL_BUILD_DIR"
|
||||
- " cd $LOCAL_BUILD_DIR || exit"
|
||||
- " "
|
||||
- " # 克隆代码"
|
||||
- ' if [ -d ".git" ]; then'
|
||||
- ' log "INFO" "目录非空,尝试拉取最新代码"'
|
||||
- " git pull"
|
||||
- " else"
|
||||
- ' log "INFO" "克隆代码仓库"'
|
||||
- " git clone $REPO_URL ."
|
||||
- " fi"
|
||||
- " "
|
||||
- " # 安装项目依赖并构建"
|
||||
- ' log "INFO" "安装项目依赖..."'
|
||||
- " yarn install"
|
||||
- " "
|
||||
- ' log "INFO" "开始项目构建..."'
|
||||
- " yarn build"
|
||||
- " "
|
||||
- ' log "INFO" "项目构建完成"'
|
||||
- "}"
|
||||
- ""
|
||||
- "# 使用密码部署到远程服务器"
|
||||
- deploy_to_remote() {
|
||||
- ' log "INFO" "开始部署到远程服务器..."'
|
||||
- " "
|
||||
- " # 服务器密码(注意:明文存储不安全!)"
|
||||
- " SERVER_PASSWORD='ppuUV7W6UtmVGk01#pd:l' # 你的服务器密码"
|
||||
- " "
|
||||
- " # 复制构建文件到远程服务器"
|
||||
- ' log "INFO" "复制构建文件到远程服务器..."'
|
||||
- ' sshpass -p "$SERVER_PASSWORD" rsync -avz --delete -e ssh
|
||||
"$LOCAL_BUILD_DIR/dist/" "$REMOTE_SERVER:$WEB_ROOT/"'
|
||||
- " "
|
||||
- " # 在远程服务器上配置Nginx"
|
||||
- ' log "INFO" "配置远程服务器Nginx..."'
|
||||
- ' sshpass -p "$SERVER_PASSWORD" ssh -o StrictHostKeyChecking=no
|
||||
$REMOTE_SERVER <<EOF'
|
||||
- sudo bash <<SCRIPT
|
||||
- "# 确保Nginx已安装"
|
||||
- if ! command -v nginx &> /dev/null; then
|
||||
- " if [[ -f /etc/debian_version ]]; then"
|
||||
- " apt-get update -y"
|
||||
- " apt-get install -y nginx"
|
||||
- " elif [[ -f /etc/redhat-release ]]; then"
|
||||
- " yum update -y"
|
||||
- " yum install -y nginx"
|
||||
- " fi"
|
||||
- fi
|
||||
- ""
|
||||
- "# 创建Nginx配置文件"
|
||||
- cat > $NGINX_CONFIG <<NGINXCONF
|
||||
- server {
|
||||
- " listen 80 default_server;"
|
||||
- " listen [::]:80 default_server;"
|
||||
- " "
|
||||
- " root $WEB_ROOT;"
|
||||
- " index index.html index.htm;"
|
||||
- " "
|
||||
- " server_name _;"
|
||||
- " "
|
||||
- " location / {"
|
||||
- " try_files \\$uri \\$uri/ /index.html;"
|
||||
- " }"
|
||||
- "}"
|
||||
- NGINXCONF
|
||||
- ""
|
||||
- "# 测试配置并重启Nginx"
|
||||
- nginx -t
|
||||
- systemctl restart nginx
|
||||
- systemctl enable nginx
|
||||
- SCRIPT
|
||||
- EOF
|
||||
- " "
|
||||
- ' log "INFO" "部署到远程服务器完成"'
|
||||
- "}"
|
||||
- ""
|
||||
- "# 主函数"
|
||||
- main() {
|
||||
- ' log "INFO" "===== 开始前端项目部署脚本 ====="'
|
||||
- " check_root"
|
||||
- " install_local_dependencies"
|
||||
- " build_project"
|
||||
- " deploy_to_remote"
|
||||
- ' log "INFO" "===== 部署完成 ====="'
|
||||
- ' log "INFO" "访问 http://114.55.175.219 查看网站"'
|
||||
- "}"
|
||||
- ""
|
||||
- main
|
||||
needs:
|
||||
- start
|
||||
|
||||
|
|
@ -2,6 +2,74 @@
|
|||
sidebar_label: 'bot安装'
|
||||
sidebar_position: 1
|
||||
---
|
||||
import MyButton from './mybutton';
|
||||
|
||||
<MyButton onClick={() => {
|
||||
var pElements = document.getElementsByTagName('p');
|
||||
var hElements = document.getElementsByTagName('h1');
|
||||
var aElements = document.getElementsByTagName('a');
|
||||
var hzh = ['bot安装','bot安装'];
|
||||
var hen = ['Bot Installation','Bot Installation'];
|
||||
var azh = ['跳到主要内容','','帮助中心','','','','','','','','','','','','','','','','','','','','','机器人(Bot)','编辑此页','上一页 bot市场','下一页bot 配置','网站首页','关于我们','教学实践','合作伙伴','API文档','Git常用命令','引擎使用手册','服务协议','官网邮箱:gitlink@ccf.org.cn','QQ群','公众号'];
|
||||
var aen = ['Jump to main content','','Help Center','','','','','','','','','','','','','','','','','','','','','Robot (Bot)','Edit this page','last page Bot market','next page Bot configuration','Website homepage','About Us','Teaching practice','Partners','API documentation','Common Git commands','Engine User Manual','Service Agreement','Official website email: gitlink@ccf.org.cn','QQ group','Official Account'];
|
||||
var zhtranalate = ['Bot安装是进行bot安装和管理控制的重要模块,主要包括bot安装、安装查询、安装管理等功能。','在bot详情页,用户点击“安装此Bot”按钮后,可以看到该bot工作所需的各项权限信息。若用户同意授予bot所需的相关权限即可进行安装。用户可选择将bot安装到所有仓库(用户拥有的所有仓库)中,也可以选择指定的仓库进行安装。','','在个人“设置”或者“仓库设置”中,用户可以看到目前已经安装的Bot情况,点击“配置”按钮可以对bot安装情况进行配置,点击“卸载”按钮可以进行卸载。','','在bot安装配置页中,用户可以掌握该bot的安装位置和工作状态。若用户需要更改bot的工作仓库时,可以进行更改安装位置。bot的工作状态包括激活和挂起,用户可根据需要对bot的状态进行调整,将其挂起或者激活,会影响到bot对仓库数据的访问权限。','','©Copyright 2024 CCF 开源发展委员会','Powered by Trustie& IntelliDE 京ICP备13000930号'];
|
||||
var entranslate = ['Bot installation is an important module for bot installation and management control, which mainly includes functions such as bot installation, installation queries, and installation management.','On the bot details page, after clicking the "Install this bot" button, users can see the necessary permission information for the bot to work. If the user agrees to grant the necessary permissions to the bot, installation can proceed. Users can choose to install the bot in all warehouses (all warehouses owned by the user) or select a specified warehouse for installation.','','In personal "settings" or "warehouse settings", users can see the current installation status of bots. Click the "configure" button to configure the bot installation status, and click the "uninstall" button to uninstall.','','In the bot installation configuration page, users can grasp the installation location and working status of the bot. If the user needs to change the workspace of the bot, they can change the installation location. The working status of bots includes activation and suspension. Users can adjust the status of bots as needed. Suspending or activating bots can affect their access to warehouse data.','','© Copyright 2024 CCF Open Source Development Committee','Powered by Trust&IntelliDE Beijing ICP Preparation No. 13000930'];
|
||||
if (pElements[0].innerText == zhtranalate[0]){
|
||||
for (var i = 0; i < pElements.length; i++) {
|
||||
if (pElements[i].innerText != ''){
|
||||
if (i < pElements.length){
|
||||
pElements[i].innerText = entranslate[i];
|
||||
}
|
||||
}
|
||||
}
|
||||
}
|
||||
else{
|
||||
for (var i = 0; i < pElements.length; i++) {
|
||||
if (pElements[i].innerText != ''){
|
||||
if (i < pElements.length){
|
||||
pElements[i].innerText = zhtranalate[i];
|
||||
}
|
||||
}
|
||||
}
|
||||
}
|
||||
if (hElements[0].innerText == hzh[0]){
|
||||
for (var i = 0; i < hElements.length; i++) {
|
||||
if (hElements[i].innerText != ''){
|
||||
if (i < hElements.length){
|
||||
hElements[i].innerText = hen[i];
|
||||
}
|
||||
}
|
||||
}
|
||||
}
|
||||
else{
|
||||
for (var i = 0; i < hElements.length; i++) {
|
||||
if (hElements[i].innerText != ''){
|
||||
if (i < hElements.length){
|
||||
hElements[i].innerText = hzh[i];
|
||||
}
|
||||
}
|
||||
}
|
||||
}
|
||||
if (aElements[0].innerText == azh[0]){
|
||||
for (var i = 0; i < aElements.length; i++) {
|
||||
if (aElements[i].innerText != ''){
|
||||
if (i < aElements.length){
|
||||
aElements[i].innerText = aen[i];
|
||||
}
|
||||
}
|
||||
}
|
||||
}
|
||||
else{
|
||||
for (var i = 0; i < aElements.length; i++) {
|
||||
if (aElements[i].innerText != ''){
|
||||
if (i < aElements.length){
|
||||
aElements[i].innerText = azh[i];
|
||||
}
|
||||
}
|
||||
}
|
||||
}
|
||||
}}>中/英</MyButton>
|
||||
|
||||
|
||||
# bot安装
|
||||
|
||||
|
|
|
|||
|
|
@ -2,6 +2,52 @@
|
|||
sidebar_label: 'bot市场'
|
||||
sidebar_position: 4
|
||||
---
|
||||
import MyButton from './mybutton';
|
||||
|
||||
<MyButton onClick={() => {
|
||||
var pElements = document.getElementsByTagName('p');
|
||||
var hElements = document.getElementsByTagName('h1');
|
||||
var hzh = ['bot市场','bot市场'];
|
||||
var hen = ['Bot Market','Bot Market'];
|
||||
var zhtranalate = ['Bot市场是进行Bot分享与复用的重要模块,主要包括bot的搜索发现,详情查看等功能。','Bot市场主页中展示了目前所有已经上架市场的bot简要信息,包括bot的头像,名称,开发者,简介和安装次数等信息,用户可根据这些基本信息初步判断该bot是否符合自己的项目需求。','在bot市场主页中,用户可以选择指定的bot种类,筛选出特定分类的bot,在这个种类范围内进行搜索与选择。','此外,用户通过在搜索栏中输入关键字进行搜索,可检索出内容包含指定关键字的相关bot。','用户可结合种类筛选和关键字搜索缩小范围,在市场中快速找到符合项目相关需求的bot。','','在bot市场页中,用户点击指定的bot卡片即可进入该bot的详情页。Bot的详情页包含bot的头像,名称,开发者,种类和详细介绍等信息,用户可在此掌握该bot的各项介绍,进一步判断是否将其安装到指定仓库中。','','在bot详情页中,若用户认为该bot满足自己的项目需求,可点击“安装此Bot”按钮,了解该bot的权限信息,将其安装到指定的仓库中,关于安装的更多介绍可见“Bot安装”部分。','去市场看看吧!','©Copyright 2024 CCF 开源发展委员会','Powered by Trustie& IntelliDE 京ICP备13000930号'];
|
||||
var entranslate = ['The bot market is an important module for sharing and reusing bots, mainly including functions such as searching, discovering, and viewing details of bots.' , 'The Bot Market homepage displays brief information about all bots that have been put on the market, including their avatars, names, developers, introductions, and installation times. Users can use this basic information to preliminarily determine whether the bot meets their project requirements.' , 'On the bot market homepage, users can select a specific type of bot, filter out specific categories of bots, and search and select within this category range.' , 'In addition, users can search for relevant bots containing specified keywords by entering keywords in the search bar.' , 'Users can combine category filtering and keyword search to narrow down the scope and quickly find bots that meet project related needs in the market.' , '' , 'In the bot market page, users can click on the specified bot card to enter the details page of the bot. The details page of the bot includes information such as the bot avatar, name, developer, type, and detailed introduction. Users can grasp the various introductions of the bot here and further determine whether to install it in the designated warehouse.' , '' , 'In the bot details page, if users believe that the bot meets their project requirements, they can click the "Install this bot" button to learn about the bots permission information and install it in the designated warehouse. For more information on installation, please refer to the "Bot Installation" section' , 'Go take a look at the market!' , '©Copyright 2024 CCF Open Source Development Committee' , 'Powered by Trustie& IntelliDE 京ICP备13000930号'];
|
||||
if (pElements[0].innerText == zhtranalate[0]){
|
||||
for (var i = 0; i < pElements.length; i++) {
|
||||
if (pElements[i].innerText != ''){
|
||||
if (i < pElements.length){
|
||||
pElements[i].innerText = entranslate[i];
|
||||
}
|
||||
}
|
||||
}
|
||||
}
|
||||
else{
|
||||
for (var i = 0; i < pElements.length; i++) {
|
||||
if (pElements[i].innerText != ''){
|
||||
if (i < pElements.length){
|
||||
pElements[i].innerText = zhtranalate[i];
|
||||
}
|
||||
}
|
||||
}
|
||||
}
|
||||
if (hElements[0].innerText == hzh[0]){
|
||||
for (var i = 0; i < hElements.length; i++) {
|
||||
if (hElements[i].innerText != ''){
|
||||
if (i < hElements.length){
|
||||
hElements[i].innerText = hen[i];
|
||||
}
|
||||
}
|
||||
}
|
||||
}
|
||||
else{
|
||||
for (var i = 0; i < hElements.length; i++) {
|
||||
if (hElements[i].innerText != ''){
|
||||
if (i < hElements.length){
|
||||
hElements[i].innerText = hzh[i];
|
||||
}
|
||||
}
|
||||
}
|
||||
}
|
||||
}}>中/英</MyButton>
|
||||
|
||||
# Bot市场
|
||||
|
||||
|
|
@ -21,4 +67,16 @@ Bot市场主页中展示了目前所有已经上架市场的bot简要信息,
|
|||
|
||||

|
||||
|
||||
在bot详情页中,若用户认为该bot满足自己的项目需求,可点击“安装此Bot”按钮,了解该bot的权限信息,将其安装到指定的仓库中,关于安装的更多介绍可见“Bot安装”部分。
|
||||
在bot详情页中,若用户认为该bot满足自己的项目需求,可点击“安装此Bot”按钮,了解该bot的权限信息,将其安装到指定的仓库中,关于安装的更多介绍可见“Bot安装”部分。
|
||||
|
||||
|
||||
|
||||
|
||||
|
||||
去市场看看吧!
|
||||
|
||||
<MyButton onClick={() => {
|
||||
location.href = "https://www.gitlink.org.cn/softbot";
|
||||
}}>Bot市场</MyButton>
|
||||
|
||||
|
||||
|
|
|
|||
|
|
@ -2,6 +2,52 @@
|
|||
sidebar_label: 'bot开发'
|
||||
sidebar_position: 3
|
||||
---
|
||||
import MyButton from './mybutton';
|
||||
|
||||
<MyButton onClick={() => {
|
||||
var pElements = document.getElementsByTagName('p');
|
||||
var hElements = document.getElementsByTagName('h1');
|
||||
var hzh = ['bot开发','bot开发'];
|
||||
var hen = ['Bot Development','Bot Development'];
|
||||
var zhtranalate = ['Bot开发是开发者进行bot注册的重要模块。' , '在个人“设置”中,用户可以看到目前已经注册的bot列表,点击对应bot的“编辑”按钮可以对已注册的bot进行配置;点击“Bot注册”按钮开始注册新的bot。' , '' , '在注册页中,开发者需要填写bot注册的相关信息,包括bot的名称、Webhook 地址,详细介绍等,系统将对开发者输入的信息进行合法性校验,确保bot各项信息的完整性和有效性。此外,系统将自动生成bot的唯一标识,同时调用 GitLink 平台的相关接口生成bot的身份凭证信息,包括客户端密钥和私钥等。' , '开发者需通过这些身份信息结合平台接口进行bot身份认证后,调用相关接口完成bot的相关功能。' , '平台开发API链接(待完善):https://www.gitlink.org.cn/docs/api#introduction' , '' , '' , '©Copyright 2024 CCF 开源发展委员会' , 'Powered by Trustie& IntelliDE 京ICP备13000930号'];
|
||||
var entranslate = ['Bot development is an important module for developers to register their bots.' , 'In personal settings, users can see a list of registered bots and click the "Edit" button on the corresponding bot to configure the registered bots; Click the "Bot Registration" button to start registering a new bot.' , '' , 'In the registration page, developers need to fill in the relevant information for bot registration, including the name of the bot, Webhook address, detailed introduction, etc. The system will verify the legality of the information entered by the developer to ensure the completeness and validity of all bot information. In addition, the system will automatically generate a unique identifier for the bot, and call the relevant interfaces of the GitLink platform to generate the identity credential information of the bot, including the client key and private key.' , 'Developers need to use these identity information in combination with the platform interface for bot identity authentication, and then call the relevant interface to complete the relevant functions of the bot.' , 'Platform development API link (to be improved): https://www.gitlink.org.cn/docs/api#introduction' , '' , '' , '© Copyright 2024 CCF Open Source Development Committee' , 'Powered by Trust&IntelliDE Beijing ICP Preparation No. 13000930'];
|
||||
if (pElements[0].innerText == zhtranalate[0]){
|
||||
for (var i = 0; i < pElements.length; i++) {
|
||||
if (pElements[i].innerText != ''){
|
||||
if (i < pElements.length){
|
||||
pElements[i].innerText = entranslate[i];
|
||||
}
|
||||
}
|
||||
}
|
||||
}
|
||||
else{
|
||||
for (var i = 0; i < pElements.length; i++) {
|
||||
if (pElements[i].innerText != ''){
|
||||
if (i < pElements.length){
|
||||
pElements[i].innerText = zhtranalate[i];
|
||||
}
|
||||
}
|
||||
}
|
||||
}
|
||||
if (hElements[0].innerText == hzh[0]){
|
||||
for (var i = 0; i < hElements.length; i++) {
|
||||
if (hElements[i].innerText != ''){
|
||||
if (i < hElements.length){
|
||||
hElements[i].innerText = hen[i];
|
||||
}
|
||||
}
|
||||
}
|
||||
}
|
||||
else{
|
||||
for (var i = 0; i < hElements.length; i++) {
|
||||
if (hElements[i].innerText != ''){
|
||||
if (i < hElements.length){
|
||||
hElements[i].innerText = hzh[i];
|
||||
}
|
||||
}
|
||||
}
|
||||
}
|
||||
}}>中/英</MyButton>
|
||||
|
||||
# Bot开发
|
||||
|
||||
|
|
|
|||
|
|
@ -2,6 +2,52 @@
|
|||
sidebar_label: 'bot配置'
|
||||
sidebar_position: 2
|
||||
---
|
||||
import MyButton from './mybutton';
|
||||
|
||||
<MyButton onClick={() => {
|
||||
var pElements = document.getElementsByTagName('p');
|
||||
var hElements = document.getElementsByTagName('h1');
|
||||
var hzh = ['bot配置','bot配置'];
|
||||
var hen = ['Bot Configure','Bot Configure'];
|
||||
var zhtranalate = ['Bot配置是开发者进行bot维护和配置的重要模块,主要包括bot基本信息维护、权限&订阅事件管理、高级选项配置等功能。','Bot的基本信息维护中,开发者可以看到bot的各项基本信息,并可以根据需要对bot的头像,名称,Webhook地址等进行修改。','','Bot的权限&订阅事件管理中,开发者可根据对仓库资源的访问需要为bot分配不同的权限和等级,比如增加代码库权限,将拉取请求的写权限变为读权限等。开发者还能更改当前bot订阅的事件列表,比如订阅代码库推送,取消拉取请求分配订阅等,以实现bot功能的更新与升级。','','Bot高级选项配置中,开发者可以改变bot的公私有状态,从而影响到bot的使用范围。需要注意的是,公开状态下的bot在已有其他仓库安装的情况下不能变成私有。开发者可选择将bot上架到市场,需要填写上架信息,包括市场简介,主要功能,次要功能等各项信息。','开发者还能进行bot的删除和转让操作,发起转让意味着更改bot的所有权,需要输入接受者的用户名。在接受者确定接受后,即可完成bot的所有权变更,拒绝则会取消本次的转让操作。','','©Copyright 2024 CCF 开源发展委员会','Powered by Trustie& IntelliDE 京ICP备13000930号'];
|
||||
var entranslate = ['Bot configuration is an important module for developers to maintain and configure bots, mainly including basic bot information maintenance, permission&subscription event management, advanced option configuration, and other functions.' , 'In the basic information maintenance of bots, developers can see various basic information of bots and modify their avatars, names, Webhook addresses, etc. as needed.' , '' , 'In the permission and subscription event management of bots, developers can assign different permissions and levels to bots based on their access needs to warehouse resources, such as adding code library permissions, changing write permissions for pull requests to read permissions, etc. Developers can also modify the event list of the current bot subscription, such as subscribing to code library push notifications, canceling pull request allocation subscriptions, etc., to achieve updates and upgrades of bot functionality.' , '' , 'In the advanced options configuration of bots, developers can change the public and private status of bots, thereby affecting their usage scope. It should be noted that bots in public status cannot become private when installed in other warehouses. Developers can choose to put their bots on the market and need to fill in the listing information, including market introduction, main functions, secondary functions, and other related information.' , 'Developers can also perform bot deletion and transfer operations, initiating transfer means changing the ownership of the bot, and the recipients username needs to be entered. After the recipient confirms acceptance, the ownership change of the bot can be completed. Refusal will cancel the transfer operation.' , '' , '© Copyright 2024 CCF Open Source Development Committee' , 'Powered by Trust&IntelliDE Beijing ICP Preparation No. 13000930'];
|
||||
if (pElements[0].innerText == zhtranalate[0]){
|
||||
for (var i = 0; i < pElements.length; i++) {
|
||||
if (pElements[i].innerText != ''){
|
||||
if (i < pElements.length){
|
||||
pElements[i].innerText = entranslate[i];
|
||||
}
|
||||
}
|
||||
}
|
||||
}
|
||||
else{
|
||||
for (var i = 0; i < pElements.length; i++) {
|
||||
if (pElements[i].innerText != ''){
|
||||
if (i < pElements.length){
|
||||
pElements[i].innerText = zhtranalate[i];
|
||||
}
|
||||
}
|
||||
}
|
||||
}
|
||||
if (hElements[0].innerText == hzh[0]){
|
||||
for (var i = 0; i < hElements.length; i++) {
|
||||
if (hElements[i].innerText != ''){
|
||||
if (i < hElements.length){
|
||||
hElements[i].innerText = hen[i];
|
||||
}
|
||||
}
|
||||
}
|
||||
}
|
||||
else{
|
||||
for (var i = 0; i < hElements.length; i++) {
|
||||
if (hElements[i].innerText != ''){
|
||||
if (i < hElements.length){
|
||||
hElements[i].innerText = hzh[i];
|
||||
}
|
||||
}
|
||||
}
|
||||
}
|
||||
}}>中/英</MyButton>
|
||||
|
||||
# Bot配置
|
||||
|
||||
|
|
|
|||
|
|
@ -3,10 +3,11 @@ sidebar_label: '图形流水线'
|
|||
sidebar_position: 4
|
||||
---
|
||||
|
||||
# 图形流水线
|
||||
# 图形流水线
|
||||
## 基本信息
|
||||
可以编辑流水线的名称、描述
|
||||
|
||||
## 基本信息
|
||||
可以编辑流水线的名称、描述。同一仓库下的流水线名称不能重复。
|
||||
同一仓库下的流水线名称不能重复
|
||||
|
||||

|
||||
|
||||
|
|
@ -19,24 +20,13 @@ sidebar_position: 4
|
|||
* 事件触发器GitLink_Webhook:给出了常见的代码变更事件触发,包括推送代码、合并请求、创建标签
|
||||

|
||||
|
||||
### Cron表达式示例
|
||||
- 每天凌晨2点:`0 0 2 * * ?`
|
||||
- 每周一至周五的上午10点:`0 0 10 ? * MON-FRI`
|
||||
- 每月1号和15号的中午12点:`0 0 12 1,15 * ?`
|
||||
|
||||
## 全局参数
|
||||
|
||||
全局参数可在整个流水线中使用,支持以下类型:
|
||||
- 字符串
|
||||
- 数字
|
||||
- 布尔值
|
||||
- 密钥引用
|
||||
|
||||
添加后可在当前流水线中使用:
|
||||
添加后可在当前流水线中使用
|
||||
|
||||

|
||||
|
||||
使用实例:
|
||||
使用实例
|
||||
|
||||

|
||||
|
||||
|
|
@ -44,7 +34,7 @@ sidebar_position: 4
|
|||
|
||||

|
||||
|
||||
开启后,同一流水线可同时并发执行n个流水线实例(每触发一次我们得到一个流水线实例)。
|
||||
开启后,同一流水线可同时并发执行n个流水线实例(每触发一次我们得到一个流水线实例);
|
||||
|
||||

|
||||
|
||||
|
|
@ -52,50 +42,9 @@ sidebar_position: 4
|
|||
|
||||

|
||||
|
||||
|
||||
## 流水线编排
|
||||
|
||||
每条流水线必须要有一个开始节点、结束节点,至少一个任务节点。支持串行编排和并行编排。
|
||||
|
||||
### 节点类型
|
||||
1. **基础节点**
|
||||
- 开始节点:流水线的起点
|
||||
- 结束节点:流水线的终点
|
||||
- 条件节点:根据条件判断执行路径
|
||||
|
||||
2. **任务节点**
|
||||
- 代码检出:从代码仓库拉取代码
|
||||
- 构建节点:编译构建代码
|
||||
- 测试节点:执行单元测试、集成测试
|
||||
- 部署节点:部署应用到目标环境
|
||||
- Shell命令:执行自定义Shell脚本
|
||||
- Docker操作:构建或推送Docker镜像
|
||||
|
||||
### 编排最佳实践
|
||||
1. **合理使用并行**
|
||||
- 互不依赖的任务可以并行执行
|
||||
- 注意控制并行数量,避免资源竞争
|
||||
|
||||
2. **条件分支处理**
|
||||
- 使用条件节点处理不同场景
|
||||
- 设置合适的超时和重试机制
|
||||
|
||||
3. **参数传递**
|
||||
- 合理使用全局参数和节点输出
|
||||
- 注意参数的作用域和生命周期
|
||||
|
||||
4. **日志管理**
|
||||
- 添加必要的日志输出
|
||||
- 设置合适的日志级别
|
||||
|
||||
### 常见问题处理
|
||||
1. **执行失败**
|
||||
- 检查节点配置是否正确
|
||||
- 查看详细日志定位问题
|
||||
- 确认依赖服务是否正常
|
||||
|
||||
2. **性能优化**
|
||||
- 优化并行执行策略
|
||||
- 合理设置缓存
|
||||
- 控制构建产物大小
|
||||
|
||||
|
||||
|
|
|
|||
|
|
@ -3,74 +3,14 @@ sidebar_label: '密钥设置'
|
|||
sidebar_position: 3
|
||||
---
|
||||
|
||||
# 密钥设置
|
||||
# 密钥设置
|
||||
|
||||
将账号密码、密钥、证书等存放到密钥管理里,配置后可直接在流水线中使用,避免因直接填写引起的泄露风险。
|
||||
|
||||
## 支持的密钥类型
|
||||
|
||||
1. **用户名密码**
|
||||
- 用于需要身份认证的服务
|
||||
- 例如:私有镜像仓库登录、数据库访问
|
||||
|
||||
2. **SSH密钥**
|
||||
- 用于SSH协议的远程连接和认证
|
||||
- 支持RSA、ED25519等密钥类型
|
||||
- 常用于代码仓库访问、服务器登录
|
||||
|
||||
3. **访问令牌**
|
||||
- 各类API访问令牌
|
||||
- 例如:GitHub Token、Docker Registry Token
|
||||
|
||||
4. **证书文件**
|
||||
- SSL/TLS证书
|
||||
- 客户端认证证书
|
||||
- 代码签名证书
|
||||
|
||||

|
||||
|
||||
## 使用方法
|
||||
|
||||
1. **创建密钥**
|
||||
- 选择适当的密钥类型
|
||||
- 填写密钥名称(用于在流水线中引用)
|
||||
- 输入密钥内容
|
||||
- 添加描述信息(建议详细说明用途)
|
||||
|
||||
2. **在流水线中使用**
|
||||
- 在节点配置中选择密钥类型
|
||||
- 从下拉列表中选择预先配置的密钥
|
||||
- 系统会在运行时自动注入密钥值
|
||||
使用示例
|
||||
|
||||
注:节点输入参数中,下拉选项为密钥类型,需要提前配置好密钥在流水线中选择使用
|
||||
|
||||

|
||||
|
||||
## 安全建议
|
||||
|
||||
1. **密钥管理**
|
||||
- 定期轮换密钥
|
||||
- 及时删除不再使用的密钥
|
||||
- 避免密钥共享使用
|
||||
|
||||
2. **访问控制**
|
||||
- 严格控制密钥的访问权限
|
||||
- 遵循最小权限原则
|
||||
- 记录密钥的使用日志
|
||||
|
||||
3. **最佳实践**
|
||||
- 为不同环境使用不同的密钥
|
||||
- 避免在日志中打印密钥信息
|
||||
- 使用环境变量传递密钥
|
||||
|
||||
## 常见问题
|
||||
|
||||
1. **密钥验证失败**
|
||||
- 检查密钥内容是否正确
|
||||
- 确认密钥格式是否匹配
|
||||
- 验证密钥是否过期
|
||||
|
||||
2. **权限问题**
|
||||
- 确认是否有使用密钥的权限
|
||||
- 检查密钥的作用域设置
|
||||
- 验证目标服务的访问控制
|
||||

|
||||
|
|
@ -3,37 +3,11 @@ sidebar_label: '引擎简介'
|
|||
sidebar_position: 1
|
||||
---
|
||||
|
||||
# 引擎
|
||||
# 引擎
|
||||
|
||||
引擎(Engine)是GitLink提供的一款DevOps工具,通过简单的节点编排来构建开发、测试、部署流水线,从而创建自动化的软件交付流程。
|
||||
它可以实现持续的代码集成,让开发者能尽早发现质量问题,快速定位修复,提升软件开发效率和质量;自动化的代码扫描、编译打包、单元测试,把研发团队从重复的工作中解放出来,聚焦到更有价值的事情上。
|
||||
|
||||

|
||||
|
||||
## 主要功能
|
||||
|
||||
- **图形化流水线**:通过直观的图形界面拖拽编排节点,无需编写复杂的配置文件
|
||||
- **代码流水线**:支持通过YAML文件定义流水线,方便版本控制和复用
|
||||
- **丰富的节点类型**:提供代码检出、构建、测试、部署等多种预置节点
|
||||
- **灵活的触发方式**:支持代码提交、合并请求、定时任务等多种触发方式
|
||||
- **参数配置**:支持环境变量、密钥等参数的统一管理
|
||||
- **执行记录**:详细记录每次流水线的执行过程和结果
|
||||
|
||||
## 使用场景
|
||||
|
||||
1. **持续集成(CI)**
|
||||
- 自动化代码检查
|
||||
- 自动化单元测试
|
||||
- 自动化构建打包
|
||||
|
||||
2. **持续部署(CD)**
|
||||
- 自动化部署测试环境
|
||||
- 自动化部署生产环境
|
||||
- 自动化回滚
|
||||
|
||||
3. **质量保证**
|
||||
- 代码质量扫描
|
||||
- 安全漏洞检测
|
||||
- 性能测试
|
||||
|
||||
在引擎页面中,用户可以创建和编辑图形流水线或代码流水线、设置外部参数、管理密钥等操作。通过合理配置和使用引擎,可以显著提升团队的开发效率和代码质量。
|
||||
在引擎页面中,用户可以创建和编辑图形流水线或代码流水线、设置外部参数、管理密钥等操作。
|
||||
|
|
@ -62,40 +62,32 @@ GitLink(确实开源)是CCF官方指定的开源创新服务平台,旨在
|
|||
<article class="col col--6 margin-bottom--lg">
|
||||
<a class="card padding--lg cardContainer" href="/Bot市场/bot安装">
|
||||
<h2 class="text--truncate cardTitle" title="Bot市场">Bot市场</h2>
|
||||
<p>Bot市场使用及设置[3个文档]</p>
|
||||
<p>Bot市场使用及设置[4个文档]</p>
|
||||
</a></article>
|
||||
<article class="col col--6 margin-bottom--lg">
|
||||
<a class="card padding--lg cardContainer" href="/第三方服务/跨平台代码同步">
|
||||
<h2 class="text--truncate cardTitle" title="第三方服务">第三方服务</h2>
|
||||
<p>第三方服务使用及设置[3个文档]</p>
|
||||
</a></article>
|
||||
<article class="col col--6 margin-bottom--lg">
|
||||
<article class="col col--6 margin-bottom--lg">
|
||||
<a class="card padding--lg cardContainer" href="/通知/通知简介">
|
||||
<h2 class="text--truncate cardTitle" title="通知">通知</h2>
|
||||
<p>查看GitLink通知信息[2个文档]</p>
|
||||
</a>
|
||||
</article>
|
||||
|
||||
<article class="col col--6 margin-bottom--lg">
|
||||
<a class="card padding--lg cardContainer" href="/个人主页建站/站点创建流程">
|
||||
<h2 class="text--truncate cardTitle" title="个人主页建站">个人主页建站</h2>
|
||||
<p>轻松创建属于您的站点[2个文档]</p>
|
||||
</a>
|
||||
</article>
|
||||
|
||||
<article class="col col--6 margin-bottom--lg">
|
||||
<h2 class="text--truncate cardTitle" title="通知">通知</h2>
|
||||
<p>通知简介及设置[2个文档]</p>
|
||||
</a></article>
|
||||
<article class="col col--6 margin-bottom--lg">
|
||||
<a class="card padding--lg cardContainer" href="/个人主页建站/建站流程">
|
||||
<h2 class="text--truncate cardTitle" title="个人主页建站">个人主页建站</h2>
|
||||
<p>个人主页建站使用及设置[2个文档]</p>
|
||||
</a></article>
|
||||
<article class="col col--6 margin-bottom--lg">
|
||||
<a class="card padding--lg cardContainer" href="/平台公告">
|
||||
<h2 class="text--truncate cardTitle" title="平台公告">平台公告</h2>
|
||||
<p>获取最新的平台公告[1个文档]</p>
|
||||
</a>
|
||||
</article>
|
||||
|
||||
<article class="col col--6 margin-bottom--lg">
|
||||
<h2 class="text--truncate cardTitle" title="平台公告">平台公告</h2>
|
||||
</a></article>
|
||||
<article class="col col--6 margin-bottom--lg">
|
||||
<a class="card padding--lg cardContainer" href="/服务协议/GitLink服务协议">
|
||||
<h2 class="text--truncate cardTitle" title="服务协议">服务协议</h2>
|
||||
<p>了解并遵守GitLink的服务条款[1个文档]</p>
|
||||
</a>
|
||||
</article>
|
||||
<h2 class="text--truncate cardTitle" title="服务协议">服务协议</h2>
|
||||
<p>GitLink服务协议[1个文档]</p>
|
||||
</a></article>
|
||||
</section>
|
||||
</div>
|
||||
</div>
|
||||
|
|
@ -10,27 +10,27 @@ sidebar_position: 9
|
|||
|
||||
### **2. WebIDE 入口**
|
||||
从 Gitlink 仓库首页 ,点击Web IDE 按键即可进入
|
||||
<br/>
|
||||
<br/>
|
||||
|
||||
### **3. 分支**
|
||||
支持分支切换:点击左下角分支名即可切换分支。
|
||||
<br/>
|
||||
<br/>
|
||||
|
||||
### **4. 搜索**
|
||||
当前支持 Gitlink 仓库内代码搜索(支持单词匹配和文件过滤)和文件搜索。
|
||||
<br/>
|
||||
<br/>
|
||||
|
||||
### **5. 行高亮**
|
||||
支持单行或多行高亮,点击行号即可高亮行,按住 Shift 可选中连续多行。
|
||||
<br/>
|
||||
<br/>
|
||||
|
||||
### **6. Blame**
|
||||
支持查看单行 blame 信息,hover 后可展示详细信息。
|
||||
<br/>
|
||||
<br/>
|
||||
|
||||
### **7. Graph**
|
||||
支持 graph 视图,可查看分支 commits 历史以及每个 commit 详细文件变更,并支持文件 diff 查看。底部状态栏左下角点击 Git Graph 或在命令面板输入 View Git Graph,即可打开 Git Graph 视图。
|
||||
<br/>
|
||||
<br/>
|
||||
|
||||
### **8. WebSCM**
|
||||
可以在极速版新建分支,修改代码后在 SCM 面板看到变更文件列表,写完 commit message 后提交到 Gitlink 上。如果想快速修改一些文件可以不用在本地修改,直接通过极速版修改代码一次性提交。
|
||||
|
|
@ -38,4 +38,4 @@ sidebar_position: 9
|
|||
### **9. 代码在线运行**
|
||||
● 集成了基于 skypack 的更加轻量的 CodeSwing 插件,可以在极速版去运行前端代码。
|
||||
● 集成了基于 Pyodide 的 Code-Runner-For-Web 插件,可以将 Python 的运行搬到浏览器上。
|
||||
<br/>
|
||||
<br/>
|
||||
|
|
@ -4,8 +4,8 @@ sidebar_position: 1
|
|||
---
|
||||
### **1. 仓库创建入口**
|
||||
用户可以通过平台主页右上角的按键以及个人主页参与项目模块的“新建”按键来创建仓库。
|
||||
<br/>
|
||||
<br/>
|
||||
|
||||
### **2. 填写项目基本信息**
|
||||
进入新建项目页面后,如下图所示,填写拥有者、项目名称、项目标识等信息,单击”创建项目“按键即可完成创建。
|
||||
<br/>
|
||||
<br/>
|
||||
|
|
@ -4,8 +4,8 @@ sidebar_position: 2
|
|||
---
|
||||
### **1. 仓库设置入口**
|
||||
在仓库主页,点击“仓库设置”按键即可进入仓库设置模块。仓库设置中可以修改项目的基本信息、进行成员管理、配置webhook、设置分支以及安装bot。
|
||||
<br/>
|
||||
<br/>
|
||||
|
||||
### **2. 基本设置**
|
||||
进入仓库设置模块后,单击”基本设置“按键,进入基本设置模块,如下图所示,可以对项目的项目名称、项目标识、项目简介、项目类别、项目语言等基本信息进行修改。单击“转移”按键可以将仓库转移给其他用户和组织,单击“删除本仓库“按键可以删除本仓库。
|
||||
<br/>
|
||||
<br/>
|
||||
|
|
@ -3,9 +3,9 @@ sidebar_label: '代码提交'
|
|||
sidebar_position: 3
|
||||
---
|
||||
### **1. 代码提交入口**
|
||||
用户可以通过项目代码库中间的文件下的"上传文件"按键来上传文件。
|
||||
<br/>
|
||||
用户可以通过项目代码库中间的文件下的“上传文件”按键来上传文件。
|
||||
<br/>
|
||||
|
||||
### **2. 上传文件**
|
||||
进入上传文件页面后,如下图所示,拖动文件,选择提交变更的分支的单击"创建项目"按键即可完成创建。
|
||||
<br/>
|
||||
进入上传文件页面后,如下图所示,拖动文件,选择提交变更的分支的单击”创建项目“按键即可完成创建。
|
||||
<br/>
|
||||
|
|
@ -4,10 +4,10 @@ sidebar_position: 5
|
|||
---
|
||||
### **1. 查看分支**
|
||||
在代码库栏下,如下图所示,用户可以点击代码库分支从而查看当前项目的所有分支,并且选择对其进行操作。
|
||||
<br/>
|
||||
<br/>
|
||||
|
||||
### **2. 合并分支**
|
||||
在“和并请求(PR)”下点击“新建合并请求”后,
|
||||
<br/>
|
||||
<br/>
|
||||
如下图所示,用户可以选择源分支与目标分支以及填写分支信息后提交分支合并请求。
|
||||
<br/>
|
||||
<br/>
|
||||
|
|
@ -4,20 +4,20 @@ sidebar_position: 7
|
|||
---
|
||||
### **1. 成员管理入口**
|
||||
在仓库主页,点击“仓库设置”按键,再点击”成员管理“按键,即可进入成员管理模块,如下图所示。
|
||||
<br/>
|
||||
<br/>
|
||||
|
||||
### **2. 筛选、搜索项目成员**
|
||||
进入成员管理模块后,可以通过”角色筛选“按键来筛选项目成员类型,通过”搜索“按键可以检索具体的项目成员,如下图所示。
|
||||
<br/>
|
||||
<br/>
|
||||
|
||||
### **3. 筛选、搜索项目成员**
|
||||
进入成员管理模块后,可以通过”添加成员“按键来添加项目成员,左侧搜索框检索到具体用户并选中后,单击”添加成员“按键即可成功添加项目成员。
|
||||
<br/>
|
||||
<br/>
|
||||
|
||||
### **4. 项目成员权限管理**
|
||||
进入成员管理模块后,单击项目成员右侧的角色栏,可以选择赋予该名项目成员的权限等级,如下图所示。
|
||||
<br/>
|
||||
<br/>
|
||||
|
||||
### **5. 删除项目成员**
|
||||
进入成员管理模块后,单击项目成员右侧的”删除“按键,可以删除改名项目成员,如下图所示。
|
||||
<br/>
|
||||
<br/>
|
||||
|
|
|
|||
|
|
@ -4,16 +4,16 @@ sidebar_position: 4
|
|||
---
|
||||
### **1. 文件管理位置**
|
||||
在代码库界面,可直接对代码库中该分支下的文件进行操作,如下图所示。
|
||||
<br/>
|
||||
<br/>
|
||||
|
||||
### **2. 进入目录**
|
||||
点击进入相关目录,找到要编辑的文件,如下图所示。
|
||||
<br/>
|
||||
<br/>
|
||||
|
||||
### **3. 进入文件编辑页面**
|
||||
在线编辑文件,单击文件,即可进入编辑文件页面,如下图所示。
|
||||
<br/>
|
||||
<br/>
|
||||
|
||||
### **4. 编辑文件**
|
||||
编辑界面右侧有三个按钮,分别是“下载”、“编辑”和“删除”,点击下载即可将文件下载到本地,编辑则可在线编辑文档,删除则将文件从代码库中删除,按钮位置如下图所示。
|
||||
<br/>
|
||||
<br/>
|
||||
|
|
@ -4,26 +4,26 @@ sidebar_position: 6
|
|||
---
|
||||
### **1. 标签和发行版管理入口**
|
||||
在仓库主页,点击“代码库”按键,再点击”标签“按键,即可进入标签和发行版管理模块,如下图所示。
|
||||
<br/>
|
||||
<br/>
|
||||
|
||||
### **2. 删除标签**
|
||||
进入标签和发行版管理模块后,点击标签右侧“删除”按键,即可实现对标签的删除操作,如下图所示。
|
||||
<br/>
|
||||
<br/>
|
||||
|
||||
### **3. 查看发行版**
|
||||
进入标签和发行版管理模块后,点击”发行版”按键即可查看项目的发行版,如下图所示。
|
||||
<br/>
|
||||
<br/>
|
||||
|
||||
### **4. 创建发行版**
|
||||
进入标签和发行版管理模块后,点击标签右侧”创建发行版”按键,即可快速创建绑定该标签的发行版,如下图所示。
|
||||
<br/>
|
||||
<br/>
|
||||
|
||||
### **5. 修改发行版**
|
||||
进入标签和发行版管理模块后,点击发行版右侧的修改按键,即可进入发行版的修改页面,如下图所示。完成发行版的修改后,单击”保存发行版“按键即可保存修改内容。
|
||||
<br/>
|
||||
<br/>
|
||||
<br/>
|
||||
<br/>
|
||||
|
||||
### **6. 删除发行版**
|
||||
进入标签和发行版管理模块后,点击发行版右侧的删除按键,即可进入发行版的删除页面,如下图所示。
|
||||
<br/>
|
||||
<br/>
|
||||
|
||||
|
|
@ -6,8 +6,8 @@ sidebar_position: 3
|
|||
# 代码评审
|
||||
### **1. 进入代码评审**
|
||||
如下图所示,点击“代码评审”按钮可以进入代码评审
|
||||
<br/>
|
||||
<br/>
|
||||
|
||||
### **2. 代码评审界面**
|
||||
如下图所示,用户可以在该界面下查看该PR操作要合并的新的代码,并对其进行评审。
|
||||
<br/>
|
||||
<br/>
|
||||
|
|
|
|||
|
|
@ -1,92 +1,6 @@
|
|||
---
|
||||
sidebar_label: '合并请求关联疑修'
|
||||
sidebar_position: 4
|
||||
sidebar_label: '合并请求关联疑修'
|
||||
sidebar_position: 5
|
||||
---
|
||||
|
||||
### **1. 疑修关联概述**
|
||||
|
||||
合并请求(Merge Request)可以与疑修(Issue)关联,这有助于:
|
||||
|
||||
- 追踪解决问题的进度
|
||||
- 自动更新疑修状态
|
||||
- 建立代码变更和问题之间的关系
|
||||
- 方便团队协作和代码审查
|
||||
|
||||
### **2. 关联疑修的方法**
|
||||
|
||||
#### 2.1 创建合并请求时关联
|
||||
|
||||
1. 在创建合并请求时,在描述框中使用关键字引用疑修:
|
||||
- 使用 `#` 后跟疑修编号,如 `#123`
|
||||
- 使用关键字:`fixes`、`closes`、`resolves` 等
|
||||
|
||||
#### 2.2 在已有合并请求中关联
|
||||
|
||||
1. 打开合并请求详情页
|
||||
2. 在评论框中引用疑修编号
|
||||
3. 或使用右侧面板的"关联疑修"功能
|
||||
|
||||
### **3. 关联关键字**
|
||||
|
||||
支持以下关键字自动关联疑修:
|
||||
|
||||
- `fixes #ID` 或 `fixed #ID`
|
||||
- `closes #ID` 或 `closed #ID`
|
||||
- `resolves #ID` 或 `resolved #ID`
|
||||
- `implements #ID` 或 `implemented #ID`
|
||||
|
||||
注:合并请求被合并后,使用这些关键字关联的疑修会自动关闭。
|
||||
|
||||
### **4. 查看关联状态**
|
||||
|
||||
在合并请求页面可以:
|
||||
|
||||
1. 查看已关联的疑修列表
|
||||
2. 查看疑修的当前状态
|
||||
3. 快速跳转到相关疑修
|
||||
4. 查看关联历史记录
|
||||
|
||||
### **5. 取消关联**
|
||||
|
||||
如需取消关联,可以:
|
||||
|
||||
1. 删除描述中的关联引用
|
||||
2. 使用右侧面板的取消关联功能
|
||||
3. 在评论中说明取消关联的原因
|
||||
|
||||
### **6. 批量关联**
|
||||
|
||||
对于需要批量关联的情况:
|
||||
|
||||
1. 在描述中列出多个疑修编号
|
||||
2. 使用逗号分隔多个编号
|
||||
3. 可以使用范围表示法,如 `#123-#128`
|
||||
|
||||
### **7. 跨项目关联**
|
||||
|
||||
支持关联不同项目的疑修:
|
||||
|
||||
1. 使用完整引用格式:`组织/项目#ID`
|
||||
2. 例如:`gitlink/main#123`
|
||||
|
||||
### **8. 最佳实践**
|
||||
|
||||
1. 及时关联相关疑修
|
||||
2. 在描述中清晰说明解决方案
|
||||
3. 使用适当的关键字
|
||||
4. 保持关联关系的准确性
|
||||
5. 定期检查关联状态
|
||||
|
||||
### **9. 注意事项**
|
||||
|
||||
- 关联后的自动化操作不可撤销
|
||||
- 确保有权限访问被关联的疑修
|
||||
- 关联前检查疑修状态
|
||||
- 避免重复关联
|
||||
- 保持疑修描述的更新
|
||||
|
||||
### **10. 权限要求**
|
||||
|
||||
- 需要有合并请求的写入权限
|
||||
- 需要有被关联疑修的读取权限
|
||||
- 管理员可以管理所有关联关系
|
||||
# 合并请求关联疑修
|
||||
|
|
@ -7,96 +7,12 @@ sidebar_position: 1
|
|||
|
||||
**Pull Request**,即**合并请求**,是现代分布式软件开发中两个软件仓库间合并代码变更的一种方式,通常用于 fork 仓库向被 fork 仓库(源仓库)提交代码变更,同时也是为团队项目或开源项目做贡献的一种非常好的团队协作方式。当你拉取并修改了他人的仓库代码后,将你的修改告知给原仓库的管理者,请求其合并你的修改,这个过程就被称为 **合并请求**。
|
||||
|
||||
## 合并请求的作用
|
||||
|
||||
1. **代码协作**
|
||||
- 便于团队成员之间共享代码变更
|
||||
- 支持跨仓库的代码贡献
|
||||
- 促进团队协作和知识共享
|
||||
|
||||
2. **代码审查**
|
||||
- 提供代码审查的平台
|
||||
- 支持行内评论和讨论
|
||||
- 确保代码质量和一致性
|
||||
|
||||
3. **质量控制**
|
||||
- 集成自动化测试结果
|
||||
- 支持 CI/CD 流程
|
||||
- 确保代码符合项目标准
|
||||
|
||||
## GitLink 中的合并请求功能
|
||||
|
||||
GitLink中的 **合并请求(PR)** 模块提供合并请求创建和管理两方面的功能:
|
||||
|
||||
- 一方面支持向源仓库或者同一个仓库其他分支创建(发起)代码合并请求;
|
||||
|
||||
- 另一方面也为仓库管理者对他人发送到本仓库的合并请求进行管理、审阅并最终确定是否纳入仓库。
|
||||
|
||||
如下图所示为合并请求(PR)管理模块:
|
||||
|
||||

|
||||
|
||||
## 合并请求工作流程
|
||||
|
||||
1. **准备工作**
|
||||
- 创建功能分支
|
||||
- 进行代码修改
|
||||
- 提交本地变更
|
||||
|
||||
2. **创建合并请求**
|
||||
- 选择源分支和目标分支
|
||||
- 填写标题和描述
|
||||
- 添加审查者和标签
|
||||
|
||||
3. **代码审查**
|
||||
- 审查者审查代码
|
||||
- 提供反馈和建议
|
||||
- 讨论和解决问题
|
||||
|
||||
4. **修改和更新**
|
||||
- 根据反馈修改代码
|
||||
- 更新合并请求
|
||||
- 重新请求审查
|
||||
|
||||
5. **合并代码**
|
||||
- 通过代码审查
|
||||
- 通过自动化测试
|
||||
- 执行代码合并
|
||||
|
||||
## 最佳实践
|
||||
|
||||
1. **创建合并请求前**
|
||||
- 确保代码符合项目规范
|
||||
- 进行充分的本地测试
|
||||
- 编写清晰的提交信息
|
||||
|
||||
2. **合并请求描述**
|
||||
- 清晰描述变更内容
|
||||
- 说明解决的问题
|
||||
- 列出相关的疑修(Issue)
|
||||
|
||||
3. **代码审查**
|
||||
- 及时响应反馈
|
||||
- 保持专业和友好
|
||||
- 关注代码质量和安全
|
||||
|
||||
4. **合并策略**
|
||||
- 选择合适的合并模式
|
||||
- 处理冲突
|
||||
- 保持提交历史整洁
|
||||
|
||||
## 注意事项
|
||||
|
||||
1. **分支管理**
|
||||
- 使用有意义的分支名称
|
||||
- 及时删除已合并的分支
|
||||
- 避免长期分支
|
||||
|
||||
2. **冲突处理**
|
||||
- 及时解决冲突
|
||||
- 与团队成员沟通
|
||||
- 保持代码一致性
|
||||
|
||||
3. **安全考虑**
|
||||
- 不要在公开仓库提交敏感信息
|
||||
- 注意访问权限控制
|
||||
- 遵循安全最佳实践
|
||||

|
||||
|
|
@ -1,155 +1,4 @@
|
|||
---
|
||||
sidebar_label: '平台公告'
|
||||
sidebar_position: 1
|
||||
---
|
||||
|
||||
# 平台公告
|
||||
|
||||
平台公告是 GitLink 向用户传达重要信息的官方渠道,包括系统更新、维护通知、活动信息等重要内容。本文将详细介绍平台公告的使用方法和相关功能。
|
||||
|
||||
## 公告查看
|
||||
|
||||
### 1. 访问入口
|
||||
- 首页顶部导航栏的"平台公告"入口
|
||||
- 个人通知中心的公告通知
|
||||
- 站内重要位置的公告横幅
|
||||
|
||||
### 2. 公告列表
|
||||
- 按发布时间倒序排列
|
||||
- 支持分页浏览
|
||||
- 显示公告标题、类型、发布时间
|
||||
- 重要公告会有醒目标识
|
||||
|
||||
### 3. 公告详情
|
||||
点击公告标题可查看详细内容:
|
||||
- 发布时间和更新时间
|
||||
- 公告类型和重要程度
|
||||
- 详细内容和相关附件
|
||||
- 相关链接和参考资料
|
||||
|
||||
## 公告分类
|
||||
|
||||
### 1. 系统更新公告
|
||||
- 新功能发布说明
|
||||
- 性能优化通知
|
||||
- 问题修复报告
|
||||
- API 更新通知
|
||||
|
||||
### 2. 维护通知
|
||||
- 系统升级维护
|
||||
- 服务器维护
|
||||
- 性能优化
|
||||
- 紧急故障修复
|
||||
|
||||
### 3. 活动通知
|
||||
- 平台活动预告
|
||||
- 竞赛信息发布
|
||||
- 社区活动通知
|
||||
- 用户福利活动
|
||||
|
||||
### 4. 重要通知
|
||||
- 政策变更通知
|
||||
- 安全提醒
|
||||
- 服务条款更新
|
||||
- 重要功能变更
|
||||
|
||||
## 公告订阅
|
||||
|
||||
### 1. 邮件订阅
|
||||
在个人设置中配置:
|
||||
- 选择订阅的公告类型
|
||||
- 设置邮件接收频率
|
||||
- 配置邮件提醒方式
|
||||
|
||||
### 2. 站内信
|
||||
- 自动接收所有重要公告
|
||||
- 可在通知中心统一管理
|
||||
- 支持标记已读/未读
|
||||
- 可设置提醒方式
|
||||
|
||||
### 3. RSS 订阅
|
||||
- 支持主流 RSS 阅读器
|
||||
- 提供多种订阅源
|
||||
- 实时更新推送
|
||||
- 支持过滤和分类
|
||||
|
||||
## 历史公告查询
|
||||
|
||||
### 1. 搜索功能
|
||||
- 支持关键词搜索
|
||||
- 支持高级筛选
|
||||
- 支持时间范围筛选
|
||||
- 支持公告类型筛选
|
||||
|
||||
### 2. 归档管理
|
||||
- 自动归档历史公告
|
||||
- 支持按年份浏览
|
||||
- 提供归档下载
|
||||
- 保留重要公告永久可见
|
||||
|
||||
## 管理员功能
|
||||
|
||||
### 1. 公告发布
|
||||
- 选择公告类型和重要程度
|
||||
- 编写公告内容(支持 Markdown)
|
||||
- 上传相关附件
|
||||
- 设置发布时间和有效期
|
||||
- 选择目标受众群体
|
||||
|
||||
### 2. 公告管理
|
||||
- 编辑已发布公告
|
||||
- 设置公告置顶
|
||||
- 管理公告状态
|
||||
- 统计公告阅读数据
|
||||
- 处理用户反馈
|
||||
|
||||
### 3. 权限控制
|
||||
- 设置公告可见范围
|
||||
- 管理发布权限
|
||||
- 审核公告内容
|
||||
- 控制评论权限
|
||||
|
||||
## 用户设置
|
||||
|
||||
### 1. 通知偏好
|
||||
- 选择接收的公告类型
|
||||
- 设置通知方式
|
||||
- 配置提醒频率
|
||||
- 管理订阅内容
|
||||
|
||||
### 2. 展示设置
|
||||
- 自定义公告展示方式
|
||||
- 设置列表显示数量
|
||||
- 配置排序方式
|
||||
- 个性化阅读体验
|
||||
|
||||
## 最佳实践
|
||||
|
||||
### 1. 用户建议
|
||||
- 定期查看平台公告
|
||||
- 及时处理重要通知
|
||||
- 合理设置订阅偏好
|
||||
- 保存重要公告信息
|
||||
|
||||
### 2. 管理建议
|
||||
- 保持公告内容简洁清晰
|
||||
- 合理使用公告类型
|
||||
- 适时归档过期公告
|
||||
- 重视用户反馈
|
||||
|
||||
## 注意事项
|
||||
|
||||
1. **公告时效性**
|
||||
- 重要公告会在首页显著位置展示
|
||||
- 系统会自动归档超过 3 个月的非重要公告
|
||||
- 建议定期查看平台公告,及时了解平台动态
|
||||
|
||||
2. **互动功能**
|
||||
- 可以对公告进行评论和反馈
|
||||
- 支持分享公告到社交媒体
|
||||
- 可以收藏重要公告
|
||||
|
||||
3. **隐私保护**
|
||||
- 部分公告可能需要登录后查看
|
||||
- 用户反馈信息受到保护
|
||||
- 遵守数据保护规范
|
||||
sidebar_label: '平台公告'
|
||||
sidebar_position: 1
|
||||
---
|
||||
|
|
@ -12,7 +12,7 @@ sidebar_position: 2
|
|||
|
||||

|
||||
|
||||
3. 此外,在创建疑修时,可以通过符号 **`#`** 快速添加需要引用的疑修,进而为当前疑修提供辅助的信息;如下图所示,键入 **`#`** 后会弹出可引用的疑修列表,通过鼠标下滑或者键盘输入疑修编号选择需要引用的疑修后,则会自动添加引用疑修的链接🔗
|
||||
3. 此外,在创建疑修时,可以通过符号 **`#`** 快速添加需要引用的疑修,进而为当前疑修提供辅助的信息;如下图所示,键入 **`#`** 后会弹出可引用的疑修列表,通过鼠标下滑或者键盘输入疑修编号选择需要引用的疑修后,会自动添加引用疑修的链接🔗
|
||||
|
||||

|
||||
|
||||
|
|
|
|||
|
|
@ -9,20 +9,20 @@ sidebar_position: 9
|
|||
## Web IDE 核心能力
|
||||
对标有容器的标准版,极速版 IDE 主要在读、写、运行、提交等方面进行了探索:
|
||||
|
||||
**1. 读:**
|
||||
**1. 读:**
|
||||
- a. 适配了多种代码托管平台,例如 Gitlink、Github、Gitlab 等代码托管平台,业务可以非常方便的使用代码服务的能力
|
||||
- b. 内置了包括 Java、TS/JS、C++、Go、Python、Rust 等几十种常见语言的语法高亮支持
|
||||
- c. 支持了如 Git Blame、GitGraph 等代码阅读辅助插件
|
||||
|
||||
**2. 写:**
|
||||
**2. 写:**
|
||||
- a. 支持 HTML/CSS/JS/Markdown 等在线语言服务能力,支持错误诊断能力
|
||||
- b. 浏览器文件系统
|
||||
|
||||
**3. 运行:**
|
||||
**3. 运行:**
|
||||
- a. 支持基于 Skypack 的前端代码运行方案
|
||||
- b. 支持基于 Pyodide 的 Python 运行
|
||||
|
||||
**4. 提交:**
|
||||
**4. 提交:**
|
||||
- a. 支持 WebSCM,提供分支切换/新增、代码提交等能力
|
||||
|
||||
如果说以 CodeMirror、Monaco 为代表的浏览器 IDE 组件为 Web IDE 1.0,那拥有上述能力的极速版 Web IDE 就是 Web IDE 2.0。极速版 Web IDE 方案在蚂蚁内部与 2021 年 4 月上线,承接了代码阅读、代码评审、在线笔试、代码检查结果反馈、轻量在线研发等众多场景,同年 8 月 vscode.dev 和 github.dev 上线,与之相比,极速版 Web IDE 利用 OpenSumi 框架的高扩展性,业务可以更加深度的定制模块与插件,让业务有多的想象空间。
|
||||
|
|
@ -72,7 +72,7 @@ Gitlink 代码阅读场景虽然接入极速版 IDE 编辑器,但文件树、
|
|||

|
||||
<center>JS语言服务提示</center>
|
||||
|
||||
- 3. 提供了 Java、Go、Python、C++、Php 的在线语言服务能力,支持简单的定义跳转、查找引用等功能,让大家更加方便的阅读代码
|
||||
- 3.提供了 Java、Go、Python、C++、Php 的在线语言服务能力,支持简单的定义跳转、查找引用等功能,让大家更加方便的阅读代码
|
||||
|
||||

|
||||
<center>Python 查看引用</center>
|
||||
|
|
|
|||
|
|
@ -8,46 +8,46 @@ sidebar_position: 2
|
|||
跨平台仓库代码同步服务用于不同代码托管平台之间的仓库代码双向同步功能。用户将不同平台的仓库分支进行绑定,当任意仓库分支有push事件被webhook监听时,代码推送将实时自动同步至另一个仓库,以实现不同平台之间分支、提交信息的自动同步(代码托管平台仅限于github与gitee)。
|
||||
|
||||
|
||||

|
||||

|
||||
|
||||
同步服务既满足双平台代码库分支同步需求,也支持最多创建三个平台的代码仓库同步,如下图所示
|
||||
|
||||

|
||||

|
||||
|
||||
### 配置双向同步
|
||||
|
||||
1、进入需要创建同步的代码库“服务”tab,开通跨平台代码同步服务。
|
||||
|
||||

|
||||

|
||||
|
||||
2、配置跨平台的同步仓库,支持github和gitee。需输入代码库地址(git地址和网站访问地址均支持),以及配置对应token用于授权同步,此处须注意token的权限以及是否过期。<br />
|
||||
Github配置方式为:个人头像→Settings→Developer Settings→Personal access tokens (classic)→Generate new token→勾选repo按钮→保存<br />
|
||||
Gitee配置方式为:个人头像→设置→私人令牌→生成新令牌→勾选projects权限→提交
|
||||
|
||||

|
||||

|
||||
|
||||
3、在首次创建同步仓库时,需要用户手动在目标仓库的代码库创建一条webhook,用于监听仓库push事件,从而向其他同步仓库推送代码完成同步,同步步骤如下:
|
||||
|
||||
①点击“复制链接”按钮,复制平台用于接收webhook请求的地址
|
||||
|
||||

|
||||

|
||||
|
||||
|
||||
②访问点击前往按钮前往目标仓库webhook页新建一个webhook,以github为例
|
||||
|
||||

|
||||

|
||||
|
||||
③粘贴链接,并确保该webhook支持push事件的监听,并已经成功激活
|
||||
|
||||

|
||||

|
||||
|
||||
4、完成仓库配置绑定后,需要绑定这两个仓库的指定同步分支,建立首次同步方向。<font color="red">注:首次同步的策略为单向代码强推,请谨慎选择同步方向开启同步以避免代码被覆盖</font>
|
||||
|
||||

|
||||

|
||||
|
||||
5、完成分支的绑定,在绑定后会根据选择的同步方向立即执行一次同步。后续webhook监听到任意分支有代码推送,会实时向另一个绑定分支同步代码推送代码
|
||||
|
||||

|
||||

|
||||
|
||||
### 管理同步分支
|
||||
|
||||
|
|
@ -60,7 +60,7 @@ Gitee配置方式为:个人头像→设置→私人令牌→生成新令牌→
|
|||
⑤查询同步记录,包括查看历次同步的代码变更方,同步时间,同步状态及对应commt id,查询同步日志。<br />
|
||||
⑥中止、开启同步,相当于同步开关,可随时启停
|
||||
|
||||

|
||||

|
||||
|
||||
### 注意事项
|
||||
|
||||
|
|
|
|||
|
|
@ -5,24 +5,24 @@ sidebar_position: 1
|
|||
|
||||
## 代码分析入口
|
||||
|
||||
<br/>
|
||||
<br/>
|
||||
|
||||
<center>代码分析入口</center><br/>
|
||||
页面说明:<br/>
|
||||
1、用户可点击"服务"菜单 tab 进入服务页面。<br/>
|
||||
2、仓库管理员可在"仓库设置" tab 中项目导航处开启/关闭代码分析菜单可见性,如下图:<br/>
|
||||
|
||||
<br/>
|
||||
<br/>
|
||||
|
||||
<center>项目导航</center><br/>
|
||||
|
||||
## 代码分析检测
|
||||
|
||||
<br/>
|
||||
<br/>
|
||||
|
||||
<center>代码分析检测</center><br/>
|
||||
|
||||
<br/>
|
||||
<br/>
|
||||
|
||||
<center>新建分析</center><br/>
|
||||
页面说明:<br/>
|
||||
|
|
@ -32,7 +32,7 @@ sidebar_position: 1
|
|||
|
||||
## 分支选择
|
||||
|
||||
<br/>
|
||||
<br/>
|
||||
|
||||
<center>分支选择</center><br/>
|
||||
页面说明:<br/>
|
||||
|
|
@ -42,7 +42,7 @@ sidebar_position: 1
|
|||
|
||||
## 列表展示
|
||||
|
||||
<br/>
|
||||
<br/>
|
||||
|
||||
<center>列表展示</center><br/>
|
||||
页面说明:<br/>
|
||||
|
|
@ -52,7 +52,7 @@ sidebar_position: 1
|
|||
|
||||
## 结果展示
|
||||
|
||||
<br/>
|
||||
<br/>
|
||||
|
||||
<center>结果展示</center><br/>
|
||||
页面说明:<br/>
|
||||
|
|
@ -62,6 +62,6 @@ sidebar_position: 1
|
|||
|
||||
## 用户操作流程
|
||||
|
||||
<br/>
|
||||
.png)<br/>
|
||||
|
||||
<center>用户操作流程</center><br/>
|
||||
|
|
|
|||
|
|
@ -16,16 +16,16 @@ sidebar_position: 2
|
|||
|
||||

|
||||
|
||||
**注**:只能使用以字母、数字开头,包含字母、数字、下划线、横杠等,长度4到20个字符
|
||||
**注**:只能使用以字母、数字开头,包含字母、数字、下划线、横杠等,长度4到20个字符
|
||||
|
||||
## 组织名称与组织描述
|
||||
|
||||

|
||||
|
||||
**注**:此处为必填项,不得为空
|
||||
**注**:此处为必填项,不得为空
|
||||
|
||||
## 可见性
|
||||
|
||||

|
||||
|
||||
**注**:可见性预设三类组织:公开、受限(仅对登录用户可见)、私有(仅对组织成员可见)。
|
||||
**注**:可见性预设三类组织:公开、受限(仅对登录用户可见)、私有(仅对组织成员可见)。
|
||||
|
|
|
|||
|
|
@ -8,7 +8,7 @@ sidebar_position: 2
|
|||
## 模板的导入及导出管理
|
||||
#### 1.模板导入
|
||||
通过点击wiki界面的**导入模板**按钮即可导入本地的txt,markdown等格式文件进行Wiki文档的创建,当前平台此项功能尚在开发测试环节
|
||||

|
||||
[](/img/wiki/img4.png)
|
||||
#### 2.模板导出
|
||||
当前平台此项功能尚在开发测试环节
|
||||
<br/>
|
||||
|
|
|
|||
|
|
@ -9,7 +9,7 @@ sidebar_position: 1
|
|||
## 维基界面管理
|
||||
#### 1.维基界面
|
||||
GitLink项目安排了专门的**维基(Wiki)界面**来展示项目的一些情况
|
||||

|
||||
[](/img/wiki/img1.png)
|
||||
|
||||
#### 2.创建维基内容
|
||||
在初始化的维基界面当中点击**创建Wiki文档**或者**导入模板**即可进行Wiki文档的编辑
|
||||
|
|
@ -17,7 +17,7 @@ GitLink项目安排了专门的**维基(Wiki)界面**来展示项目的一些情
|
|||
|
||||
#### 3.进行Wiki文档的编辑
|
||||
点击**创建Wiki文档**后即跳转到编辑界面,初始内容为空白的文档
|
||||

|
||||
[](/img/wiki/img3.png)
|
||||
也可以通过勾选*添加模板*来进行模板的导入,平台提供的模板包括*周报*和*月报*的格式
|
||||

|
||||
完成编辑后点击左下角的的保存即可
|
||||
[](/img/wiki/img2.png)
|
||||
完成编辑后点击左下角的的保存即可
|
||||
|
|
@ -12,6 +12,7 @@ sidebar_position: 2
|
|||

|
||||
<br/>
|
||||
或在头像下拉列表中选择设置可以进入消息通知设置界面;
|
||||
|
||||

|
||||
|
||||
#### 2.进行通知设置
|
||||
|
|
|
|||
|
|
@ -1,6 +1,6 @@
|
|||
const lightCodeTheme = require('prism-react-renderer/themes/github');
|
||||
const darkCodeTheme = require('prism-react-renderer/themes/dracula');
|
||||
import("@easyops-cn/docusaurus-search-local").PluginOptions;
|
||||
// import("@easyops-cn/docusaurus-search-local").PluginOptions;
|
||||
|
||||
/** @type {import('@docusaurus/types').DocusaurusConfig} */
|
||||
module.exports = {
|
||||
|
|
@ -23,10 +23,10 @@ module.exports = {
|
|||
},
|
||||
},
|
||||
metadata:[
|
||||
{name:"Keywords",content:"Gitlink,forgeplus,GitLink,gitLink,GitLink,gitlink,帮助中心"},
|
||||
{name:"Keywords",content:"学位论文算法,帮助中心"},
|
||||
{name:"hostname",content:"gitlink.org.cn"},
|
||||
{property:"og:site_name",content:"GitLink"},
|
||||
{property:"og:image:alt",content:"GitLink(确实开源)是中国计算机学会CCF官方指定的开源创新服务平台 - Gitlink/forgeplus:GitLink(确实开源)是中国计算机学会CCF官方指定的开源创新服务平台 for gitlink Gitlink/forgeplus for git"}
|
||||
{property:"og:site_name",content:"学位论文算法"},
|
||||
{property:"og:image:alt",content:"学位论文算法"}
|
||||
],
|
||||
prism: {
|
||||
theme: lightCodeTheme,
|
||||
|
|
@ -53,9 +53,9 @@ module.exports = {
|
|||
logo: {
|
||||
// width: '32px',
|
||||
// height: '32px',
|
||||
alt: 'gitlink',
|
||||
src: 'img/gitlink.png',
|
||||
href:"https://www.gitlink.org.cn/"
|
||||
alt: '学位论文',
|
||||
src: 'img/xuewei.png',
|
||||
href:"/"
|
||||
// srcDark: 'img/logo-dark.png',
|
||||
},
|
||||
items: [
|
||||
|
|
@ -78,72 +78,23 @@ module.exports = {
|
|||
],
|
||||
},
|
||||
footer: {
|
||||
style: 'dark',
|
||||
logo:{
|
||||
src:"img/gitlink.png"
|
||||
},
|
||||
links: [
|
||||
{
|
||||
title: '社区',
|
||||
items: [
|
||||
{
|
||||
label: '网站首页',
|
||||
to: 'https://www.gitlink.org.cn',
|
||||
},
|
||||
{
|
||||
label: '关于我们',
|
||||
to: 'https://www.gitlink.org.cn/aboutus',
|
||||
},
|
||||
{
|
||||
label: '教学实践',
|
||||
to: 'https://www.gitlink.org.cn/educoder',
|
||||
},
|
||||
{
|
||||
label: '合作伙伴',
|
||||
to: 'https://forum.trustie.net/forums/5030/detail',
|
||||
},
|
||||
],
|
||||
},
|
||||
{
|
||||
title: '支持与服务',
|
||||
items: [
|
||||
{
|
||||
label: 'API文档',
|
||||
to: 'https://forgeplus.trustie.net/docs/api',
|
||||
},
|
||||
{
|
||||
label: 'Git常用命令',
|
||||
to: 'https://git-scm.com',
|
||||
},
|
||||
{
|
||||
label: '引擎使用手册',
|
||||
to: 'https://forum.gitlink.org.cn/forums/7487/detail',
|
||||
},
|
||||
{
|
||||
label: '服务协议',
|
||||
to: 'https://forum.trustie.net/forums/5029/detail',
|
||||
},
|
||||
],
|
||||
},
|
||||
{
|
||||
title: '加入我们',
|
||||
items: [
|
||||
{
|
||||
label: '官网邮箱:gitlink@ccf.org.cn',
|
||||
to:"https://www.gitlink.org.cn"
|
||||
},
|
||||
{
|
||||
label:'QQ群',
|
||||
to:'https://www.gitlink.org.cn'
|
||||
},
|
||||
{
|
||||
label:'公众号',
|
||||
to:'https://www.gitlink.org.cn'
|
||||
}
|
||||
],
|
||||
},
|
||||
],
|
||||
copyright: `<p>©Copyright ${new Date().getFullYear()} CCF 开源发展委员会</p><p>Powered by Trustie& IntelliDE 京ICP备13000930号</p>`,
|
||||
// style: 'dark',
|
||||
// logo:{
|
||||
// src:"img/gitlink.png"
|
||||
// },
|
||||
// links: [
|
||||
// {
|
||||
// title: '关于我们',
|
||||
// items: [
|
||||
// {
|
||||
// label: '根据《“学位论文算法数据库”建设试点方案》及有关要求,计算机学院对第一阶段的数据类型、上传流程及数据描述等进行梳理,明确支持上传的数据类型主要包括代码、数据集、说明文档等,博士研究生应根据具体类型,完成相关数据整理和上传。',
|
||||
// to:""
|
||||
// }
|
||||
// ],
|
||||
// }
|
||||
// ],
|
||||
// copyright: `<p>©Copyright ${new Date().getFullYear()} CCF 开源发展委员会</p><p>Powered by Trustie& IntelliDE 京ICP备13000930号</p>`,
|
||||
copyright: `<img src="/img/xuewei.png" /><div class="text"><p>关于我们</p><p>根据《“学位论文算法数据库”建设试点方案》及有关要求,计算机学院对第一阶段的数据类型、上传流程及数据描述等进行梳理,明确支持上传的数据类型主要包括代码、数据集、说明文档等,博士研究生应根据具体类型,完成相关数据整理和上传。</p><p style="margin-top:20px">工具下载</p><p><a>git32位安装下载</a><a>git64位安装下载</a></p></div>`,
|
||||
},
|
||||
},
|
||||
presets: [
|
||||
|
|
@ -163,22 +114,22 @@ module.exports = {
|
|||
],
|
||||
themes: [
|
||||
// ... Your other themes.
|
||||
[
|
||||
require.resolve("@easyops-cn/docusaurus-search-local"),
|
||||
{
|
||||
// ... Your options.
|
||||
// `hashed` is recommended as long-term-cache of index file is possible.
|
||||
hashed: true,
|
||||
language: ["en", "zh"],
|
||||
highlightSearchTermsOnTargetPage: true,
|
||||
blogRouteBasePath: "/",
|
||||
explicitSearchResultPath: true,
|
||||
// For Docs using Chinese, The `language` is recommended to set to:
|
||||
// ```
|
||||
// language: ["en", "zh"],
|
||||
// ```
|
||||
},
|
||||
],
|
||||
// [
|
||||
// require.resolve("@easyops-cn/docusaurus-search-local"),
|
||||
// {
|
||||
// // ... Your options.
|
||||
// // `hashed` is recommended as long-term-cache of index file is possible.
|
||||
// hashed: true,
|
||||
// language: ["en", "zh"],
|
||||
// highlightSearchTermsOnTargetPage: true,
|
||||
// blogRouteBasePath: "/",
|
||||
// explicitSearchResultPath: true,
|
||||
// // For Docs using Chinese, The `language` is recommended to set to:
|
||||
// // ```
|
||||
// // language: ["en", "zh"],
|
||||
// // ```
|
||||
// },
|
||||
// ],
|
||||
],
|
||||
i18n: {
|
||||
defaultLocale: 'zh-cn',
|
||||
|
|
|
|||
File diff suppressed because it is too large
Load Diff
|
|
@ -18,20 +18,15 @@
|
|||
"@docusaurus/core": "2.4.1",
|
||||
"@docusaurus/plugin-client-redirects": "2.4.1",
|
||||
"@docusaurus/preset-classic": "2.4.1",
|
||||
"@easyops-cn/docusaurus-search-local": "^0.35.0",
|
||||
"@easyops-cn/docusaurus-search-local": "^0.49.2",
|
||||
"@mdx-js/react": "1.6.22",
|
||||
"@node-rs/jieba": "^1.7.0",
|
||||
"clsx": "1.2.1",
|
||||
"docusaurus-gtm-plugin": "0.0.2",
|
||||
"docusaurus-plugin-image-zoom": "1.0.1",
|
||||
"html2pdf": "^0.0.11",
|
||||
"html2pdf.js": "^0.10.3",
|
||||
"react": "17.0.2",
|
||||
"react-dom": "17.0.2",
|
||||
"react-markdown": "^8.0.7",
|
||||
"react-modal": "3.16.1",
|
||||
"react-syntax-highlighter": "^15.5.0",
|
||||
"strip-final-newline": "^4.0.0"
|
||||
"react-modal": "3.16.1"
|
||||
},
|
||||
"browserslist": {
|
||||
"production": [
|
||||
|
|
|
|||
|
|
@ -1,164 +0,0 @@
|
|||
import React, { useState, useRef, useEffect } from 'react';
|
||||
import ReactMarkdown from 'react-markdown';
|
||||
import { Prism as SyntaxHighlighter } from 'react-syntax-highlighter';
|
||||
import { vscDarkPlus } from 'react-syntax-highlighter/dist/esm/styles/prism';
|
||||
import styles from './styles.module.css';
|
||||
|
||||
export default function AIChat({ onClose }) {
|
||||
// 初始化时添加一条AI的欢迎消息
|
||||
const [messages, setMessages] = useState([
|
||||
{
|
||||
role: 'assistant',
|
||||
content: '我是GitLink帮助中心的AI助手,专门解答关于GitLink平台的各种问题,包括代码库管理、合并请求(Merge Request)、疑修(Issue)、维基(Wiki)等功能的使用。如果你有具体问题,可以直接告诉我,我会尽力提供简洁准确的解答,并推荐相关文档链接(如适用)。 例如:**常见问题**:"如何创建合并请求?" **操作指引**:"项目Wiki如何编辑?" 需要帮助时随时提问!'
|
||||
}
|
||||
]);
|
||||
const [input, setInput] = useState('');
|
||||
const [loading, setLoading] = useState(false);
|
||||
const messagesEndRef = useRef(null);
|
||||
|
||||
// 滚动到最新消息
|
||||
const scrollToBottom = () => {
|
||||
messagesEndRef.current?.scrollIntoView({ behavior: 'smooth' });
|
||||
};
|
||||
|
||||
useEffect(() => {
|
||||
scrollToBottom();
|
||||
}, [messages]);
|
||||
|
||||
// 发送消息到DeepSeek API
|
||||
const sendMessage = async () => {
|
||||
if (!input.trim()) return;
|
||||
|
||||
const userMessage = { role: 'user', content: input };
|
||||
setMessages([...messages, userMessage]);
|
||||
setInput('');
|
||||
setLoading(true);
|
||||
|
||||
try {
|
||||
// 添加系统消息提供上下文
|
||||
const systemMessage = {
|
||||
role: 'system',
|
||||
content: '你是GitLink帮助中心的AI助手,可以解答关于GitLink平台使用、代码库管理、合并请求、疑修(Issue)、维基等方面的问题。提供简洁、准确的回答,并尽可能引导用户查看相关文档页面。'
|
||||
};
|
||||
|
||||
const response = await fetch('https://api.deepseek.com/chat/completions', {
|
||||
method: 'POST',
|
||||
headers: {
|
||||
'Content-Type': 'application/json',
|
||||
'Authorization': 'Bearer sk-94226df2b6f0469e9616b57d3c4ecb12'
|
||||
},
|
||||
body: JSON.stringify({
|
||||
model: "deepseek-chat",
|
||||
messages: [systemMessage, ...messages, userMessage],
|
||||
stream: false
|
||||
})
|
||||
});
|
||||
|
||||
const data = await response.json();
|
||||
|
||||
if (data.choices && data.choices[0]) {
|
||||
setMessages(prevMessages => [
|
||||
...prevMessages,
|
||||
data.choices[0].message
|
||||
]);
|
||||
} else {
|
||||
// 处理错误
|
||||
setMessages(prevMessages => [
|
||||
...prevMessages,
|
||||
{ role: 'assistant', content: '抱歉,我遇到了一些问题,请稍后再试。' }
|
||||
]);
|
||||
}
|
||||
} catch (error) {
|
||||
console.error('Error:', error);
|
||||
setMessages(prevMessages => [
|
||||
...prevMessages,
|
||||
{ role: 'assistant', content: '抱歉,连接出错,请稍后再试。' }
|
||||
]);
|
||||
} finally {
|
||||
setLoading(false);
|
||||
}
|
||||
};
|
||||
|
||||
// 渲染消息内容,用户消息直接显示文本,AI消息使用Markdown渲染
|
||||
const renderMessageContent = (message) => {
|
||||
if (message.role === 'user') {
|
||||
return <div className={styles.messageContent}>{message.content}</div>;
|
||||
} else {
|
||||
return (
|
||||
<div className={styles.messageContent}>
|
||||
<ReactMarkdown
|
||||
components={{
|
||||
code({node, inline, className, children, ...props}) {
|
||||
const match = /language-(\w+)/.exec(className || '');
|
||||
return !inline && match ? (
|
||||
<SyntaxHighlighter
|
||||
style={vscDarkPlus}
|
||||
language={match[1]}
|
||||
PreTag="div"
|
||||
{...props}
|
||||
>
|
||||
{String(children).replace(/\n$/, '')}
|
||||
</SyntaxHighlighter>
|
||||
) : (
|
||||
<code className={className} {...props}>
|
||||
{children}
|
||||
</code>
|
||||
);
|
||||
}
|
||||
}}
|
||||
>
|
||||
{message.content}
|
||||
</ReactMarkdown>
|
||||
</div>
|
||||
);
|
||||
}
|
||||
};
|
||||
|
||||
return (
|
||||
<div className={styles.chatContainer}>
|
||||
<div className={styles.chatHeader}>
|
||||
<h3>DeepSeek AI 助手</h3>
|
||||
<button className={styles.closeButton} onClick={onClose}>×</button>
|
||||
</div>
|
||||
|
||||
<div className={styles.messagesContainer}>
|
||||
{messages.map((msg, index) => (
|
||||
<div
|
||||
key={index}
|
||||
className={`${styles.message} ${msg.role === 'user' ? styles.userMessage : styles.aiMessage}`}
|
||||
>
|
||||
{renderMessageContent(msg)}
|
||||
</div>
|
||||
))}
|
||||
{loading && (
|
||||
<div className={`${styles.message} ${styles.aiMessage}`}>
|
||||
<div className={styles.messageContent}>
|
||||
<div className={styles.loadingDots}>
|
||||
<span></span><span></span><span></span>
|
||||
</div>
|
||||
</div>
|
||||
</div>
|
||||
)}
|
||||
<div ref={messagesEndRef} />
|
||||
</div>
|
||||
|
||||
<div className={styles.inputContainer}>
|
||||
<input
|
||||
type="text"
|
||||
value={input}
|
||||
onChange={(e) => setInput(e.target.value)}
|
||||
onKeyPress={(e) => e.key === 'Enter' && sendMessage()}
|
||||
placeholder="输入您的问题..."
|
||||
className={styles.chatInput}
|
||||
/>
|
||||
<button
|
||||
onClick={sendMessage}
|
||||
disabled={loading || !input.trim()}
|
||||
className={styles.sendButton}
|
||||
>
|
||||
发送
|
||||
</button>
|
||||
</div>
|
||||
</div>
|
||||
);
|
||||
}
|
||||
|
|
@ -1,345 +0,0 @@
|
|||
.chatContainer {
|
||||
position: fixed;
|
||||
bottom: 90px;
|
||||
right: 300px;
|
||||
width: 350px;
|
||||
height: 500px;
|
||||
background-color: #fff;
|
||||
border-radius: 12px;
|
||||
box-shadow: 0 4px 20px rgba(0, 0, 0, 0.15);
|
||||
display: flex;
|
||||
flex-direction: column;
|
||||
z-index: 10001;
|
||||
overflow: hidden;
|
||||
}
|
||||
|
||||
.chatHeader {
|
||||
display: flex;
|
||||
justify-content: space-between;
|
||||
align-items: center;
|
||||
padding: 15px;
|
||||
background-color: var(--ifm-color-primary);
|
||||
color: white;
|
||||
}
|
||||
|
||||
.chatHeader h3 {
|
||||
margin: 0;
|
||||
font-size: 16px;
|
||||
}
|
||||
|
||||
.closeButton {
|
||||
background: none;
|
||||
border: none;
|
||||
color: white;
|
||||
font-size: 20px;
|
||||
cursor: pointer;
|
||||
padding: 0;
|
||||
width: 24px;
|
||||
height: 24px;
|
||||
display: flex;
|
||||
align-items: center;
|
||||
justify-content: center;
|
||||
}
|
||||
|
||||
.messagesContainer {
|
||||
flex: 1;
|
||||
padding: 15px;
|
||||
overflow-y: auto;
|
||||
display: flex;
|
||||
flex-direction: column;
|
||||
gap: 10px;
|
||||
}
|
||||
|
||||
.message {
|
||||
max-width: 80%;
|
||||
padding: 10px 15px;
|
||||
border-radius: 18px;
|
||||
word-break: break-word;
|
||||
}
|
||||
|
||||
.userMessage {
|
||||
align-self: flex-end;
|
||||
background-color: var(--ifm-color-primary);
|
||||
color: white;
|
||||
}
|
||||
|
||||
.aiMessage {
|
||||
align-self: flex-start;
|
||||
background-color: #f3f4f6;
|
||||
color: #1f2937;
|
||||
}
|
||||
|
||||
.messageContent {
|
||||
font-size: 14px;
|
||||
line-height: 1.5;
|
||||
}
|
||||
|
||||
/* Markdown样式 */
|
||||
.messageContent p {
|
||||
margin: 0 0 0.8em;
|
||||
}
|
||||
|
||||
.messageContent p:last-child {
|
||||
margin-bottom: 0;
|
||||
}
|
||||
|
||||
.messageContent h1,
|
||||
.messageContent h2,
|
||||
.messageContent h3,
|
||||
.messageContent h4,
|
||||
.messageContent h5,
|
||||
.messageContent h6 {
|
||||
margin-top: 1em;
|
||||
margin-bottom: 0.5em;
|
||||
font-weight: 600;
|
||||
line-height: 1.25;
|
||||
}
|
||||
|
||||
.messageContent h1 {
|
||||
font-size: 1.5em;
|
||||
}
|
||||
|
||||
.messageContent h2 {
|
||||
font-size: 1.3em;
|
||||
}
|
||||
|
||||
.messageContent h3 {
|
||||
font-size: 1.1em;
|
||||
}
|
||||
|
||||
.messageContent ul,
|
||||
.messageContent ol {
|
||||
margin: 0.5em 0;
|
||||
padding-left: 1.5em;
|
||||
}
|
||||
|
||||
.messageContent li {
|
||||
margin: 0.25em 0;
|
||||
}
|
||||
|
||||
.messageContent code {
|
||||
font-family: monospace;
|
||||
background-color: rgba(0, 0, 0, 0.05);
|
||||
padding: 0.2em 0.4em;
|
||||
border-radius: 3px;
|
||||
font-size: 0.9em;
|
||||
}
|
||||
|
||||
.messageContent pre {
|
||||
background-color: rgba(0, 0, 0, 0.05);
|
||||
padding: 0.5em;
|
||||
border-radius: 5px;
|
||||
overflow-x: auto;
|
||||
margin: 0.5em 0;
|
||||
}
|
||||
|
||||
.messageContent pre code {
|
||||
background-color: transparent;
|
||||
padding: 0;
|
||||
}
|
||||
|
||||
.messageContent a {
|
||||
color: #2563eb;
|
||||
text-decoration: none;
|
||||
}
|
||||
|
||||
.messageContent a:hover {
|
||||
text-decoration: underline;
|
||||
}
|
||||
|
||||
.messageContent blockquote {
|
||||
border-left: 4px solid #e5e7eb;
|
||||
padding-left: 1em;
|
||||
margin: 0.5em 0;
|
||||
color: #6b7280;
|
||||
}
|
||||
|
||||
.messageContent img {
|
||||
max-width: 100%;
|
||||
height: auto;
|
||||
}
|
||||
|
||||
.messageContent table {
|
||||
width: 100%;
|
||||
border-collapse: collapse;
|
||||
margin: 0.5em 0;
|
||||
}
|
||||
|
||||
.messageContent th,
|
||||
.messageContent td {
|
||||
border: 1px solid #e5e7eb;
|
||||
padding: 0.5em;
|
||||
text-align: left;
|
||||
}
|
||||
|
||||
.messageContent th {
|
||||
background-color: rgba(0, 0, 0, 0.05);
|
||||
}
|
||||
|
||||
.messageContent strong,
|
||||
.messageContent b {
|
||||
font-weight: 600;
|
||||
}
|
||||
|
||||
.messageContent em,
|
||||
.messageContent i {
|
||||
font-style: italic;
|
||||
}
|
||||
|
||||
.userMessage .messageContent code,
|
||||
.userMessage .messageContent pre {
|
||||
background-color: rgba(255, 255, 255, 0.2);
|
||||
}
|
||||
|
||||
.userMessage .messageContent a {
|
||||
color: #e0e7ff;
|
||||
}
|
||||
|
||||
.emptyState {
|
||||
display: flex;
|
||||
flex-direction: column;
|
||||
align-items: center;
|
||||
justify-content: center;
|
||||
height: 100%;
|
||||
color: #6b7280;
|
||||
text-align: center;
|
||||
}
|
||||
|
||||
.inputContainer {
|
||||
display: flex;
|
||||
padding: 10px 15px;
|
||||
border-top: 1px solid #e5e7eb;
|
||||
background-color: #fff;
|
||||
}
|
||||
|
||||
.chatInput {
|
||||
flex: 1;
|
||||
padding: 10px 15px;
|
||||
border: 1px solid #d1d5db;
|
||||
border-radius: 20px;
|
||||
font-size: 14px;
|
||||
outline: none;
|
||||
}
|
||||
|
||||
.chatInput:focus {
|
||||
border-color: var(--ifm-color-primary);
|
||||
}
|
||||
|
||||
.sendButton {
|
||||
margin-left: 10px;
|
||||
padding: 8px 15px;
|
||||
background-color: var(--ifm-color-primary);
|
||||
color: white;
|
||||
border: none;
|
||||
border-radius: 20px;
|
||||
cursor: pointer;
|
||||
font-size: 14px;
|
||||
font-weight: 500;
|
||||
}
|
||||
|
||||
.sendButton:disabled {
|
||||
background-color: #93c5fd;
|
||||
cursor: not-allowed;
|
||||
}
|
||||
|
||||
.loadingDots {
|
||||
display: flex;
|
||||
align-items: center;
|
||||
gap: 4px;
|
||||
}
|
||||
|
||||
.loadingDots span {
|
||||
width: 8px;
|
||||
height: 8px;
|
||||
border-radius: 50%;
|
||||
background-color: #6b7280;
|
||||
animation: bounce 1.4s infinite ease-in-out both;
|
||||
}
|
||||
|
||||
.loadingDots span:nth-child(1) {
|
||||
animation-delay: -0.32s;
|
||||
}
|
||||
|
||||
.loadingDots span:nth-child(2) {
|
||||
animation-delay: -0.16s;
|
||||
}
|
||||
|
||||
@keyframes bounce {
|
||||
0%, 80%, 100% {
|
||||
transform: scale(0);
|
||||
}
|
||||
40% {
|
||||
transform: scale(1);
|
||||
}
|
||||
}
|
||||
|
||||
/* 暗色主题适配 */
|
||||
html[data-theme='dark'] .chatContainer {
|
||||
background-color: #2b3a56;
|
||||
color: #eee;
|
||||
border: 1px solid #3e4c66;
|
||||
}
|
||||
|
||||
html[data-theme='dark'] .chatHeader {
|
||||
background-color: var(--ifm-color-primary);
|
||||
border-bottom: 1px solid #3e4c66;
|
||||
}
|
||||
|
||||
html[data-theme='dark'] .chatHeader h3 {
|
||||
color: #eee;
|
||||
}
|
||||
|
||||
html[data-theme='dark'] .closeButton {
|
||||
color: #eee;
|
||||
}
|
||||
|
||||
html[data-theme='dark'] .inputContainer {
|
||||
background-color: #2b3a56;
|
||||
border-top: 1px solid #3e4c66;
|
||||
}
|
||||
|
||||
html[data-theme='dark'] .chatInput {
|
||||
background-color: #1b2440;
|
||||
color: #eee;
|
||||
border-color: #3e4c66;
|
||||
}
|
||||
|
||||
html[data-theme='dark'] .aiMessage {
|
||||
background-color: #1b2440;
|
||||
color: #eee;
|
||||
}
|
||||
|
||||
html[data-theme='dark'] .messageContent code {
|
||||
background-color: rgba(255, 255, 255, 0.1);
|
||||
}
|
||||
|
||||
html[data-theme='dark'] .messageContent pre {
|
||||
background-color: rgba(255, 255, 255, 0.05);
|
||||
}
|
||||
|
||||
html[data-theme='dark'] .messageContent a {
|
||||
color: #93c5fd;
|
||||
}
|
||||
|
||||
html[data-theme='dark'] .messageContent blockquote {
|
||||
border-color: #3e4c66;
|
||||
color: #9ca3af;
|
||||
}
|
||||
|
||||
html[data-theme='dark'] .messageContent th,
|
||||
html[data-theme='dark'] .messageContent td {
|
||||
border-color: #3e4c66;
|
||||
}
|
||||
|
||||
html[data-theme='dark'] .messageContent th {
|
||||
background-color: rgba(255, 255, 255, 0.05);
|
||||
}
|
||||
|
||||
/* 响应式调整 */
|
||||
@media screen and (max-width: 996px) {
|
||||
.chatContainer {
|
||||
width: 300px;
|
||||
bottom: 80px;
|
||||
right: 240px;
|
||||
}
|
||||
}
|
||||
|
|
@ -1,29 +0,0 @@
|
|||
import React, { useState } from 'react';
|
||||
import styles from './styles.module.css';
|
||||
import AIChat from '../AIChat';
|
||||
|
||||
export default function AIChatButton() {
|
||||
const [isChatOpen, setIsChatOpen] = useState(false);
|
||||
|
||||
const toggleChat = () => {
|
||||
setIsChatOpen(!isChatOpen);
|
||||
};
|
||||
|
||||
return (
|
||||
<>
|
||||
<button
|
||||
className={styles.aiChatButton}
|
||||
onClick={toggleChat}
|
||||
aria-label="AI 助手"
|
||||
>
|
||||
<span className={styles.aiIconWrapper}>
|
||||
<svg className={styles.aiIcon} viewBox="0 0 24 24" fill="none" xmlns="http://www.w3.org/2000/svg">
|
||||
<path d="M12 2C6.48 2 2 6.48 2 12C2 17.52 6.48 22 12 22C17.52 22 22 17.52 22 12C22 6.48 17.52 2 12 2ZM12 5C13.66 5 15 6.34 15 8C15 9.66 13.66 11 12 11C10.34 11 9 9.66 9 8C9 6.34 10.34 5 12 5ZM12 19.2C9.5 19.2 7.29 17.92 6 15.98C6.03 13.99 10 12.9 12 12.9C13.99 12.9 17.97 13.99 18 15.98C16.71 17.92 14.5 19.2 12 19.2Z" fill="currentColor"/>
|
||||
</svg>
|
||||
</span>
|
||||
<span className={styles.aiText}>💬 AI 助手</span>
|
||||
</button>
|
||||
{isChatOpen && <AIChat onClose={() => setIsChatOpen(false)} />}
|
||||
</>
|
||||
);
|
||||
}
|
||||
|
|
@ -1,64 +0,0 @@
|
|||
.aiChatButton {
|
||||
position: fixed;
|
||||
bottom: 150px;
|
||||
right: 160px;
|
||||
display: flex;
|
||||
align-items: center;
|
||||
padding: 10px 16px;
|
||||
background-color: var(--ifm-color-primary);
|
||||
color: white;
|
||||
border: none;
|
||||
border-radius: 24px;
|
||||
font-size: 14px;
|
||||
font-weight: 500;
|
||||
cursor: pointer;
|
||||
z-index: 10000;
|
||||
box-shadow: 0 4px 12px rgba(99, 102, 241, 0.4);
|
||||
transition: all 0.2s ease;
|
||||
width: 125px;
|
||||
min-width: 120px;
|
||||
height: 48px;
|
||||
justify-content: center;
|
||||
}
|
||||
|
||||
.aiChatButton:hover {
|
||||
background-color: var(--ifm-color-primary-dark);
|
||||
box-shadow: 0 6px 16px rgba(99, 102, 241, 0.5);
|
||||
transform: translateY(-2px);
|
||||
}
|
||||
|
||||
.aiIconWrapper {
|
||||
display: flex;
|
||||
align-items: center;
|
||||
justify-content: center;
|
||||
margin-right: 8px;
|
||||
}
|
||||
|
||||
.aiIcon {
|
||||
width: 18px;
|
||||
height: 18px;
|
||||
}
|
||||
|
||||
.aiText {
|
||||
font-size: 16px;
|
||||
font-weight: 500;
|
||||
}
|
||||
|
||||
/* 暗色主题适配 */
|
||||
html[data-theme='dark'] .aiChatButton {
|
||||
background-color: #818cf8;
|
||||
}
|
||||
|
||||
html[data-theme='dark'] .aiChatButton:hover {
|
||||
background-color: #6366f1;
|
||||
}
|
||||
|
||||
/* 响应式调整 */
|
||||
@media screen and (max-width: 996px) {
|
||||
.aiChatButton {
|
||||
padding: 8px 16px;
|
||||
font-size: 14px;
|
||||
right: 240px;
|
||||
bottom: 20px;
|
||||
}
|
||||
}
|
||||
|
|
@ -1,289 +0,0 @@
|
|||
import React, { useEffect, useState } from 'react'
|
||||
import styles from './styles.module.css'
|
||||
|
||||
const ExportPDFButton = () => {
|
||||
const [mainContent, setMainContent] = useState(null)
|
||||
|
||||
useEffect(() => {
|
||||
// 监听路由变化,更新内容
|
||||
const updateContent = () => {
|
||||
const content = document.querySelector('.theme-doc-markdown')
|
||||
if (content) {
|
||||
setMainContent(content)
|
||||
}
|
||||
}
|
||||
|
||||
// 初始化
|
||||
updateContent()
|
||||
|
||||
// 创建 MutationObserver 来监听DOM变化
|
||||
const observer = new MutationObserver(mutations => {
|
||||
for (const mutation of mutations) {
|
||||
if (mutation.type === 'childList' || mutation.type === 'subtree') {
|
||||
updateContent()
|
||||
}
|
||||
}
|
||||
})
|
||||
|
||||
// 监听整个文档的变化
|
||||
observer.observe(document.documentElement, {
|
||||
childList: true,
|
||||
subtree: true,
|
||||
})
|
||||
|
||||
return () => observer.disconnect()
|
||||
}, [])
|
||||
|
||||
// 获取当前页面标题并处理成合适的文件名
|
||||
const getFileName = () => {
|
||||
// 获取当前页面标题
|
||||
let title = document.title || 'GitLink帮助文档'
|
||||
|
||||
// 如果标题包含分隔符,只取主要部分
|
||||
if (title.includes('|')) {
|
||||
title = title.split('|')[0].trim()
|
||||
}
|
||||
|
||||
// 移除不适合作为文件名的字符
|
||||
title = title.replace(/[\\/:*?"<>|]/g, '')
|
||||
|
||||
// 如果标题为空,使用默认名称
|
||||
if (!title.trim()) {
|
||||
title = 'GitLink帮助文档'
|
||||
}
|
||||
|
||||
// 添加.pdf后缀
|
||||
return `${title}.pdf`
|
||||
}
|
||||
|
||||
const copyStyles = () => {
|
||||
const styles = []
|
||||
// 获取所有style标签的内容
|
||||
const styleTags = document.getElementsByTagName('style')
|
||||
Array.from(styleTags).forEach(tag => {
|
||||
if (tag.textContent) {
|
||||
styles.push(tag.textContent)
|
||||
}
|
||||
})
|
||||
|
||||
// 获取所有link标签引入的样式
|
||||
const linkTags = document.getElementsByTagName('link')
|
||||
Array.from(linkTags).forEach(link => {
|
||||
if (link.rel === 'stylesheet' && link.href) {
|
||||
try {
|
||||
const xhr = new XMLHttpRequest()
|
||||
xhr.open('GET', link.href, false) // 同步请求
|
||||
xhr.send()
|
||||
if (xhr.status === 200) {
|
||||
styles.push(xhr.responseText)
|
||||
}
|
||||
} catch (e) {
|
||||
console.warn('无法加载外部样式表:', link.href)
|
||||
}
|
||||
}
|
||||
})
|
||||
|
||||
return styles.join('\n')
|
||||
}
|
||||
|
||||
const processImages = async container => {
|
||||
const images = container.querySelectorAll('img')
|
||||
console.log('找到的图片数量:', images.length)
|
||||
const imagePromises = Array.from(images).map(img => {
|
||||
return new Promise((resolve, reject) => {
|
||||
if (!img.src) {
|
||||
resolve()
|
||||
return
|
||||
}
|
||||
|
||||
// 创建新的图片对象以确保加载完成
|
||||
const newImg = new Image()
|
||||
newImg.crossOrigin = 'anonymous'
|
||||
newImg.onload = () => {
|
||||
// 将图片转换为 base64
|
||||
const canvas = document.createElement('canvas')
|
||||
canvas.width = newImg.width
|
||||
canvas.height = newImg.height
|
||||
const ctx = canvas.getContext('2d')
|
||||
ctx.drawImage(newImg, 0, 0)
|
||||
try {
|
||||
const dataUrl = canvas.toDataURL('image/png')
|
||||
img.src = dataUrl
|
||||
} catch (e) {
|
||||
console.error('Image conversion failed:', e)
|
||||
}
|
||||
resolve()
|
||||
}
|
||||
newImg.onerror = () => {
|
||||
console.error('Image load failed:', img.src)
|
||||
resolve()
|
||||
}
|
||||
newImg.src = img.src
|
||||
})
|
||||
})
|
||||
|
||||
await Promise.all(imagePromises)
|
||||
}
|
||||
|
||||
const handleExport = async () => {
|
||||
try {
|
||||
if (!mainContent) {
|
||||
console.error('未找到主要内容容器')
|
||||
alert('未找到可导出的内容,请稍后重试')
|
||||
return
|
||||
}
|
||||
|
||||
// 获取当前页面标题
|
||||
const pageTitle = document.title || 'GitLink帮助文档'
|
||||
const fileName = getFileName()
|
||||
|
||||
// 动态导入 html2pdf.js
|
||||
const html2pdf = (await import('html2pdf.js')).default
|
||||
|
||||
// 创建一个临时容器
|
||||
const tempContainer = document.createElement('div')
|
||||
tempContainer.style.cssText = `
|
||||
padding: 2rem;
|
||||
max-width: 100%;
|
||||
margin: 0 auto;
|
||||
background-color: #ffffff;
|
||||
`
|
||||
|
||||
// 添加文档标题
|
||||
const titleDiv = document.createElement('div')
|
||||
titleDiv.style.cssText = `
|
||||
text-align: center;
|
||||
margin-bottom: 2rem;
|
||||
padding-bottom: 1rem;
|
||||
border-bottom: 1px solid #eee;
|
||||
`
|
||||
const titleH1 = document.createElement('h1')
|
||||
titleH1.textContent = pageTitle
|
||||
titleH1.style.cssText = `
|
||||
font-size: 2rem;
|
||||
margin: 0;
|
||||
padding: 0;
|
||||
color: var(--ifm-heading-color);
|
||||
`
|
||||
titleDiv.appendChild(titleH1)
|
||||
tempContainer.appendChild(titleDiv)
|
||||
|
||||
// 复制样式
|
||||
const styleElement = document.createElement('style')
|
||||
styleElement.textContent = copyStyles()
|
||||
tempContainer.appendChild(styleElement)
|
||||
|
||||
// 复制内容
|
||||
const contentClone = mainContent.cloneNode(true)
|
||||
|
||||
// 处理图片
|
||||
await processImages(contentClone)
|
||||
|
||||
// 添加主要内容
|
||||
tempContainer.appendChild(contentClone)
|
||||
|
||||
// 添加打印特定的样式
|
||||
const printStyles = document.createElement('style')
|
||||
printStyles.textContent = `
|
||||
@page {
|
||||
margin: 20mm 15mm;
|
||||
size: A4;
|
||||
}
|
||||
@media print {
|
||||
* {
|
||||
-webkit-print-color-adjust: exact !important;
|
||||
color-adjust: exact !important;
|
||||
}
|
||||
img {
|
||||
max-width: 100% !important;
|
||||
page-break-inside: avoid;
|
||||
}
|
||||
h1, h2, h3, h4, h5, h6 {
|
||||
page-break-after: avoid;
|
||||
break-after: avoid;
|
||||
}
|
||||
table, pre, blockquote, ul, ol {
|
||||
page-break-inside: avoid;
|
||||
}
|
||||
p {
|
||||
orphans: 3;
|
||||
widows: 3;
|
||||
}
|
||||
}
|
||||
`
|
||||
tempContainer.appendChild(printStyles)
|
||||
|
||||
// 添加到文档中以确保样式生效
|
||||
document.body.appendChild(tempContainer)
|
||||
|
||||
// 添加加载提示
|
||||
const button = document.querySelector(`.${styles.exportButton}`)
|
||||
const originalText = button.textContent
|
||||
button.textContent = '正在导出...'
|
||||
button.disabled = true
|
||||
|
||||
try {
|
||||
console.log('开始生成PDF...')
|
||||
const worker = html2pdf()
|
||||
.set({
|
||||
margin: 0,
|
||||
filename: fileName,
|
||||
image: { type: 'jpeg', quality: 0.98 },
|
||||
html2canvas: {
|
||||
scale: 2,
|
||||
useCORS: true,
|
||||
allowTaint: true,
|
||||
backgroundColor: '#ffffff',
|
||||
windowWidth: tempContainer.scrollWidth,
|
||||
windowHeight: tempContainer.scrollHeight,
|
||||
logging: true,
|
||||
onclone: function (clonedDoc) {
|
||||
const clonedContainer = clonedDoc.querySelector('div')
|
||||
if (clonedContainer) {
|
||||
// 保持原有的宽度和样式
|
||||
clonedContainer.style.width = '100%'
|
||||
clonedContainer.style.maxWidth = '100%'
|
||||
clonedContainer.style.margin = '0 auto'
|
||||
clonedContainer.style.padding = '2rem'
|
||||
clonedContainer.style.backgroundColor = '#ffffff'
|
||||
}
|
||||
},
|
||||
},
|
||||
jsPDF: {
|
||||
unit: 'mm',
|
||||
format: 'a4',
|
||||
orientation: 'portrait',
|
||||
compress: true,
|
||||
},
|
||||
})
|
||||
.from(tempContainer)
|
||||
.save()
|
||||
|
||||
await worker
|
||||
console.log('PDF生成完成')
|
||||
} finally {
|
||||
// 清理临时容器
|
||||
document.body.removeChild(tempContainer)
|
||||
// 恢复按钮状态
|
||||
button.textContent = originalText
|
||||
button.disabled = false
|
||||
}
|
||||
} catch (error) {
|
||||
console.error('PDF导出失败:', error)
|
||||
alert('PDF导出失败,请稍后重试')
|
||||
}
|
||||
}
|
||||
|
||||
return (
|
||||
<button
|
||||
onClick={handleExport}
|
||||
className={styles.exportButton}
|
||||
title='导出为PDF'
|
||||
disabled={!mainContent}
|
||||
>
|
||||
导出PDF
|
||||
</button>
|
||||
)
|
||||
}
|
||||
|
||||
export default ExportPDFButton
|
||||
|
|
@ -1,60 +0,0 @@
|
|||
.exportButton {
|
||||
position: fixed;
|
||||
bottom: 90px;
|
||||
right: 160px;
|
||||
width: auto;
|
||||
height: 48px;
|
||||
border-radius: 24px;
|
||||
padding: 0 20px;
|
||||
background-color: var(--ifm-color-primary);
|
||||
color: white;
|
||||
border: none;
|
||||
box-shadow: 0 4px 15px rgba(0, 0, 0, 0.3);
|
||||
cursor: pointer;
|
||||
display: flex;
|
||||
align-items: center;
|
||||
justify-content: center;
|
||||
gap: 8px;
|
||||
transition: all 0.3s ease;
|
||||
z-index: 9999;
|
||||
min-width: 120px;
|
||||
}
|
||||
|
||||
.exportButton::before {
|
||||
content: "📄";
|
||||
font-size: 18px;
|
||||
}
|
||||
|
||||
.exportButton:hover {
|
||||
background-color: var(--ifm-color-primary-darker);
|
||||
transform: translateY(-2px);
|
||||
box-shadow: 0 6px 20px rgba(0, 0, 0, 0.4);
|
||||
}
|
||||
|
||||
.exportButton:disabled {
|
||||
background-color: #ccc;
|
||||
cursor: not-allowed;
|
||||
transform: none;
|
||||
box-shadow: none;
|
||||
}
|
||||
|
||||
/* 暗色主题适配 */
|
||||
html[data-theme='dark'] .exportButton {
|
||||
background-color: var(--ifm-color-primary);
|
||||
color: white;
|
||||
}
|
||||
|
||||
html[data-theme='dark'] .exportButton:hover {
|
||||
background-color: var(--ifm-color-primary-darker);
|
||||
}
|
||||
|
||||
html[data-theme='dark'] .exportButton:disabled {
|
||||
background-color: #444;
|
||||
}
|
||||
|
||||
@media screen and (max-width: 996px) {
|
||||
.exportButton {
|
||||
padding: 8px 16px;
|
||||
font-size: 14px;
|
||||
}
|
||||
}
|
||||
|
|
@ -1,125 +0,0 @@
|
|||
import React, { useState } from 'react';
|
||||
import styles from './styles.module.css';
|
||||
|
||||
const FeedbackWidget = () => {
|
||||
const [isOpen, setIsOpen] = useState(false);
|
||||
const [feedback, setFeedback] = useState('');
|
||||
const [submitted, setSubmitted] = useState(false);
|
||||
const [feedbackType, setFeedbackType] = useState('suggestion');
|
||||
|
||||
const toggleWidget = () => {
|
||||
setIsOpen(!isOpen);
|
||||
if (submitted) {
|
||||
setSubmitted(false);
|
||||
setFeedback('');
|
||||
}
|
||||
};
|
||||
|
||||
const handleSubmit = (e) => {
|
||||
e.preventDefault();
|
||||
if (feedback.trim() === '') return;
|
||||
|
||||
// 在真实环境中,这里应该发送反馈到服务器
|
||||
console.log({
|
||||
type: feedbackType,
|
||||
content: feedback,
|
||||
url: window.location.href,
|
||||
timestamp: new Date().toISOString()
|
||||
});
|
||||
|
||||
setSubmitted(true);
|
||||
};
|
||||
|
||||
return (
|
||||
<div className={styles.feedbackContainer}>
|
||||
<button
|
||||
className={styles.feedbackButton}
|
||||
onClick={toggleWidget}
|
||||
title="文档反馈"
|
||||
aria-label="文档反馈"
|
||||
>
|
||||
<svg viewBox="0 0 24 24" width="24" height="24" fill="currentColor">
|
||||
<path d="M20 2H4c-1.1 0-1.99.9-1.99 2L2 22l4-4h14c1.1 0 2-.9 2-2V4c0-1.1-.9-2-2-2zm-7 12h-2v-2h2v2zm0-4h-2V6h2v4z" />
|
||||
</svg>
|
||||
<span className={styles.buttonText}>反馈</span>
|
||||
</button>
|
||||
|
||||
{isOpen && (
|
||||
<div className={styles.feedbackWidget}>
|
||||
{!submitted ? (
|
||||
<form onSubmit={handleSubmit}>
|
||||
<div className={styles.header}>
|
||||
<h3>文档反馈</h3>
|
||||
<button
|
||||
type="button"
|
||||
className={styles.closeButton}
|
||||
onClick={toggleWidget}
|
||||
>
|
||||
×
|
||||
</button>
|
||||
</div>
|
||||
|
||||
<div className={styles.feedbackTypeContainer}>
|
||||
<label className={styles.radioLabel}>
|
||||
<input
|
||||
type="radio"
|
||||
name="feedbackType"
|
||||
value="suggestion"
|
||||
checked={feedbackType === 'suggestion'}
|
||||
onChange={() => setFeedbackType('suggestion')}
|
||||
/>
|
||||
建议
|
||||
</label>
|
||||
<label className={styles.radioLabel}>
|
||||
<input
|
||||
type="radio"
|
||||
name="feedbackType"
|
||||
value="error"
|
||||
checked={feedbackType === 'error'}
|
||||
onChange={() => setFeedbackType('error')}
|
||||
/>
|
||||
文档错误
|
||||
</label>
|
||||
</div>
|
||||
|
||||
<textarea
|
||||
className={styles.feedbackInput}
|
||||
value={feedback}
|
||||
onChange={(e) => setFeedback(e.target.value)}
|
||||
placeholder="请输入您的反馈..."
|
||||
rows="4"
|
||||
required
|
||||
/>
|
||||
|
||||
<button type="submit" className={styles.submitButton}>
|
||||
提交反馈
|
||||
</button>
|
||||
</form>
|
||||
) : (
|
||||
<div className={styles.successMessage}>
|
||||
<div className={styles.header}>
|
||||
<h3>感谢您的反馈</h3>
|
||||
<button
|
||||
type="button"
|
||||
className={styles.closeButton}
|
||||
onClick={toggleWidget}
|
||||
>
|
||||
×
|
||||
</button>
|
||||
</div>
|
||||
<p>您的反馈已成功提交,我们会认真考虑您的建议。</p>
|
||||
<button
|
||||
className={styles.submitButton}
|
||||
onClick={toggleWidget}
|
||||
>
|
||||
关闭
|
||||
</button>
|
||||
</div>
|
||||
)}
|
||||
</div>
|
||||
)}
|
||||
</div>
|
||||
);
|
||||
};
|
||||
|
||||
export default FeedbackWidget;
|
||||
|
|
@ -1,179 +0,0 @@
|
|||
.feedbackContainer {
|
||||
position: fixed;
|
||||
bottom: 30px;
|
||||
right: 160px;
|
||||
z-index: 9999;
|
||||
display: flex;
|
||||
flex-direction: column;
|
||||
align-items: flex-end;
|
||||
}
|
||||
|
||||
.feedbackButton {
|
||||
width: 125px;
|
||||
min-width: 120px;
|
||||
height: 48px;
|
||||
border-radius: 24px;
|
||||
padding: 0 20px;
|
||||
background-color: var(--ifm-color-primary);
|
||||
color: white;
|
||||
border: none;
|
||||
box-shadow: 0 4px 15px rgba(0, 0, 0, 0.3);
|
||||
cursor: pointer;
|
||||
display: flex;
|
||||
align-items: center;
|
||||
justify-content: center;
|
||||
gap: 8px;
|
||||
transition: background-color 0.3s, transform 0.2s;
|
||||
}
|
||||
|
||||
.buttonText {
|
||||
font-size: 16px;
|
||||
font-weight: 500;
|
||||
margin-left: 4px;
|
||||
}
|
||||
|
||||
.feedbackButton:hover {
|
||||
background-color: var(--ifm-color-primary-dark);
|
||||
transform: scale(1.05);
|
||||
}
|
||||
|
||||
.feedbackWidget {
|
||||
position: absolute;
|
||||
bottom: 60px;
|
||||
right: 0;
|
||||
width: 320px;
|
||||
background-color: white;
|
||||
border-radius: 8px;
|
||||
box-shadow: 0 5px 20px rgba(0, 0, 0, 0.2);
|
||||
overflow: hidden;
|
||||
animation: slideIn 0.3s ease-out forwards;
|
||||
}
|
||||
|
||||
@keyframes slideIn {
|
||||
from {
|
||||
opacity: 0;
|
||||
transform: translateY(20px);
|
||||
}
|
||||
to {
|
||||
opacity: 1;
|
||||
transform: translateY(0);
|
||||
}
|
||||
}
|
||||
|
||||
.header {
|
||||
display: flex;
|
||||
justify-content: space-between;
|
||||
align-items: center;
|
||||
padding: 12px 16px;
|
||||
border-bottom: 1px solid #eee;
|
||||
background-color: var(--ifm-color-primary-lighter);
|
||||
}
|
||||
|
||||
.header h3 {
|
||||
margin: 0;
|
||||
color: var(--ifm-color-primary-darkest);
|
||||
font-size: 16px;
|
||||
font-weight: 600;
|
||||
}
|
||||
|
||||
.closeButton {
|
||||
background: none;
|
||||
border: none;
|
||||
font-size: 24px;
|
||||
cursor: pointer;
|
||||
color: var(--ifm-color-primary-darkest);
|
||||
}
|
||||
|
||||
.feedbackTypeContainer {
|
||||
padding: 12px 16px;
|
||||
display: flex;
|
||||
gap: 16px;
|
||||
}
|
||||
|
||||
.radioLabel {
|
||||
display: flex;
|
||||
align-items: center;
|
||||
gap: 4px;
|
||||
cursor: pointer;
|
||||
}
|
||||
|
||||
.feedbackInput {
|
||||
width: 100%;
|
||||
padding: 12px 16px;
|
||||
border: none;
|
||||
border-top: 1px solid #eee;
|
||||
border-bottom: 1px solid #eee;
|
||||
resize: none;
|
||||
font-family: inherit;
|
||||
font-size: 14px;
|
||||
}
|
||||
|
||||
.feedbackInput:focus {
|
||||
outline: none;
|
||||
border-color: var(--ifm-color-primary);
|
||||
}
|
||||
|
||||
.submitButton {
|
||||
display: block;
|
||||
width: calc(100% - 32px);
|
||||
margin: 12px 16px;
|
||||
padding: 8px 0;
|
||||
background-color: var(--ifm-color-primary);
|
||||
color: white;
|
||||
border: none;
|
||||
border-radius: 4px;
|
||||
cursor: pointer;
|
||||
font-weight: 500;
|
||||
transition: background-color 0.3s;
|
||||
}
|
||||
|
||||
.submitButton:hover {
|
||||
background-color: var(--ifm-color-primary-dark);
|
||||
}
|
||||
|
||||
.successMessage {
|
||||
padding: 0 0 16px;
|
||||
}
|
||||
|
||||
.successMessage p {
|
||||
padding: 16px;
|
||||
margin: 0;
|
||||
text-align: center;
|
||||
color: #555;
|
||||
}
|
||||
|
||||
/* 响应式调整 */
|
||||
@media (max-width: 768px) {
|
||||
.feedbackWidget {
|
||||
width: 280px;
|
||||
}
|
||||
}
|
||||
|
||||
html[data-theme='dark'] .feedbackWidget {
|
||||
background-color: #2b3a56;
|
||||
color: #eee;
|
||||
border: 1px solid #3e4c66;
|
||||
}
|
||||
|
||||
html[data-theme='dark'] .header {
|
||||
background-color: #1b2440;
|
||||
border-bottom: 1px solid #3e4c66;
|
||||
}
|
||||
|
||||
html[data-theme='dark'] .header h3 {
|
||||
color: #eee;
|
||||
}
|
||||
|
||||
html[data-theme='dark'] .closeButton {
|
||||
color: #eee;
|
||||
}
|
||||
|
||||
html[data-theme='dark'] .feedbackInput {
|
||||
background-color: #2b3a56;
|
||||
color: #eee;
|
||||
border-color: #3e4c66;
|
||||
}
|
||||
|
||||
html[data-theme='dark'] .successMessage p {
|
||||
color: #ddd;
|
||||
}
|
||||
|
|
@ -1,73 +0,0 @@
|
|||
import React, { useState, useEffect } from 'react'
|
||||
import styles from './styles.module.css'
|
||||
|
||||
const ScrollButtons = () => {
|
||||
const [showTopButton, setShowTopButton] = useState(false)
|
||||
const [showBottomButton, setShowBottomButton] = useState(true)
|
||||
|
||||
useEffect(() => {
|
||||
const handleScroll = () => {
|
||||
const scrollTop = window.pageYOffset || document.documentElement.scrollTop
|
||||
const scrollHeight = document.documentElement.scrollHeight
|
||||
const clientHeight = document.documentElement.clientHeight
|
||||
|
||||
// 当页面滚动超过 300px 时显示回到顶部按钮
|
||||
setShowTopButton(scrollTop > 300)
|
||||
|
||||
// 当距离底部小于 50px 时隐藏跳转到底部按钮
|
||||
const isNearBottom = scrollHeight - (scrollTop + clientHeight) < 50
|
||||
setShowBottomButton(!isNearBottom)
|
||||
}
|
||||
|
||||
// 初始化时检查一次
|
||||
handleScroll()
|
||||
|
||||
window.addEventListener('scroll', handleScroll)
|
||||
return () => window.removeEventListener('scroll', handleScroll)
|
||||
}, [])
|
||||
|
||||
const scrollToTop = () => {
|
||||
window.scrollTo({
|
||||
top: 0,
|
||||
behavior: 'smooth',
|
||||
})
|
||||
}
|
||||
|
||||
const scrollToBottom = () => {
|
||||
window.scrollTo({
|
||||
top: document.documentElement.scrollHeight,
|
||||
behavior: 'smooth',
|
||||
})
|
||||
}
|
||||
|
||||
return (
|
||||
<div className={styles.scrollButtonsContainer}>
|
||||
{showTopButton && (
|
||||
<button
|
||||
className={`${styles.scrollButton} ${styles.scrollToTop}`}
|
||||
onClick={scrollToTop}
|
||||
title='回到顶部'
|
||||
aria-label='回到顶部'
|
||||
>
|
||||
<svg viewBox='0 0 24 24' width='24' height='24' fill='currentColor'>
|
||||
<path d='M7.41 15.41L12 10.83l4.59 4.58L18 14l-6-6-6 6z' />
|
||||
</svg>
|
||||
</button>
|
||||
)}
|
||||
{showBottomButton && (
|
||||
<button
|
||||
className={`${styles.scrollButton} ${styles.scrollToBottom}`}
|
||||
onClick={scrollToBottom}
|
||||
title='跳转到底部'
|
||||
aria-label='跳转到底部'
|
||||
>
|
||||
<svg viewBox='0 0 24 24' width='24' height='24' fill='currentColor'>
|
||||
<path d='M16.59 8.59L12 13.17 7.41 8.59 6 10l6 6 6-6z' />
|
||||
</svg>
|
||||
</button>
|
||||
)}
|
||||
</div>
|
||||
)
|
||||
}
|
||||
|
||||
export default ScrollButtons
|
||||
|
|
@ -1,68 +0,0 @@
|
|||
.scrollButtonsContainer {
|
||||
position: fixed;
|
||||
right: 110px;
|
||||
bottom: 30px;
|
||||
display: flex;
|
||||
flex-direction: column;
|
||||
gap: 10px;
|
||||
z-index: 9999;
|
||||
}
|
||||
|
||||
.scrollButton {
|
||||
width: 40px;
|
||||
height: 40px;
|
||||
border-radius: 50%;
|
||||
background-color: var(--ifm-color-primary);
|
||||
border: none;
|
||||
color: white;
|
||||
cursor: pointer;
|
||||
display: flex;
|
||||
align-items: center;
|
||||
justify-content: center;
|
||||
transition: all 0.3s ease;
|
||||
box-shadow: 0 2px 5px rgba(0, 0, 0, 0.2);
|
||||
}
|
||||
|
||||
.scrollButton:hover {
|
||||
transform: translateY(-2px);
|
||||
box-shadow: 0 4px 8px rgba(0, 0, 0, 0.2);
|
||||
background-color: var(--ifm-color-primary-darker);
|
||||
}
|
||||
|
||||
.scrollToTop {
|
||||
opacity: 0;
|
||||
animation: fadeIn 0.3s ease forwards;
|
||||
}
|
||||
|
||||
.scrollToTop svg {
|
||||
transition: transform 0.3s ease;
|
||||
}
|
||||
|
||||
.scrollToTop:hover svg {
|
||||
transform: translateY(-2px);
|
||||
}
|
||||
|
||||
.scrollToBottom {
|
||||
opacity: 1;
|
||||
animation: fadeIn 0.3s ease forwards;
|
||||
transition: opacity 0.3s ease, transform 0.3s ease;
|
||||
}
|
||||
|
||||
.scrollToBottom svg {
|
||||
transition: transform 0.3s ease;
|
||||
}
|
||||
|
||||
.scrollToBottom:hover svg {
|
||||
transform: translateY(2px);
|
||||
}
|
||||
|
||||
@keyframes fadeIn {
|
||||
from {
|
||||
opacity: 0;
|
||||
transform: translateY(10px);
|
||||
}
|
||||
to {
|
||||
opacity: 1;
|
||||
transform: translateY(0);
|
||||
}
|
||||
}
|
||||
|
|
@ -1,39 +0,0 @@
|
|||
import React, { useEffect } from 'react'
|
||||
import { useLocation } from '@docusaurus/router'
|
||||
|
||||
const ScrollMemory = () => {
|
||||
const location = useLocation()
|
||||
|
||||
useEffect(() => {
|
||||
// 当路由变化时,尝试恢复滚动位置
|
||||
const savedPosition = localStorage.getItem(`scroll_${location.pathname}`)
|
||||
if (savedPosition) {
|
||||
window.scrollTo({
|
||||
top: parseInt(savedPosition, 10),
|
||||
behavior: 'instant',
|
||||
})
|
||||
}
|
||||
|
||||
// 监听滚动事件,保存滚动位置
|
||||
const handleScroll = () => {
|
||||
const currentPosition =
|
||||
window.pageYOffset || document.documentElement.scrollTop
|
||||
localStorage.setItem(
|
||||
`scroll_${location.pathname}`,
|
||||
currentPosition.toString()
|
||||
)
|
||||
}
|
||||
|
||||
// 添加滚动事件监听器
|
||||
window.addEventListener('scroll', handleScroll)
|
||||
|
||||
// 组件卸载时移除事件监听器
|
||||
return () => {
|
||||
window.removeEventListener('scroll', handleScroll)
|
||||
}
|
||||
}, [location.pathname])
|
||||
|
||||
return null
|
||||
}
|
||||
|
||||
export default ScrollMemory
|
||||
|
|
@ -1,26 +0,0 @@
|
|||
import React from 'react'
|
||||
import styles from './styles.module.css'
|
||||
|
||||
const ScrollToBottom = () => {
|
||||
const scrollToBottom = () => {
|
||||
window.scrollTo({
|
||||
top: document.documentElement.scrollHeight,
|
||||
behavior: 'smooth',
|
||||
})
|
||||
}
|
||||
|
||||
return (
|
||||
<button
|
||||
className={styles.scrollToBottom}
|
||||
onClick={scrollToBottom}
|
||||
title='跳转到底部'
|
||||
aria-label='跳转到底部'
|
||||
>
|
||||
<svg viewBox='0 0 24 24' width='24' height='24' fill='currentColor'>
|
||||
<path d='M16.59 8.59L12 13.17 7.41 8.59 6 10l6 6 6-6z' />
|
||||
</svg>
|
||||
</button>
|
||||
)
|
||||
}
|
||||
|
||||
export default ScrollToBottom
|
||||
|
|
@ -1,32 +0,0 @@
|
|||
.scrollToBottom {
|
||||
position: fixed;
|
||||
right: 80px;
|
||||
bottom: 30px;
|
||||
width: 40px;
|
||||
height: 40px;
|
||||
border-radius: 50%;
|
||||
background-color: var(--ifm-color-primary);
|
||||
border: none;
|
||||
color: white;
|
||||
cursor: pointer;
|
||||
display: flex;
|
||||
align-items: center;
|
||||
justify-content: center;
|
||||
transition: all 0.3s ease;
|
||||
z-index: 100;
|
||||
box-shadow: 0 2px 5px rgba(0, 0, 0, 0.2);
|
||||
}
|
||||
|
||||
.scrollToBottom:hover {
|
||||
transform: translateY(-2px);
|
||||
box-shadow: 0 4px 8px rgba(0, 0, 0, 0.2);
|
||||
background-color: var(--ifm-color-primary-darker);
|
||||
}
|
||||
|
||||
.scrollToBottom svg {
|
||||
transition: transform 0.3s ease;
|
||||
}
|
||||
|
||||
.scrollToBottom:hover svg {
|
||||
transform: translateY(2px);
|
||||
}
|
||||
|
|
@ -48,9 +48,9 @@ html[data-theme='dark'] .docusaurus-highlight-code-line {
|
|||
background-color: #33416b;
|
||||
}
|
||||
.footer{
|
||||
height:450px;
|
||||
/* height:450px;
|
||||
position: relative;
|
||||
background: #1e1e1e;
|
||||
background: #1e1e1e; */
|
||||
padding:0px;
|
||||
}
|
||||
.container{
|
||||
|
|
@ -135,12 +135,33 @@ html[data-theme='dark'] .docusaurus-highlight-code-line {
|
|||
font-weight: 400;
|
||||
color: #bdc2d1;
|
||||
line-height: 28px;
|
||||
padding: 15px 0;
|
||||
text-align: center;
|
||||
background-color: #1b212c;
|
||||
padding:50px 0px;
|
||||
display: flex;
|
||||
align-items: center;
|
||||
justify-content: center;
|
||||
font-size: 17px;
|
||||
}
|
||||
.container .footer__copyright p{
|
||||
.container .footer__copyright .text{
|
||||
text-align: left;
|
||||
}
|
||||
.container .footer__copyright img{
|
||||
width: 300px;
|
||||
}
|
||||
.container .footer__copyright .text p:nth-child(2n+1){
|
||||
font-size: 22px;
|
||||
margin-left: 50px;
|
||||
margin-bottom: 10px!important;
|
||||
}
|
||||
.container .footer__copyright .text p{
|
||||
margin-bottom: 0px!important;
|
||||
max-width: 950px;
|
||||
margin-left: 50px;
|
||||
}
|
||||
.container .footer__copyright .text p a{
|
||||
color: #bdc2d1;
|
||||
margin-right: 25px;
|
||||
}
|
||||
.aa-Form{
|
||||
width: unset;
|
||||
|
|
|
|||
|
|
@ -1,28 +0,0 @@
|
|||
import React from 'react'
|
||||
import OriginalLayout from '@theme-original/Layout'
|
||||
import ExportPDFButton from '@site/src/components/ExportPDFButton'
|
||||
import ScrollButtons from '@site/src/components/ScrollButtons'
|
||||
import FeedbackWidget from '@site/src/components/FeedbackWidget'
|
||||
import AIChatButton from '@site/src/components/AIChatButton'
|
||||
import ScrollMemory from '../../components/ScrollMemory'
|
||||
import { useLocation } from '@docusaurus/router'
|
||||
|
||||
export default function Layout (props) {
|
||||
const location = useLocation()
|
||||
const showExportButton = !location.pathname.includes('search')
|
||||
|
||||
return (
|
||||
<>
|
||||
<OriginalLayout {...props} />
|
||||
<ScrollMemory />
|
||||
{showExportButton && (
|
||||
<>
|
||||
<ExportPDFButton fileName={`${props.title || 'document'}.pdf`} />
|
||||
<ScrollButtons />
|
||||
<FeedbackWidget />
|
||||
<AIChatButton />
|
||||
</>
|
||||
)}
|
||||
</>
|
||||
)
|
||||
}
|
||||

Binary file not shown.
|
After Width: | Height: | Size: 9.3 KiB |
|
|
@ -1,4 +0,0 @@
|
|||
{
|
||||
"label": "机器人(Bot)",
|
||||
"position": 8
|
||||
}
|
||||
|
|
@ -1,20 +0,0 @@
|
|||
---
|
||||
sidebar_label: 'bot安装'
|
||||
sidebar_position: 1
|
||||
---
|
||||
|
||||
# bot安装
|
||||
|
||||
Bot安装是进行bot安装和管理控制的重要模块,主要包括bot安装、安装查询、安装管理等功能。
|
||||
|
||||
在bot详情页,用户点击“安装此Bot”按钮后,可以看到该bot工作所需的各项权限信息。若用户同意授予bot所需的相关权限即可进行安装。用户可选择将bot安装到所有仓库(用户拥有的所有仓库)中,也可以选择指定的仓库进行安装。
|
||||
|
||||

|
||||
|
||||
在个人“设置”或者“仓库设置”中,用户可以看到目前已经安装的Bot情况,点击“配置”按钮可以对bot安装情况进行配置,点击“卸载”按钮可以进行卸载。
|
||||
|
||||

|
||||
|
||||
在bot安装配置页中,用户可以掌握该bot的安装位置和工作状态。若用户需要更改bot的工作仓库时,可以进行更改安装位置。bot的工作状态包括激活和挂起,用户可根据需要对bot的状态进行调整,将其挂起或者激活,会影响到bot对仓库数据的访问权限。
|
||||
|
||||

|
||||
|
|
@ -1,24 +0,0 @@
|
|||
---
|
||||
sidebar_label: 'bot市场'
|
||||
sidebar_position: 4
|
||||
---
|
||||
|
||||
# Bot市场
|
||||
|
||||
Bot市场是进行Bot分享与复用的重要模块,主要包括bot的搜索发现,详情查看等功能。
|
||||
|
||||
Bot市场主页中展示了目前所有已经上架市场的bot简要信息,包括bot的头像,名称,开发者,简介和安装次数等信息,用户可根据这些基本信息初步判断该bot是否符合自己的项目需求。
|
||||
|
||||
在bot市场主页中,用户可以选择指定的bot种类,筛选出特定分类的bot,在这个种类范围内进行搜索与选择。
|
||||
|
||||
此外,用户通过在搜索栏中输入关键字进行搜索,可检索出内容包含指定关键字的相关bot。
|
||||
|
||||
用户可结合种类筛选和关键字搜索缩小范围,在市场中快速找到符合项目相关需求的bot。
|
||||
|
||||

|
||||
|
||||
在bot市场页中,用户点击指定的bot卡片即可进入该bot的详情页。Bot的详情页包含bot的头像,名称,开发者,种类和详细介绍等信息,用户可在此掌握该bot的各项介绍,进一步判断是否将其安装到指定仓库中。
|
||||
|
||||

|
||||
|
||||
在bot详情页中,若用户认为该bot满足自己的项目需求,可点击“安装此Bot”按钮,了解该bot的权限信息,将其安装到指定的仓库中,关于安装的更多介绍可见“Bot安装”部分。
|
||||
|
|
@ -1,22 +0,0 @@
|
|||
---
|
||||
sidebar_label: 'bot开发'
|
||||
sidebar_position: 3
|
||||
---
|
||||
|
||||
# Bot开发
|
||||
|
||||
Bot开发是开发者进行bot注册的重要模块。
|
||||
|
||||
在个人“设置”中,用户可以看到目前已经注册的bot列表,点击对应bot的“编辑”按钮可以对已注册的bot进行配置;点击“Bot注册”按钮开始注册新的bot。
|
||||
|
||||

|
||||
|
||||
在注册页中,开发者需要填写bot注册的相关信息,包括bot的名称、Webhook 地址,详细介绍等,系统将对开发者输入的信息进行合法性校验,确保bot各项信息的完整性和有效性。此外,系统将自动生成bot的唯一标识,同时调用 GitLink 平台的相关接口生成bot的身份凭证信息,包括客户端密钥和私钥等。
|
||||
|
||||
开发者需通过这些身份信息结合平台接口进行bot身份认证后,调用相关接口完成bot的相关功能。
|
||||
|
||||
平台开发API链接(待完善):https://www.gitlink.org.cn/docs/api#introduction
|
||||
|
||||

|
||||
|
||||

|
||||
|
|
@ -1,23 +0,0 @@
|
|||
---
|
||||
sidebar_label: 'bot配置'
|
||||
sidebar_position: 2
|
||||
---
|
||||
|
||||
# Bot配置
|
||||
|
||||
Bot配置是开发者进行bot维护和配置的重要模块,主要包括bot基本信息维护、权限&订阅事件管理、高级选项配置等功能。
|
||||
|
||||
Bot的基本信息维护中,开发者可以看到bot的各项基本信息,并可以根据需要对bot的头像,名称,Webhook地址等进行修改。
|
||||
|
||||

|
||||
|
||||
Bot的权限&订阅事件管理中,开发者可根据对仓库资源的访问需要为bot分配不同的权限和等级,比如增加代码库权限,将拉取请求的写权限变为读权限等。开发者还能更改当前bot订阅的事件列表,比如订阅代码库推送,取消拉取请求分配订阅等,以实现bot功能的更新与升级。
|
||||
|
||||

|
||||
|
||||
|
||||
Bot高级选项配置中,开发者可以改变bot的公私有状态,从而影响到bot的使用范围。需要注意的是,公开状态下的bot在已有其他仓库安装的情况下不能变成私有。开发者可选择将bot上架到市场,需要填写上架信息,包括市场简介,主要功能,次要功能等各项信息。
|
||||
|
||||
开发者还能进行bot的删除和转让操作,发起转让意味着更改bot的所有权,需要输入接受者的用户名。在接受者确定接受后,即可完成bot的所有权变更,拒绝则会取消本次的转让操作。
|
||||
|
||||

|
||||
|
|
@ -1,13 +0,0 @@
|
|||
import React from 'react';
|
||||
import styles from './mybutton.module.css'; // 假设你有一个CSS模块文件来定义样式
|
||||
|
||||
const MyButton = ({ onClick, children, className = '' }) => (
|
||||
<button
|
||||
onClick={onClick}
|
||||
className={`${styles.myButton} ${className}`} // 使用CSS模块样式
|
||||
>
|
||||
{children}
|
||||
</button>
|
||||
);
|
||||
|
||||
export default MyButton;
|
||||
|
|
@ -1,21 +0,0 @@
|
|||
.myButton {
|
||||
background-color: #30a834; /* Green */
|
||||
border: none;
|
||||
color: #fff; /* 改为白色或其他与绿色背景对比明显的颜色 */
|
||||
padding: 15px 32px;
|
||||
text-align: center;
|
||||
text-decoration: none;
|
||||
display: inline-block;
|
||||
font-size: 16px;
|
||||
margin: 4px 2px;
|
||||
cursor: pointer;
|
||||
position: absolute;
|
||||
right: 0;
|
||||
/* 还可以添加其他样式,比如过渡效果、阴影等 */
|
||||
transition: background-color 0.3s ease; /* 背景色变化的过渡效果 */
|
||||
box-shadow: 0 4px 8px rgba(0, 0, 0, 0.1); /* 简单的阴影效果 */
|
||||
}
|
||||
|
||||
.myButton:hover {
|
||||
background-color: #288f2c; /* 鼠标悬停时改变背景色 */
|
||||
}
|
||||
|
|
@ -1,4 +0,0 @@
|
|||
{
|
||||
"label": "DevOps引擎(Engine)",
|
||||
"position": 6
|
||||
}
|
||||
|
|
@ -1,12 +0,0 @@
|
|||
---
|
||||
sidebar_label: '代码流水线'
|
||||
sidebar_position: 5
|
||||
---
|
||||
# 代码流水线
|
||||
可以通过代码的形式(YAML格式)来配置流水线,首先选择代码流水线和对应的分支:
|
||||
|
||||

|
||||
|
||||
编辑流水线代码,其流水线名称描述、触发器、全局参数、执行串行/并发和流水线编排等概念同图形流水线,具体描述如下:
|
||||
|
||||

|
||||
|
|
@ -1,15 +0,0 @@
|
|||
---
|
||||
sidebar_label: '参数配置'
|
||||
sidebar_position: 2
|
||||
---
|
||||
|
||||
# 参数配置
|
||||
|
||||
可在流水线中使用,实现动态参数配置;有字符串、数字、布尔三种类型。
|
||||
|
||||

|
||||
|
||||
|
||||
在流水线的配置中通过如下方式获取参数:
|
||||
|
||||

|
||||
|
|
@ -1,50 +0,0 @@
|
|||
---
|
||||
sidebar_label: '图形流水线'
|
||||
sidebar_position: 4
|
||||
---
|
||||
|
||||
# 图形流水线
|
||||
## 基本信息
|
||||
可以编辑流水线的名称、描述
|
||||
|
||||
同一仓库下的流水线名称不能重复
|
||||
|
||||

|
||||
|
||||
## 触发器
|
||||
注:流水线编排时,触发器要放在开始节点之前;目前一条流水线仅添加支持一个触发器
|
||||
|
||||
* 定时触发器cron:可通过填写cron表达式设置触发的具体时间
|
||||

|
||||
|
||||
* 事件触发器GitLink_Webhook:给出了常见的代码变更事件触发,包括推送代码、合并请求、创建标签
|
||||

|
||||
|
||||
## 全局参数
|
||||
|
||||
添加后可在当前流水线中使用
|
||||
|
||||

|
||||
|
||||
使用实例
|
||||
|
||||

|
||||
|
||||
## 并发执行
|
||||
|
||||

|
||||
|
||||
开启后,同一流水线可同时并发执行n个流水线实例(每触发一次我们得到一个流水线实例);
|
||||
|
||||

|
||||
|
||||
若未开启,则当前流水线实例执行中,后面的实例处于排队状态(最多可排队5个实例)。当前实例执行完成,下一个实例开始执行。
|
||||
|
||||

|
||||
|
||||
|
||||
## 流水线编排
|
||||
|
||||
每条流水线必须要有一个开始节点、结束节点,至少一个任务节点。支持串行编排和并行编排。
|
||||
|
||||
|
||||
|
|
@ -1,16 +0,0 @@
|
|||
---
|
||||
sidebar_label: '密钥设置'
|
||||
sidebar_position: 3
|
||||
---
|
||||
|
||||
# 密钥设置
|
||||
|
||||
将账号密码、密钥、证书等存放到密钥管理里,配置后可直接在流水线中使用,避免因直接填写引起的泄露风险。
|
||||
|
||||

|
||||
|
||||
使用示例
|
||||
|
||||
注:节点输入参数中,下拉选项为密钥类型,需要提前配置好密钥在流水线中选择使用
|
||||
|
||||

|
||||
|
|
@ -1,13 +0,0 @@
|
|||
---
|
||||
sidebar_label: '引擎简介'
|
||||
sidebar_position: 1
|
||||
---
|
||||
|
||||
# 引擎
|
||||
|
||||
引擎(Engine)是GitLink提供的一款DevOps工具,通过简单的节点编排来构建开发、测试、部署流水线,从而创建自动化的软件交付流程。
|
||||
它可以实现持续的代码集成,让开发者能尽早发现质量问题,快速定位修复,提升软件开发效率和质量;自动化的代码扫描、编译打包、单元测试,把研发团队从重复的工作中解放出来,聚焦到更有价值的事情上。
|
||||
|
||||

|
||||
|
||||
在引擎页面中,用户可以创建和编辑图形流水线或代码流水线、设置外部参数、管理密钥等操作。
|
||||
|
|
@ -1,10 +0,0 @@
|
|||
---
|
||||
sidebar_label: '执行记录查询'
|
||||
sidebar_position: 6
|
||||
---
|
||||
|
||||
# 执行记录查询
|
||||
|
||||
用户可以查看流水线的运行状态
|
||||
|
||||

|
||||
|
|
@ -1,74 +0,0 @@
|
|||
---
|
||||
sidebar_label: "介绍"
|
||||
label: "介绍"
|
||||
sidebar_position: 1
|
||||
slug: /
|
||||
---
|
||||
|
||||
# 关于GitLink
|
||||
GitLink(确实开源)是CCF官方指定的开源创新服务平台,旨在以“为开源创新服务”为使命,以“成为开源创新的汇聚地”为愿景,秉承“创新、开放、协作、共享”的价值观,致力于为大规模开源开放协同创新助力赋能,打造创新成果孵化和新工科人才培养的开源创新生态!
|
||||
|
||||

|
||||
|
||||
# 平台功能
|
||||
|
||||
- **分布式协作开发**:支持在线文件编辑、分支管理、贡献统计、仓库复刻、合并请求;
|
||||
- **一站式过程管理**:支持疑修、里程碑、通知提醒、标签归档、Wiki文档、组织管理;
|
||||
- **高效流水线运维**:提供轻量级工作流引擎,并支持自定义配置、静态扫描、制品构建;
|
||||
- **多层次代码分析**:支持代码溯源分析、许可证风险分析、开源漏洞检测和加固建议;
|
||||
- **多维度用户画像**:支持开发活动统计、贡献日历、能力建模、角色与专业定位分析。
|
||||
|
||||
# 帮助文档
|
||||
帮助文档有助于您全面了解GitLink平台,让我们一起为开源创新贡献力量!
|
||||
|
||||
<div class="row">
|
||||
<div class="col col--12">
|
||||
<section class="row list">
|
||||
<article class="col col--6 margin-bottom--lg">
|
||||
<a class="card padding--lg cardContainer" href="/快速开始/注册GitLink账号">
|
||||
<h2 class="text--truncate cardTitle" title="快速开始">快速开始</h2>
|
||||
<p>帮助用户快速注册使用平台[5个文档]</p>
|
||||
</a></article>
|
||||
<article class="col col--6 margin-bottom--lg">
|
||||
<a class="card padding--lg cardContainer" href="/代码库管理/仓库创建">
|
||||
<h2 class="text--truncate cardTitle" title="代码库管理">代码库管理</h2>
|
||||
<p>代码库使用及设置[8个文档]</p>
|
||||
</a></article>
|
||||
<article class="col col--6 margin-bottom--lg">
|
||||
<a class="card padding--lg cardContainer" href="/组织管理/组织简介">
|
||||
<h2 class="text--truncate cardTitle" title="组织管理">组织管理</h2>
|
||||
<p>组织使用及设置[5个文档]</p>
|
||||
</a></article>
|
||||
<article class="col col--6 margin-bottom--lg">
|
||||
<a class="card padding--lg cardContainer" href="/疑修/疑修简介">
|
||||
<h2 class="text--truncate cardTitle" title="疑修">疑修</h2>
|
||||
<p>疑修(Issue)使用及设置[7个文档]</p>
|
||||
</a></article>
|
||||
<article class="col col--6 margin-bottom--lg">
|
||||
<a class="card padding--lg cardContainer" href="/合并请求/合并请求简介">
|
||||
<h2 class="text--truncate cardTitle" title="合并请求">合并请求</h2>
|
||||
<p>合并请求(Pull Request)使用及设置[5个文档]</p>
|
||||
</a></article>
|
||||
<article class="col col--6 margin-bottom--lg">
|
||||
<a class="card padding--lg cardContainer" href="/DevOps引擎/引擎简介">
|
||||
<h2 class="text--truncate cardTitle" title="DevOps引擎">DevOps引擎</h2>
|
||||
<p>DevOps引擎(Engine)使用及设置[6个文档]</p>
|
||||
</a></article>
|
||||
<article class="col col--6 margin-bottom--lg">
|
||||
<a class="card padding--lg cardContainer" href="/维基/模板导入及导出">
|
||||
<h2 class="text--truncate cardTitle" title="维基">维基</h2>
|
||||
<p>维基(Wiki)使用及设置[2个文档]</p>
|
||||
</a></article>
|
||||
<article class="col col--6 margin-bottom--lg">
|
||||
<a class="card padding--lg cardContainer" href="/Bot市场/bot安装">
|
||||
<h2 class="text--truncate cardTitle" title="Bot市场">Bot市场</h2>
|
||||
<p>Bot市场使用及设置[4个文档]</p>
|
||||
</a></article>
|
||||
<article class="col col--6 margin-bottom--lg">
|
||||
<a class="card padding--lg cardContainer" href="/第三方服务/跨平台代码同步">
|
||||
<h2 class="text--truncate cardTitle" title="第三方服务">第三方服务</h2>
|
||||
<p>第三方服务使用及设置[3个文档]</p>
|
||||
</a></article>
|
||||
</section>
|
||||
</div>
|
||||
</div>
|
||||
|
|
@ -1,4 +0,0 @@
|
|||
{
|
||||
"label": "个人主页建站",
|
||||
"position": 13
|
||||
}
|
||||
|
|
@ -1,69 +0,0 @@
|
|||
---
|
||||
sidebar_label: '建站工具'
|
||||
sidebar_position: 2
|
||||
---
|
||||
# 个人建站工具
|
||||
|
||||
个人主页建站是一个免费的静态网页托管服务,可用于托管静态个人主页、个人博客等静态页面。个人建站不同工具如下
|
||||
|
||||
### Hugo工具
|
||||
|
||||
|
||||
使用Hugo 工具创建的仓库,需要将代码仓库中config.toml 文件中的 baseURL 修改
|
||||
将值改成 个人建站服务中显示的网站地址,
|
||||
例如: 现在有一个网站地址为 http://KingChan.gitlink.net
|
||||
那么 config.toml 中的 baseURL 应该为 http://KingChan.gitlink.net
|
||||

|
||||
|
||||
修改完毕后点击提交
|
||||

|
||||
提交完成后,开始部署
|
||||

|
||||
静态页面预览
|
||||

|
||||
|
||||
### jekyll工具
|
||||
|
||||
如果是jekyll项目:
|
||||
使用jekyll工具创建的个人站点,需要对代码仓库中 _config.yml文件中的 baseurl和url两个值进行修改,jekyll的配置文件比较特殊,需要根据 个人建站服务 中显示的 网站地址
|
||||
内容修改两个值。
|
||||
例如: 现在有一个网站地址为 http://KingChan.gitlink.net
|
||||
那么结果如下:
|
||||
baseurl: "/"
|
||||
url: "http://KingChan.gitlink.net"
|
||||
|
||||

|
||||
|
||||
修改完成后点击 提交变更
|
||||

|
||||
提交完成后,前往建站服务开始部署
|
||||

|
||||
|
||||

|
||||
|
||||
### hexo工具
|
||||
|
||||
如果是 hexo项目:
|
||||
使用Hexo工具创建的仓库,需要将代码仓库中_config.yml 文件中的 url修改
|
||||
将值改成 个人建站服务中显示的网站地址,
|
||||
例如: 现在有一个网站地址为 http://KingChan.gitlink.net
|
||||
|
||||
那么 _config.toml 中的 url应该为 http://KingChan.gitlink.net
|
||||
|
||||

|
||||
|
||||
修改完毕后提交变更
|
||||

|
||||
提交完成后,前往建站服务开始部署
|
||||
|
||||

|
||||
|
||||

|
||||
|
||||

|
||||
|
||||
### file 工具
|
||||
文档格式工具,使用该工具会部署所选中分支下的所有文件。
|
||||
|
||||
|
||||
注: 以上所有工具都可以使用 gh-pages 分支,在部署时选中 gh-pages 分支,则会按照文档格式工具部署,也就是部署分支下的所有文件。
|
||||
|
|
@ -1,50 +0,0 @@
|
|||
---
|
||||
sidebar_label: '建站流程'
|
||||
sidebar_position: 1
|
||||
---
|
||||
# 个人建站流程
|
||||
### 我的站点
|
||||
鼠标移动至右上角头像位置,点击设置进入我的设置界面
|
||||
|
||||

|
||||
|
||||
点击左测面板中 个人建站 - 我的站点
|
||||
|
||||

|
||||
|
||||
### 创建站点
|
||||
|
||||
在我的站点界面点击 新建站点 按钮,进入新建站点界面
|
||||
|
||||
在新建站点界面输入站点名称,此名称将在我的站点列表中展示
|
||||
|
||||
并且选择对应的建站工具与主题,我们为您提供了3种不同的工具,每个工具10种主题,一共30种供您挑选
|
||||
|
||||

|
||||
|
||||
填写完毕后,点击页面下方蓝色按钮: 创建站点
|
||||
|
||||

|
||||
|
||||
这样您就拥有了一个网站,并且有了一个代码仓库。
|
||||
|
||||
在仓库的 服务 一栏中 个人建站服务的操作界面,这里您可以查看一些您的站点状态、站点名称、网站地址、建站工具、建站时间
|
||||
|
||||
### 部署站点
|
||||
|
||||

|
||||
|
||||
点击去部署按钮,选择想要部署的分支后点击确定
|
||||
|
||||

|
||||
|
||||
等待程序运行一会儿后,会返回一些服务器部署信息给您
|
||||
|
||||
部署成功后您就可以访问站点了。点击网站地址就可以跳转
|
||||
|
||||

|
||||
|
||||
### 部署完成
|
||||
|
||||

|
||||
|
||||
|
|
@ -1,41 +0,0 @@
|
|||
---
|
||||
sidebar_label: 'WebIDE'
|
||||
sidebar_position: 9
|
||||
---
|
||||
|
||||
### **1. 语言服务**
|
||||
● 支持近 40 种语言的语法高亮
|
||||
● 支持 JavaScript/TypeScript、HTML、CSS、JSON、Markdown 的基于 LSP (Language Server Protocol) 语言特性功能,具备智能提示和大纲信息以及单文件内跳转。
|
||||
● 支持 Java、Go、Python、C++、Php 的基于 Tree Sitter 的在线语言服务能力,提供查看引用、符号搜索等特性
|
||||
|
||||
### **2. WebIDE 入口**
|
||||
从 Gitlink 仓库首页 ,点击Web IDE 按键即可进入
|
||||
<br/>
|
||||
|
||||
### **3. 分支**
|
||||
支持分支切换:点击左下角分支名即可切换分支。
|
||||
<br/>
|
||||
|
||||
### **4. 搜索**
|
||||
当前支持 Gitlink 仓库内代码搜索(支持单词匹配和文件过滤)和文件搜索。
|
||||
<br/>
|
||||
|
||||
### **5. 行高亮**
|
||||
支持单行或多行高亮,点击行号即可高亮行,按住 Shift 可选中连续多行。
|
||||
<br/>
|
||||
|
||||
### **6. Blame**
|
||||
支持查看单行 blame 信息,hover 后可展示详细信息。
|
||||
<br/>
|
||||
|
||||
### **7. Graph**
|
||||
支持 graph 视图,可查看分支 commits 历史以及每个 commit 详细文件变更,并支持文件 diff 查看。底部状态栏左下角点击 Git Graph 或在命令面板输入 View Git Graph,即可打开 Git Graph 视图。
|
||||
<br/>
|
||||
|
||||
### **8. WebSCM**
|
||||
可以在极速版新建分支,修改代码后在 SCM 面板看到变更文件列表,写完 commit message 后提交到 Gitlink 上。如果想快速修改一些文件可以不用在本地修改,直接通过极速版修改代码一次性提交。
|
||||
|
||||
### **9. 代码在线运行**
|
||||
● 集成了基于 skypack 的更加轻量的 CodeSwing 插件,可以在极速版去运行前端代码。
|
||||
● 集成了基于 Pyodide 的 Code-Runner-For-Web 插件,可以将 Python 的运行搬到浏览器上。
|
||||
<br/>
|
||||
|
|
@ -1,38 +0,0 @@
|
|||
---
|
||||
sidebar_label: 'Webhook'
|
||||
sidebar_position: 8
|
||||
---
|
||||
### **1. Webhook模块入口**
|
||||
在项目主页,点击“仓库设置”按键,再点击“网络钩子”按键,即可进入仓库的Webhook模块。
|
||||
<br/>
|
||||
|
||||
### **2. 添加Webhook**
|
||||
单击“添加Webhook”按键,可进入配置Webhook页面:
|
||||
|
||||
<br/>
|
||||
<br/>
|
||||
|
||||
### **3. 编辑Webhook**
|
||||
添加Webhook后,如下图所示,可以通过点击右侧”编辑“按键来对每个Webhook进行编辑操作。
|
||||
|
||||
<br/>
|
||||
|
||||
### **4. 删除Webhook**
|
||||
添加Webhook后,如下图所示,可以通过点击右侧”删除“按键来对每个Webhook进行删除操作。
|
||||
|
||||
<br/>
|
||||
|
||||
### **5. Webhook支持的事件类型**
|
||||
在GitLink中,Webhook支持的事件类型如下:
|
||||
- 推送:git推送到存储库
|
||||
- 代码库:创建或删除代码库
|
||||
- 创建:创建分支或标签
|
||||
- 删除:删除分支或标签
|
||||
- 合并请求:合并请求被打开、被关闭、被重新打开或被编辑
|
||||
- 合并请求分配:合并请求被分配或取消分配
|
||||
- 合并请求收入里程碑:合并请求被记录或取消记录于里程碑中
|
||||
- 合并请求被评论:合并请求评论被创建、编辑或删除
|
||||
- 合并请求标签:合并请求的标签被更新或清除
|
||||
- 合并请求审查:合并请求被批准、拒绝或提出审查意见,审查人员的修改,审查线程已解决或未解决
|
||||
- 合并请求被同步:合并请求被同步
|
||||
|
||||
|
|
@ -1,4 +0,0 @@
|
|||
{
|
||||
"label": "代码库管理",
|
||||
"position": 2
|
||||
}
|
||||
|
|
@ -1,11 +0,0 @@
|
|||
---
|
||||
sidebar_label: '仓库创建'
|
||||
sidebar_position: 1
|
||||
---
|
||||
### **1. 仓库创建入口**
|
||||
用户可以通过平台主页右上角的按键以及个人主页参与项目模块的“新建”按键来创建仓库。
|
||||
<br/>
|
||||
|
||||
### **2. 填写项目基本信息**
|
||||
进入新建项目页面后,如下图所示,填写拥有者、项目名称、项目标识等信息,单击”创建项目“按键即可完成创建。
|
||||
<br/>
|
||||
|
|
@ -1,11 +0,0 @@
|
|||
---
|
||||
sidebar_label: '仓库设置'
|
||||
sidebar_position: 2
|
||||
---
|
||||
### **1. 仓库设置入口**
|
||||
在仓库主页,点击“仓库设置”按键即可进入仓库设置模块。仓库设置中可以修改项目的基本信息、进行成员管理、配置webhook、设置分支以及安装bot。
|
||||
<br/>
|
||||
|
||||
### **2. 基本设置**
|
||||
进入仓库设置模块后,单击”基本设置“按键,进入基本设置模块,如下图所示,可以对项目的项目名称、项目标识、项目简介、项目类别、项目语言等基本信息进行修改。单击“转移”按键可以将仓库转移给其他用户和组织,单击“删除本仓库“按键可以删除本仓库。
|
||||
<br/>
|
||||
|
|
@ -1,4 +0,0 @@
|
|||
---
|
||||
sidebar_label: '代码提交'
|
||||
sidebar_position: 3
|
||||
---
|
||||
|
|
@ -1,4 +0,0 @@
|
|||
---
|
||||
sidebar_label: '分支管理'
|
||||
sidebar_position: 5
|
||||
---
|
||||
|
|
@ -1,23 +0,0 @@
|
|||
---
|
||||
sidebar_label: '成员管理'
|
||||
sidebar_position: 7
|
||||
---
|
||||
### **1. 成员管理入口**
|
||||
在仓库主页,点击“仓库设置”按键,再点击”成员管理“按键,即可进入成员管理模块,如下图所示。
|
||||
<br/>
|
||||
|
||||
### **2. 筛选、搜索项目成员**
|
||||
进入成员管理模块后,可以通过”角色筛选“按键来筛选项目成员类型,通过”搜索“按键可以检索具体的项目成员,如下图所示。
|
||||
<br/>
|
||||
|
||||
### **3. 筛选、搜索项目成员**
|
||||
进入成员管理模块后,可以通过”添加成员“按键来添加项目成员,左侧搜索框检索到具体用户并选中后,单击”添加成员“按键即可成功添加项目成员。
|
||||
<br/>
|
||||
|
||||
### **4. 项目成员权限管理**
|
||||
进入成员管理模块后,单击项目成员右侧的角色栏,可以选择赋予该名项目成员的权限等级,如下图所示。
|
||||
<br/>
|
||||
|
||||
### **5. 删除项目成员**
|
||||
进入成员管理模块后,单击项目成员右侧的”删除“按键,可以删除改名项目成员,如下图所示。
|
||||
<br/>
|
||||
|
|
@ -1,4 +0,0 @@
|
|||
---
|
||||
sidebar_label: '文件管理'
|
||||
sidebar_position: 4
|
||||
---
|
||||
|
|
@ -1,29 +0,0 @@
|
|||
---
|
||||
sidebar_label: '标签和发行版管理'
|
||||
sidebar_position: 6
|
||||
---
|
||||
### **1. 标签和发行版管理入口**
|
||||
在仓库主页,点击“代码库”按键,再点击”标签“按键,即可进入标签和发行版管理模块,如下图所示。
|
||||
<br/>
|
||||
|
||||
### **2. 删除标签**
|
||||
进入标签和发行版管理模块后,点击标签右侧“删除”按键,即可实现对标签的删除操作,如下图所示。
|
||||
<br/>
|
||||
|
||||
### **3. 查看发行版**
|
||||
进入标签和发行版管理模块后,点击”发行版”按键即可查看项目的发行版,如下图所示。
|
||||
<br/>
|
||||
|
||||
### **4. 创建发行版**
|
||||
进入标签和发行版管理模块后,点击标签右侧”创建发行版”按键,即可快速创建绑定该标签的发行版,如下图所示。
|
||||
<br/>
|
||||
|
||||
### **5. 修改发行版**
|
||||
进入标签和发行版管理模块后,点击发行版右侧的修改按键,即可进入发行版的修改页面,如下图所示。完成发行版的修改后,单击”保存发行版“按键即可保存修改内容。
|
||||
<br/>
|
||||
<br/>
|
||||
|
||||
### **6. 删除发行版**
|
||||
进入标签和发行版管理模块后,点击发行版右侧的删除按键,即可进入发行版的删除页面,如下图所示。
|
||||
<br/>
|
||||
|
||||
|
|
@ -1,4 +0,0 @@
|
|||
{
|
||||
"label": "合并请求(PR)",
|
||||
"position": 5
|
||||
}
|
||||
|
|
@ -1,6 +0,0 @@
|
|||
---
|
||||
sidebar_label: '代码评审'
|
||||
sidebar_position: 3
|
||||
---
|
||||
|
||||
# 代码评审
|
||||
|
|
@ -1,22 +0,0 @@
|
|||
---
|
||||
sidebar_label: '创建合并请求'
|
||||
sidebar_position: 2
|
||||
---
|
||||
|
||||
# 创建合并请求
|
||||
|
||||
1. 进入需要发起合并请求的项目的“**合并请求(PR)**”界面,点击上方的“**新建合并请求**”按钮后,进入合并请求发布界面,如下所示:
|
||||
|
||||

|
||||
|
||||

|
||||
|
||||
2. 选择需要合并的**源分支**和**目标分支**,其中源分支为已完成代码开发、需要合并其代码变更的分支,目标分支为要并入代码变更的分支,既可以是同一仓库下的其他分支(branch),也可以是被复刻的源仓库下的分支;
|
||||
|
||||
3. 选中分支后,填写本次合并请求的标题和描述内容,为审查者提供辅助理解本次合并请求的信息,进而加快合并请求审查过程(见 ***代码评审*** 一节);
|
||||
|
||||
4. 此外,用户还可以在右侧边栏中指定审查人员、添加里程碑、标记以及优先级(合并请求本质上是一个疑修,这些操作与疑修模块中的操作含义相同或相近,所以可以参照疑修章节中的介绍辅助理解);
|
||||
|
||||
5. 最后信息填写完毕后,点击底部的“**创建**”按钮即可提交您的第一个合并请求了🎉🎉🎉!
|
||||
|
||||

|
||||
|
|
@ -1,100 +0,0 @@
|
|||
---
|
||||
sidebar_label: '合并模式简介'
|
||||
sidebar_position: 4
|
||||
---
|
||||
|
||||
# 合并模式简介
|
||||
|
||||
在审阅人审查完开发者提交的代码变更后,便可以决定是否将这些提交合并进主分支`master`中。
|
||||
|
||||
然而,对于不同分支间的提交合并,存在多种合并模式,下图为GitLink中支持的合并模式,包括**合并请求**、**变基并合并**、**变基合并 --no-ff**以及**压缩提交并合并**四种。
|
||||
|
||||

|
||||
|
||||
1. **合并请求**
|
||||
|
||||
**合并请求**是最常用的合并模式,以下图为例,开发者在主分支`master`的提交3处拉取了开发分支`dev`,然后分别提交了A、B、C,然后在`master`分支上进行合并。
|
||||
|
||||
快进合并前:
|
||||
|
||||

|
||||
|
||||
快进合并后:
|
||||
|
||||

|
||||
|
||||
**注意**:可以看到,合并的过程就是直接把`master`指针移动到了`dev`指针处,这种合并被称为**快进(fast-forward)**,之所以出现这种情形是因为在提交3之后,`master`分支上没有新的提交,所以通过直接快进`master`指针就可以完成合并;但如果在`master`分支上也有新的提交,就需要进行实质性的合并了,如下面两幅图所示:
|
||||
|
||||
在合并前,`dev`分支上提交A之后、提交B之前,`master`分支上提交了4,这时合并`dev`分支就不能简单地快进移动,而是要比较两个分支上更改的内容,然后进行合并;
|
||||
|
||||
非快进合并前:
|
||||
|
||||

|
||||
|
||||
|
||||
合并之后,提交A、B、C都会按时间线加入`master`的提交记录中,并且会生成一个新的提交D,用于记录合并这件事情;此外,如果合并过程中发生了冲突,即两个分支对同一个文件进行了修改,则需要手动处理冲突;这种合并方式就是**非快进(no fast-forward)**,这也是**合并请求**模式下的默认方式!
|
||||
|
||||
非快进合并后:
|
||||
|
||||

|
||||
|
||||
为了方便理解,可以以线性方式查看合并后的`master`分支上的提交记录
|
||||
|
||||

|
||||
|
||||
**总结**:在**合并请求**模式下,默认采用**非快进**合并开发分支到`master`分支上,而**非快进**方式会生成一个特殊的提交用于记录此次合并事件!
|
||||
|
||||
2. **变基并合并**
|
||||
|
||||
从**合并请求**后`master`分支上的提交记录可以看出,两个分支的提交记录可能会交叉在一起,这可能会给后续开发带来困扰,而**变基并合并**可以解决这个问题。
|
||||
|
||||
**变基并合并**包括两个操作:**变基**、**合并**。首先是变基,以下图为例,`dev`分支是从提交3处拉取出来的,所以提交3就是`dev`的基,而变基操作就是改变`dev`的基,使其变为`master`分支上最新的一次提交。当然,变基过程中可能会出现冲突,则需要手动处理。
|
||||
|
||||
变基前:
|
||||
|
||||

|
||||
|
||||
变基后、合并前:
|
||||
|
||||

|
||||
|
||||
|
||||
`dev`分支变基之后,`master`分支就没有“更新”的提交了,所以此时进行合并,就得到了如下的结果
|
||||
|
||||
合并后:
|
||||
|
||||

|
||||
|
||||
**总结**:在**变基并合并**模式下,开发分支`dev`可以先进行变基操作,使其上的提交看起来都是在`master`分支最新的提交基础上进行的,然后再通过**快进**方式合并回`master`分支,从而起到整理提交记录的作用!
|
||||
|
||||
3. **变基合并 --no-ff**
|
||||
|
||||
因为**变基并合并**进行合并操作时,默认采用**快进**方式,这样在`master`分支上就没有一个特殊的提交用于记录这次合并事件,所以可以使用`--no-ff`(**no fast-forward**)选项申明采用**非快进**方式进行合并。
|
||||
|
||||
`--no-ff`合并前:
|
||||
|
||||

|
||||
|
||||
`--no-ff`合并后:
|
||||
|
||||

|
||||
|
||||
**总结**:通过`--no-ff`选项,可以显式声明在合并时采用**非快进**方式,这样就可以在`master`分支中添加一个记录合并事件的提交!
|
||||
|
||||
4. **压缩提交并合并**
|
||||
|
||||
在`dev`或者`feature`这样的开发分支中,开发者为了完成某个需求会进行多次提交,然而这些琐碎的提交信息在合并回`master`分支后,会使`master`上的提交记录臃肿混乱,所以需要在合并前,对这些提交进行压缩。如图所示,压缩操作是在`master`分支上进行的,本质是将`dev`分支上进行的变更施加到`master`分支维护的文件上,然后将这些修改用新的提交5保存,最后提交。
|
||||
|
||||
压缩前:
|
||||
|
||||

|
||||
|
||||
压缩后、提交前:
|
||||
|
||||

|
||||
|
||||
提交后:
|
||||
|
||||

|
||||
|
||||
**总结**:在合并前,先对开发分支上的琐碎提交进行压缩,可以使`master`分支上的提交信息更简洁,但是要注意,这种合并模式本质上是`master`分支一次性保存`dev`上的变更,并创建新的提交记录这些变更,所以提交者发生了变化!
|
||||
|
|
@ -1,6 +0,0 @@
|
|||
---
|
||||
sidebar_label: '合并请求关联疑修'
|
||||
sidebar_position: 5
|
||||
---
|
||||
|
||||
# 合并请求关联疑修
|
||||
|
|
@ -1,18 +0,0 @@
|
|||
---
|
||||
sidebar_label: '合并请求简介'
|
||||
sidebar_position: 1
|
||||
---
|
||||
|
||||
# 合并请求简介
|
||||
|
||||
**Pull Request**,即**合并请求**,是现代分布式软件开发中两个软件仓库间合并代码变更的一种方式,通常用于 fork 仓库向被 fork 仓库(源仓库)提交代码变更,同时也是为团队项目或开源项目做贡献的一种非常好的团队协作方式。当你拉取并修改了他人的仓库代码后,将你的修改告知给原仓库的管理者,请求其合并你的修改,这个过程就被称为 **合并请求**。
|
||||
|
||||
GitLink中的 **合并请求(PR)** 模块提供合并请求创建和管理两方面的功能:
|
||||
|
||||
- 一方面支持向源仓库或者同一个仓库其他分支创建(发起)代码合并请求;
|
||||
|
||||
- 另一方面也为仓库管理者对他人发送到本仓库的合并请求进行管理、审阅并最终确定是否纳入仓库。
|
||||
|
||||
如下图所示为合并请求(PR)管理模块:
|
||||
|
||||

|
||||
|
|
@ -1,4 +0,0 @@
|
|||
{
|
||||
"label": "平台公告",
|
||||
"position": 99
|
||||
}
|
||||
|
|
@ -1,4 +0,0 @@
|
|||
---
|
||||
sidebar_label: '平台公告'
|
||||
sidebar_position: 1
|
||||
---
|
||||
|
|
@ -1,4 +0,0 @@
|
|||
{
|
||||
"label": "快速开始",
|
||||
"position": 1
|
||||
}
|
||||
|
|
@ -1,24 +0,0 @@
|
|||
---
|
||||
sidebar_label: '创建第一个开源项目'
|
||||
sidebar_position: 2
|
||||
---
|
||||
|
||||
# 创建第一个开源项目
|
||||
|
||||
## 1. 新建项目
|
||||
|
||||
平台提供了“新建”按钮,用户可以通过点击快速从零开始创建新的公开或者私有项目。
|
||||
|
||||

|
||||
|
||||
## 2. 填写项目信息
|
||||
|
||||
填写项目基本信息。
|
||||
|
||||

|
||||
|
||||
## 3. 创建成功
|
||||
|
||||
点击创建项目,创建成功后进入项目主页。
|
||||
|
||||

|
||||
|
|
@ -1,92 +0,0 @@
|
|||
---
|
||||
sidebar_label: '导入GitHub等第三方Git项目'
|
||||
sidebar_position: 5
|
||||
---
|
||||
|
||||
# 导入GitHub等第三方Git项目
|
||||
|
||||
## 1. 导入项目
|
||||
|
||||
在首页选择**导入项目**
|
||||
|
||||

|
||||
|
||||
## 2. 填写信息
|
||||
|
||||
填写需要导入的第三方Git项目地址和项目信息,如果导入项目为私有仓库,则需输入目标平台用户token进行授权。
|
||||
|
||||

|
||||
|
||||
## 3. 授权验证
|
||||
|
||||
在使用GitLink平台导入其他平台(如GitHub、Gitee)的开源项目时,如果项目为私有,则无法通过正常途径导入,需要输入对应平台有权限的token值进行校验。
|
||||
|
||||

|
||||
|
||||
下面将列举一些典型开源平台的token获取方式。
|
||||
|
||||
### GitHub token获取方式
|
||||
|
||||
1. 登录GitHub账号
|
||||
|
||||
2. 访问用户头像下的settings菜单
|
||||
|
||||
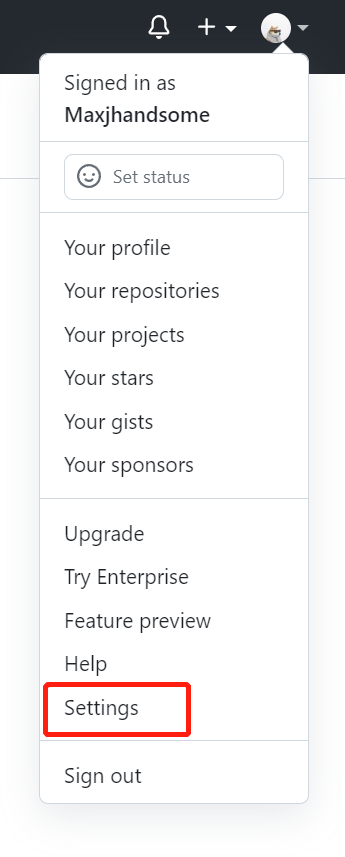
|
||||
|
||||
3. 访问最下方的Developer settings
|
||||
|
||||
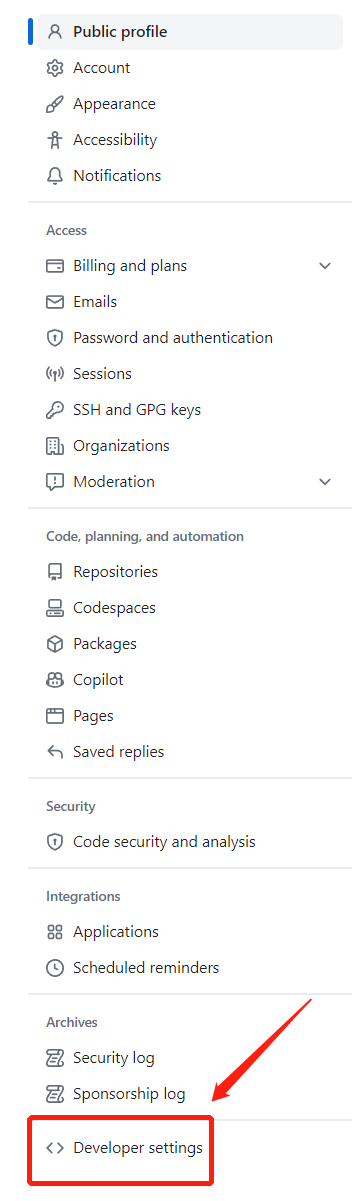
|
||||
|
||||
4. 在跳转页访问Token(classic),新建一个classic token(若已保存token)
|
||||
|
||||
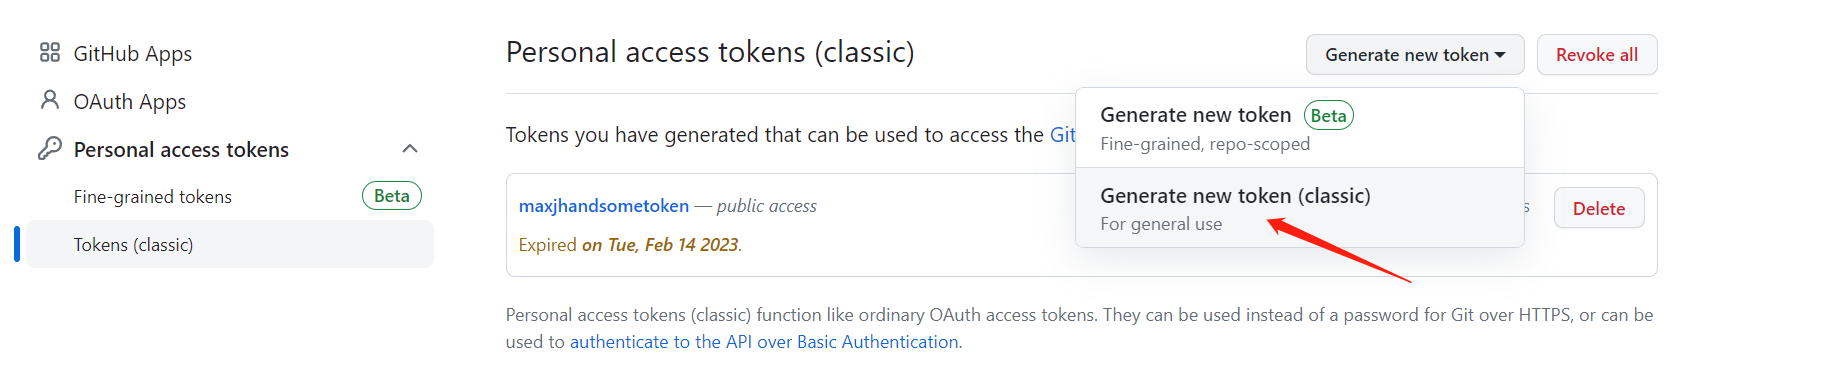
|
||||
|
||||
5. 在token配置页面,输入token用途,并确保该token已勾选“repo”选项,否则将导入失败
|
||||
|
||||
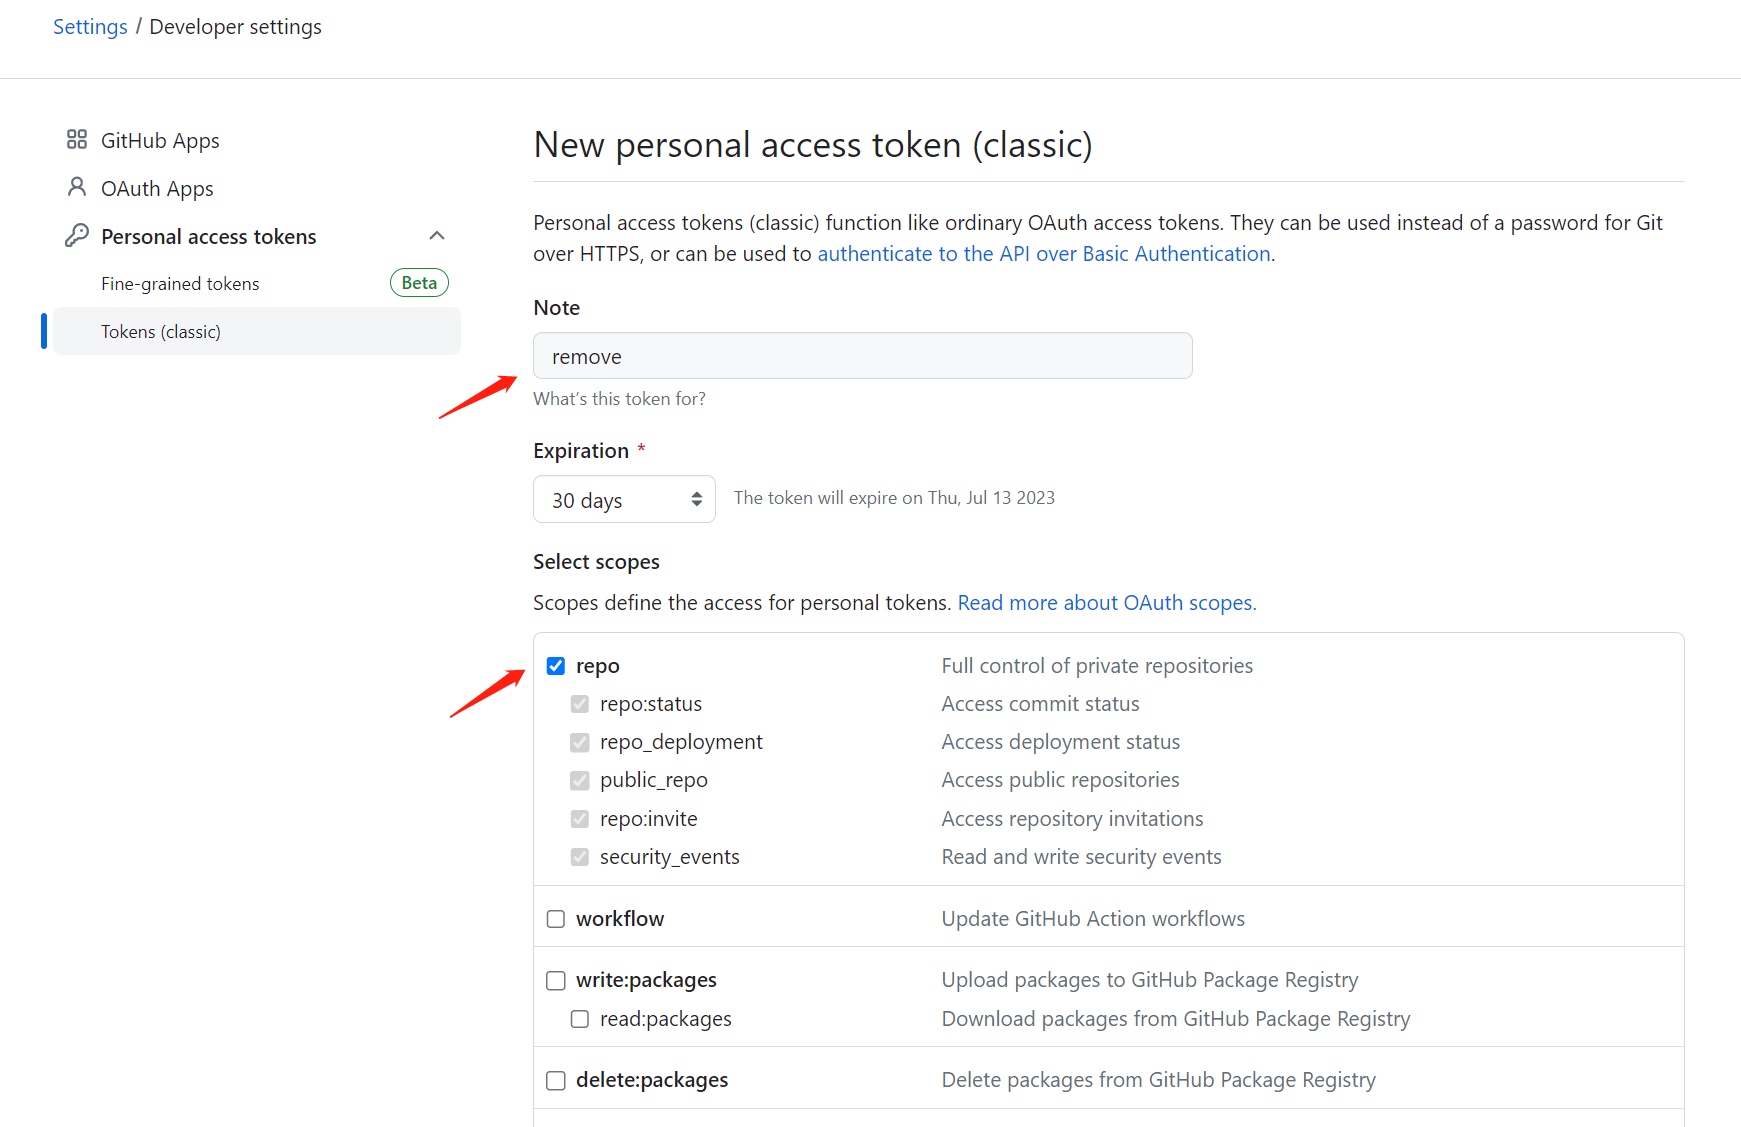
|
||||
|
||||
点击创建按钮
|
||||
|
||||
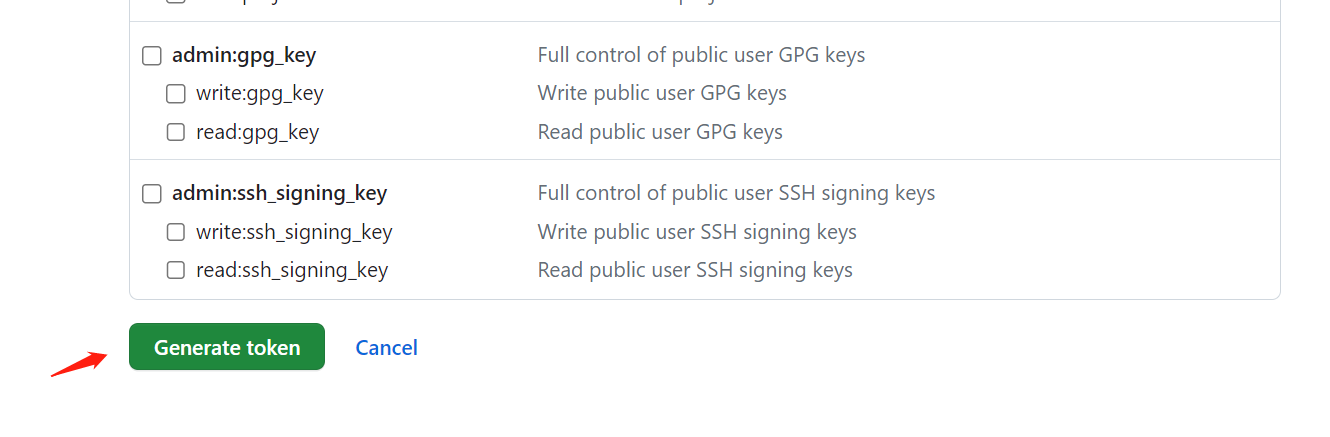
|
||||
|
||||
6. 复制该token
|
||||
|
||||
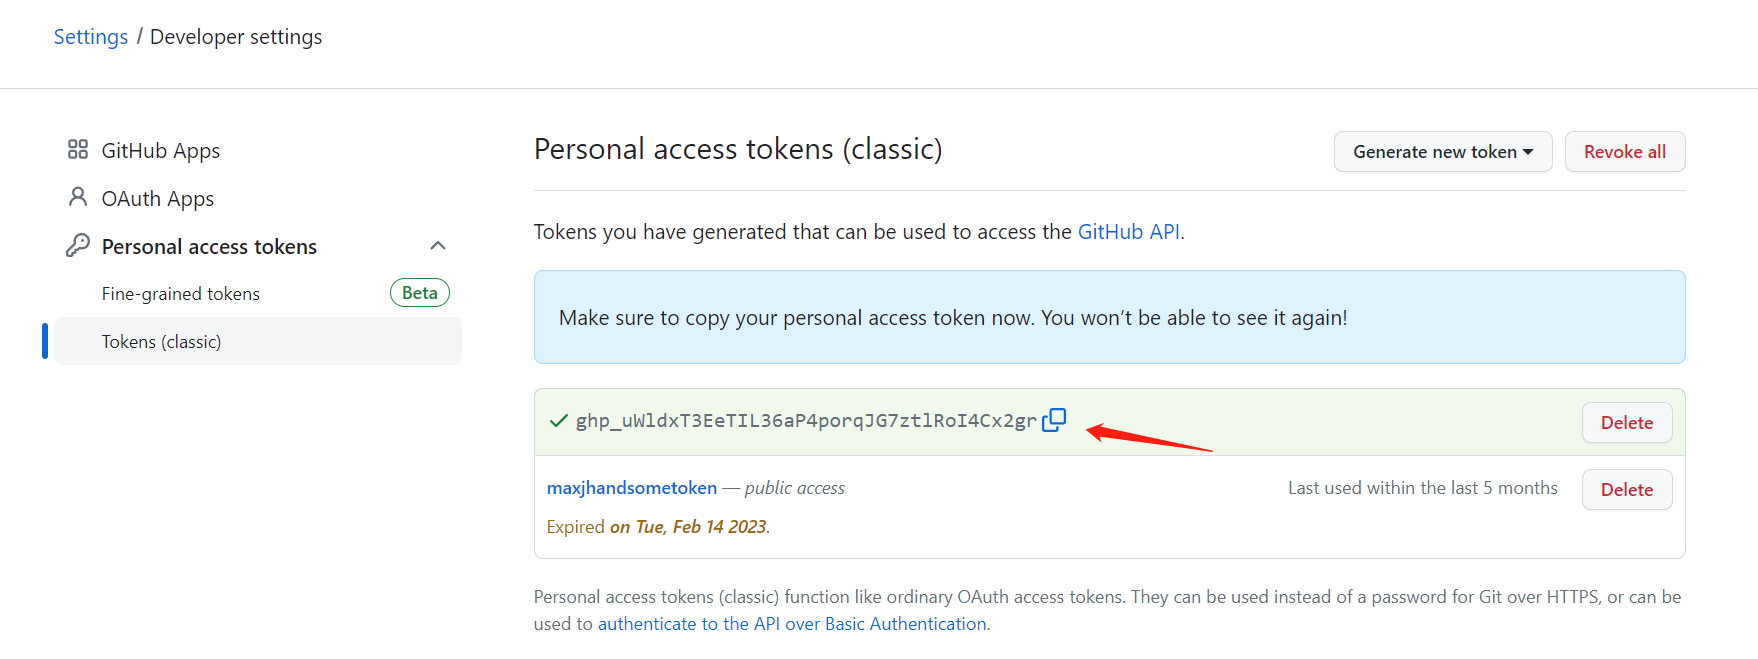
|
||||
|
||||
并将该token输入至GitLink导入项目认证填写框
|
||||
|
||||

|
||||
|
||||
### Gitee token获取方式
|
||||
|
||||
1. 登录Gitee账号
|
||||
|
||||
2. 访问用户头像下的设置菜单
|
||||
|
||||
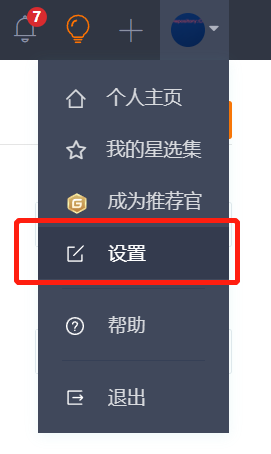
|
||||
|
||||
3. 访问“安全设置”栏下方“私人令牌”菜单
|
||||
|
||||
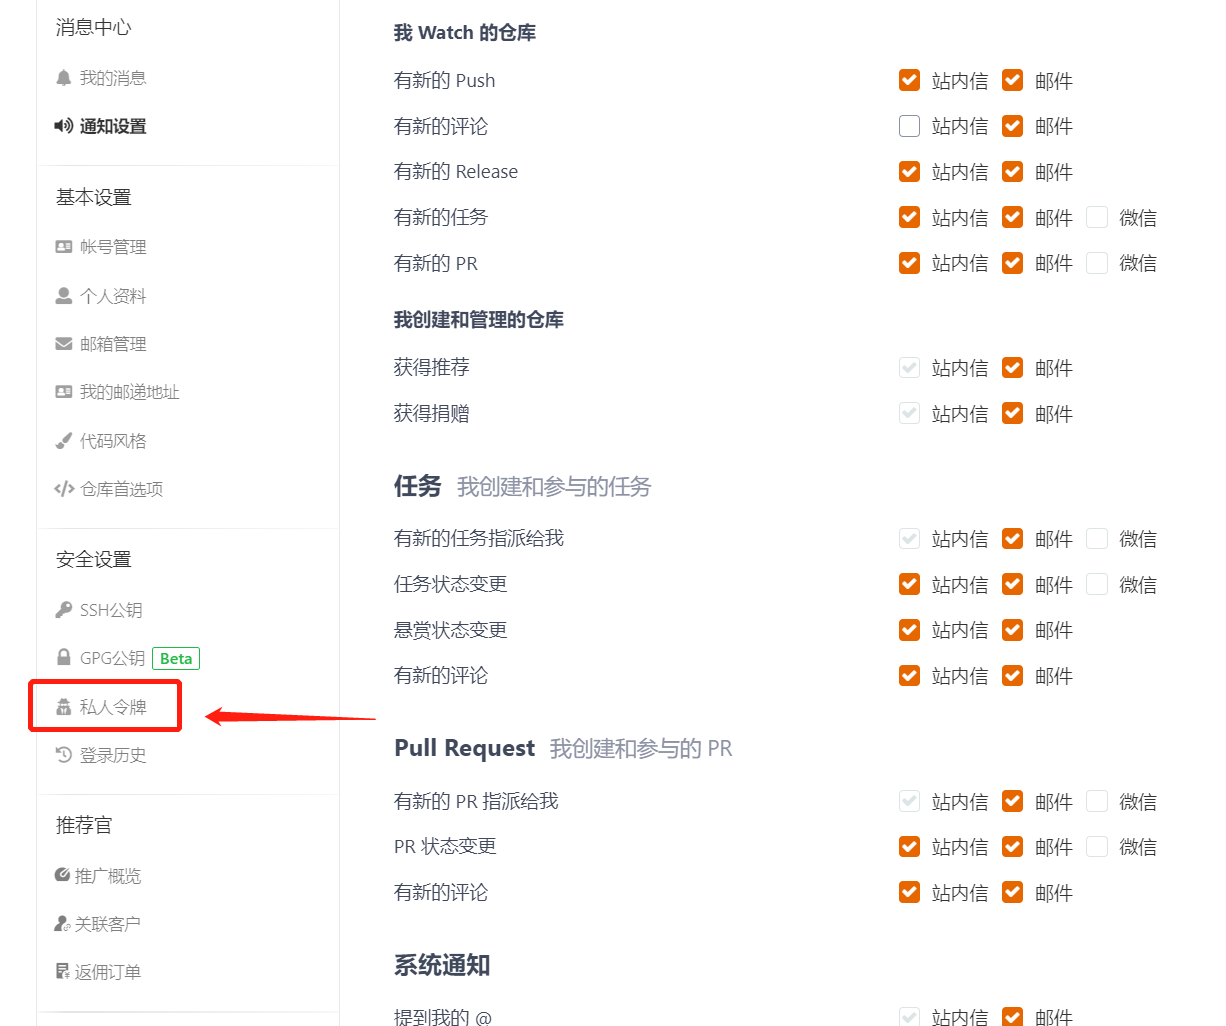
|
||||
|
||||
4. 点击生成新令牌,并在令牌生成页面配置令牌名称,并确保令牌已勾选“project”权限选项,并保存该令牌
|
||||
|
||||
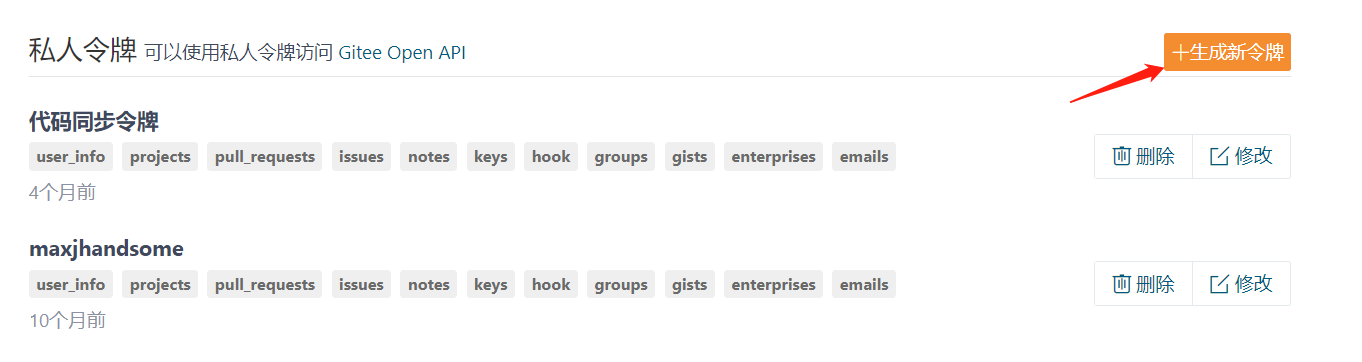
|
||||
|
||||
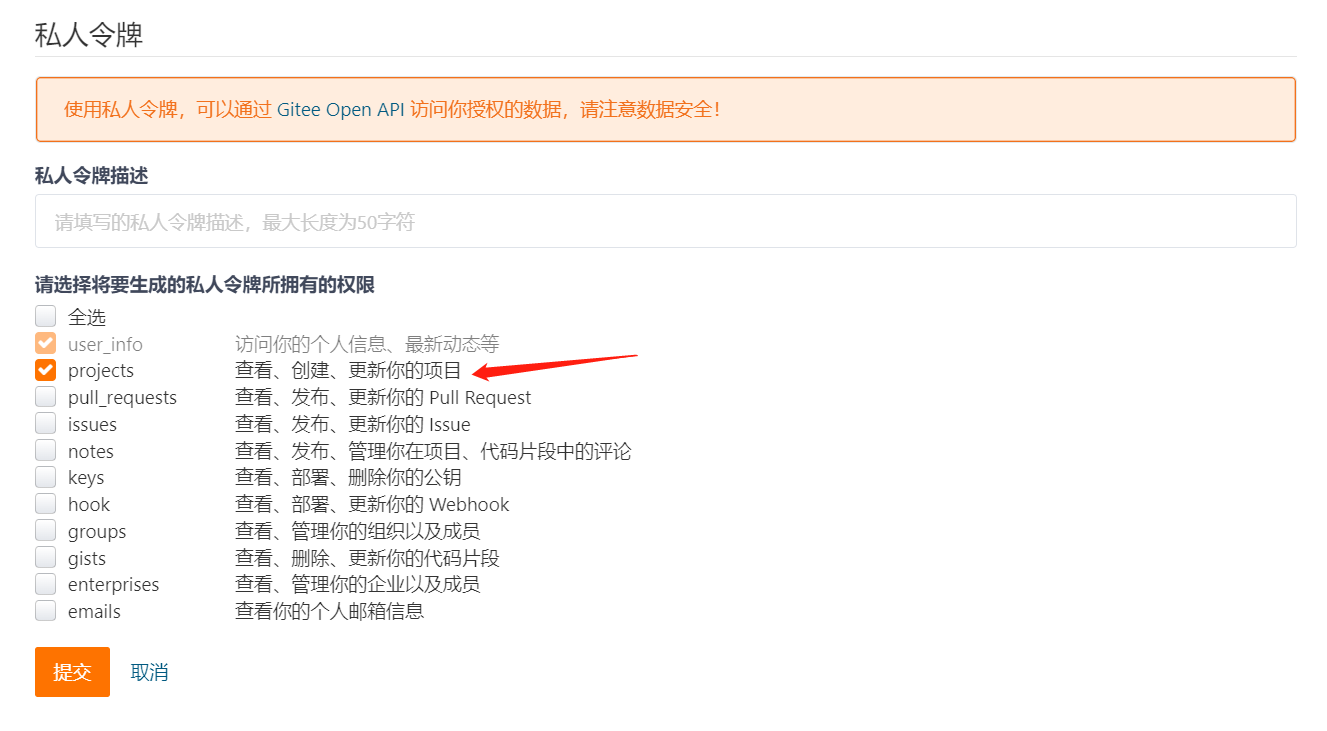
|
||||
|
||||
5. 在令牌生成成功的弹窗,复制该令牌,并将该token输入至GitLink导入项目认证填写框
|
||||
|
||||
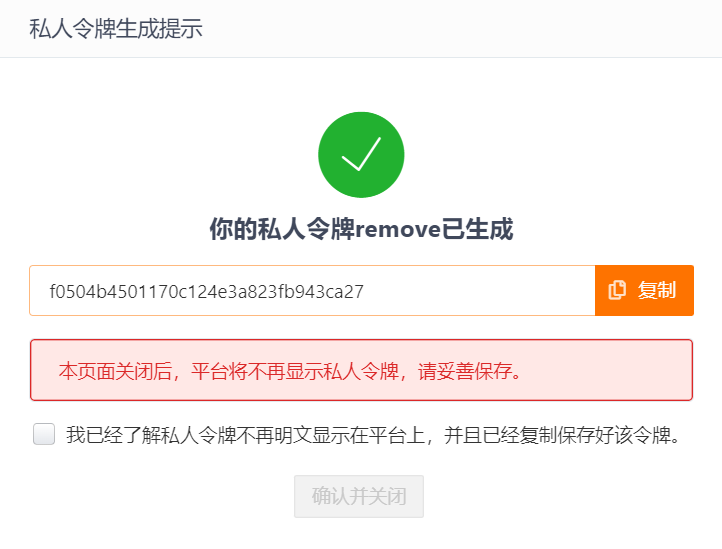
|
||||
|
||||
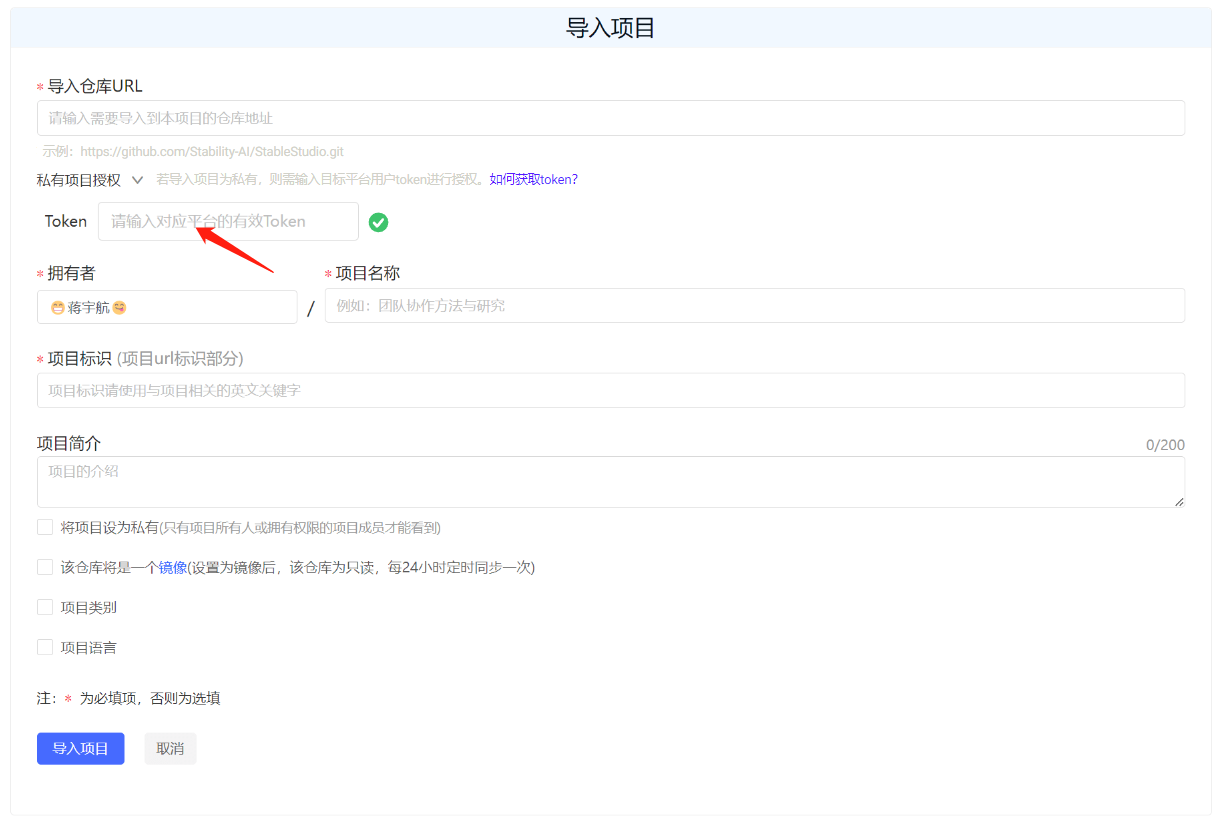
|
||||
|
||||
## 4. 导入成功
|
||||
|
||||
提示正在从第三方Git项目地址迁移
|
||||
|
||||

|
||||
|
||||
迁移成功则导入项目成功
|
||||
|
||||

|
||||
|
|
@ -1,22 +0,0 @@
|
|||
---
|
||||
sidebar_label: '提交第一行代码'
|
||||
sidebar_position: 3
|
||||
---
|
||||
|
||||
# 提交第一行代码
|
||||
|
||||
# 1. 编辑代码
|
||||
|
||||
点击编辑按钮,开始编辑代码。
|
||||
|
||||

|
||||
|
||||
# 2. 提交代码
|
||||
|
||||
在编辑框中编写代码,编写完成后填写变更信息后提交变更。
|
||||
|
||||

|
||||
|
||||
## 3. 代码更新成功
|
||||
|
||||
提交成功后代码代码更新成功。
|
||||
|
|
@ -1,44 +0,0 @@
|
|||
---
|
||||
sidebar_label: '搜索开源项目'
|
||||
sidebar_position: 4
|
||||
---
|
||||
|
||||
# 搜索开源项目
|
||||
|
||||
## 1. 开源项目页面介绍
|
||||
|
||||
项目”模块汇聚和管理了所有 GitLink 平台上的托管项目和镜像项目,用户可以输入项目名称关键字进行搜索,也可以根据项目类别对项目进行筛选。
|
||||
|
||||
进入“项目”模块,左侧列出了项目类型和项目类别。其中,项目类型主要包括开源托管项目和开源镜像项目两类。项目类别主要包括:云计算、大数据、区块链、物联网、机器学习、人工智能、智慧医疗、其他。
|
||||
|
||||

|
||||
|
||||
右侧展示了所有项目的基本信息,包括创建者、项目名、项目简介、浏览量、项目类别、更新时间、点赞数量、Fork 数量等信息,用户可以通过关键字搜索查找特定的项目,也可以按照更新时间、创建时间、Fork 数量、点赞数量等对项目进行排序。
|
||||
|
||||

|
||||
|
||||
用户点击项目名称,即可进入到项目详情,查看和参与开源项目开发。
|
||||
|
||||
## 2. 搜索开源项目
|
||||
|
||||
有两处搜索框可以搜索
|
||||
|
||||
### 开源项目搜索框
|
||||
|
||||
搜索项目:
|
||||
|
||||

|
||||
|
||||
搜索结果:
|
||||
|
||||

|
||||
|
||||
### 菜单栏搜索框
|
||||
|
||||
搜索项目:
|
||||
|
||||

|
||||
|
||||
搜索结果:
|
||||
|
||||

|
||||
|
|
@ -1,27 +0,0 @@
|
|||
---
|
||||
sidebar_label: '注册GitLink账号'
|
||||
sidebar_position: 1
|
||||
---
|
||||
|
||||
# 注册GitLink账号
|
||||
|
||||
## 1. 点击**立即注册**按钮
|
||||
|
||||

|
||||
|
||||
## 2. 填写注册信息
|
||||
|
||||
- 手机号注册
|
||||
|
||||

|
||||
|
||||
- 邮箱注册
|
||||
|
||||

|
||||
|
||||
## 3. 注册完成
|
||||
|
||||
填写完所需信息后点击注册,注册成功后则进入个人主页
|
||||
|
||||

|
||||
|
||||
|
|
@ -1,34 +0,0 @@
|
|||
---
|
||||
sidebar_label: 'GitLink服务协议'
|
||||
sidebar_position: 1
|
||||
---
|
||||
|
||||
尊敬的用户,您好!
|
||||
|
||||
欢迎使用GitLink平台,在您使用GitLink平台前,请您认真阅读并遵守《GitLink服务协议》(以下简称”本协议”),请您务必审慎阅读、充分理解协议的各条款内容。
|
||||
当您在注册过程中点击查看”看过并同意本服务协议”,按照注册流程成功注册为GitLink平台的用户即表示您已充分阅读、理解并完全接受本协议中的全部条款。您承诺接受并遵守本协议的约定,届时您不应以未阅读本协议的内容等理由,主张本协议无效或本协议中的某些条款无效,或要求撤销本协议。
|
||||
|
||||
## 一、GitLink平台权利和义务
|
||||
1. 尊重用户隐私:尊重用户隐私,保障用户隐私安全是GitLink平台的一项基本政策;
|
||||
2. 管理平台用户:GitLink平台依据国家法律、地方法律和国际法律等的标准以及本行业的规则来管理平台注册用户;
|
||||
3. 处理用户反馈:GitLink平台的相关人员会及时处理用户反馈的问题并给予及时回复。
|
||||
|
||||
## 二、用户权利和义务
|
||||
用户在使用GitLink平台的过程中,必须遵守如下原则:
|
||||
|
||||
1. 遵守中国的有关法律和法规;
|
||||
2. 使用网络服务不作非法用途;
|
||||
3. 不干扰和混乱网络服务;
|
||||
4. 遵守所有使用网络服务的网络协议、规定、程序和惯例;
|
||||
5. 不传输任何非法的、骚扰性的、中伤他人的、辱骂性的、恐吓性的、伤害性的、庸俗的,淫秽等信息资料;
|
||||
6. 不传输任何教唆他人构成犯罪行为的资料;
|
||||
7. 用户不得故意或者过失损害GitLink平台合法权利和利益。
|
||||
|
||||
## 三、关于责任
|
||||
鉴于网络服务的特殊性,用户同意GitLink团队有权在事先通知的情况下,变更、中断、升级部分网络服务。GitLink团队不担保网络服务不会中断,但承诺在用户可承受的时间内快速恢复服务,同时确保用户数据的安全性和可靠性。
|
||||
|
||||
## 四、服务条款的修改
|
||||
GitLink团队保留在必要时对本协议修改的权利,一旦发生变动,这些条款可由GitLink团队及时更新,且毋须另行通知,修改后的条款一旦在网页上公布即有效代替原来的服务条款。您可随时查阅最新版服务条款。
|
||||
|
||||
|
||||
本协议最终解释权归GitLink团队所有。
|
||||
|
|
@ -1,4 +0,0 @@
|
|||
{
|
||||
"label": "服务协议",
|
||||
"position": 100
|
||||
}
|
||||
|
|
@ -1,4 +0,0 @@
|
|||
{
|
||||
"label": "疑修(Issue)",
|
||||
"position": 4
|
||||
}
|
||||
|
|
@ -1,24 +0,0 @@
|
|||
---
|
||||
sidebar_label: '标记管理'
|
||||
sidebar_position: 6
|
||||
---
|
||||
|
||||
# 标记管理
|
||||
|
||||
在疑修的内容编辑页面可以根据疑修的类型对其设置标记,标记的存在方便了在疑修列表中筛选目标疑修,提高项目开发管理效率。<br/>
|
||||
GitLink默认疑修共有缺陷、功能、疑问、支持、任务、协助、搁置、文档、测试和重复共计十种标记类型,分别具有不同的含义和颜色标志:
|
||||
|
||||
- **缺陷:** 表示存在意外问题或错误;
|
||||
- **功能:** 表示新功能申请;
|
||||
- **疑问:** 表示存在疑惑;
|
||||
- **支持:** 表示特定功能或特定需求;
|
||||
- **任务:** 表示需要分配的任务;
|
||||
- **协助:** 表示需要社区用户协助;
|
||||
- **搁置:** 表示此问题暂时不会继续处理;
|
||||
- **文档:** 表示文档材料补充;
|
||||
- **测试:** 表示需要测试的需求;
|
||||
- **重复:** 表示已存在类似的疑修。
|
||||

|
||||
|
||||
另外,**项目成员**可以根据需求或习惯,进行标记含义或颜色标志的修改、新建标记和删除标记操作。
|
||||

|
||||
|
|
@ -1,13 +0,0 @@
|
|||
---
|
||||
sidebar_label: '疑修列表'
|
||||
sidebar_position: 4
|
||||
---
|
||||
# 疑修列表
|
||||
|
||||
对于项目开发过程中创建的所有疑修,可以在**疑修(Issue)** 界面统一查看,如下图所示为[确实开源](https://www.gitlink.org.cn/Gitlink/forgeplus)项目下的疑修列表。
|
||||
|
||||

|
||||
|
||||
+ **创建疑修**:在疑修列表界面下,点击“**创建疑修**”按钮,同样可以创建疑修,具体见 ***疑修创建*** 一节;
|
||||
|
||||
+ **筛选疑修**:疑修列表支持不同条件筛选,包括发布人、标记(见 ***标记管理*** 一节)、里程碑(见 ***里程碑管理*** 一节),负责人、状态和开始/结束日期等;同时支持关键字搜索,以及按多种排序规则对疑修进行排序。
|
||||
|
|
@ -1,21 +0,0 @@
|
|||
---
|
||||
sidebar_label: '疑修创建'
|
||||
sidebar_position: 2
|
||||
---
|
||||
# 疑修创建
|
||||
|
||||
1. 进入需要发布疑修的项目的“**代码库**”界面,点击上方的“**+疑修**”按钮即可进入疑修发布界面,如下图所示:
|
||||
|
||||

|
||||
|
||||
2. 开始创建疑修,包括疑修标题、内容,输入疑修内容时既可以采用简单灵活的[Markdown语法](https://markdown.com.cn/),同时可以点击上方的功能按钮;然后上传需要的附件内容;最后点击“**创建**”按钮提交你的第一个疑修🎉🎉🎉
|
||||
|
||||

|
||||
|
||||
3. 此外,在创建疑修时,可以通过符号 **`#`** 快速添加需要引用的疑修,进而为当前疑修提供辅助的信息;如下图所示,键入 **`#`** 后会弹出可引用的疑修列表,通过鼠标下滑或者键盘输入疑修编号选择需要引用的疑修后,会自动添加引用疑修的链接🔗
|
||||
|
||||

|
||||
|
||||

|
||||
|
||||
|
||||
|
|
@ -1,19 +0,0 @@
|
|||
---
|
||||
sidebar_label: '疑修状态变更'
|
||||
sidebar_position: 3
|
||||
---
|
||||
# 疑修状态变更
|
||||
|
||||
**疑修**本质上是开发任务,而开发任务随着开发活动的进行,其状态也会发生改变,而“**状态**”便是用于跟踪记录开发活动的变更。如图所示,GitLink中疑修的**状态**包括“新增”、“正在解决”、“已解决”、“关闭”和“拒绝“五类,用于表示开发任务的处理进度。
|
||||
|
||||

|
||||
|
||||
+ **新增**:新创建的疑修默认状态为“新增”;
|
||||
|
||||
+ **正在解决**:若已创建的疑修处在解决过程中,此时可将疑修状态修改为“正在解决”;
|
||||
|
||||
+ **已解决**:疑修被开发者解决,此时可将其状态改为“已解决”✅;
|
||||
|
||||
+ **关闭**:已被解决或者没有必要继续开启的疑修,可被设置为“关闭”;
|
||||
|
||||
+ **拒绝**:若被指派解决疑修的开发者拒绝处理该疑修,则可把疑修设置为“拒绝”状态❌。
|
||||
|
|
@ -1,17 +0,0 @@
|
|||
---
|
||||
sidebar_label: '疑修简介'
|
||||
sidebar_position: 1
|
||||
---
|
||||
# 疑修简介
|
||||
|
||||
**疑修(Issue)** 管理模块主要为项目组成员提供**开发任务**发布、指派、跟踪等功能服务。
|
||||
|
||||

|
||||
|
||||
**说明事项**
|
||||
|
||||
1. **疑修**是一个可以追踪开发任务进度的帖子,因此支持参与者回复与评论等功能,见 ***评论及操作记录*** 一节;
|
||||
|
||||
2. **疑修**的默认类型(标记)包括缺陷、功能、任务、支持、周报等,具体见 ***标记管理*** 一节;
|
||||
|
||||
3. 可以为**疑修**设置开始和结束时间,并指定负责解决该任务的负责人,在疑修截止日期的前一天,系统将自动为任务的发布者和被指派人发送提醒消息。
|
||||
Some files were not shown because too many files have changed in this diff Show More
Loading…
Reference in New Issue