Compare commits
62 Commits
| Author | SHA1 | Date |
|---|---|---|
 chroe
chroe
|
ea1868cabb | |
 yetja yetja
|
af3b0d4130 | |
|
yetja
|
854ce5dc61 | |
|
chroe
|
9ba83dfee7 | |
|
chroe
|
aa5b252d75 | |
|
Martin
|
7f9acfa1fb | |
|
Martin
|
5fe686eccc | |
|
Martin
|
1a36086f21 | |
|
Martin
|
1c16be2091 | |
|
yetja
|
6874fb1305 | |
|
yetja
|
3aacd558a2 | |
|
chroe
|
ed2aa77d4a | |
|
chroe
|
3815773f17 | |
|
chroe
|
421e56e3b3 | |
|
chroe
|
1b85f034a0 | |
|
chroe
|
213b6dd8bd | |
|
chroe
|
beb3423684 | |
|
chroe
|
3f71c92c72 | |
|
chroe
|
cb5617af8a | |
|
chroe
|
0175015623 | |
|
chroe
|
9ac7330111 | |
|
chroe
|
48dd5e7bf2 | |
|
yetja
|
e4cbb3cf06 | |
|
yetja
|
f48410d269 | |
|
chroe
|
72f3f9f7b0 | |
|
white-yj8109
|
d6128222eb | |
|
chroe
|
27db06bffd | |
|
chroe
|
ba7fcd6d38 | |
|
chroe
|
51c24b1845 | |
|
chroe
|
681ebed03f | |
|
chroe
|
540c28a1bc | |
|
yetja
|
1b40c6a95f | |
|
chroe
|
5dd2325b51 | |
|
chroe
|
7f8127b4a3 | |
|
chroe
|
a7134a79a1 | |
|
chroe
|
74e8441164 | |
|
yetja
|
832b2beb42 | |
 chroe chroe
|
c7f93650d7 | |
|
yetja
|
8030f35a9e | |
|
yetja
|
c9f87633d8 | |
|
yetja
|
beacfa3bce | |
|
yetja
|
20a6298f08 | |
|
yetja
|
c054e148b6 | |
|
yetja
|
9ab4e58543 | |
|
yetja
|
e67814acd6 | |
|
yetja
|
388d1e069e | |
|
yetja
|
a0437ffb2b | |
|
yetja
|
1cf14f70c3 | |
|
yetja
|
f46e9f1f6d | |
|
yetja
|
cce1c6f453 | |
|
yetja
|
f37cd92993 | |
|
yetja
|
012175b64b | |
|
yetja
|
38cf6d525e | |
|
yetja
|
3e7a68edd9 | |
|
yetja
|
2a983f0ca0 | |
|
yetja
|
737973cd53 | |
|
yetja
|
abdab34451 | |
|
yetja
|
44dd66b1c3 | |
|
yetja
|
9c3f532177 | |
|
chroe
|
2c9394c6ef | |
|
chroe
|
c866ec8206 | |
|
chroe
|
7035abf6cf |
|
|
@ -12,51 +12,20 @@ workflow:
|
|||
- ref: start
|
||||
name: 开始
|
||||
task: start
|
||||
- ref: git_clone_0
|
||||
name: git clone
|
||||
task: git_clone@1.2.9
|
||||
input:
|
||||
username: ((ganshihao21.ganshihao21_user))
|
||||
password: ((ganshihao21.ganshihao21))
|
||||
remote_url: '"https://gitlink.org.cn/ganshihao21/reposync.git"'
|
||||
ref: '"refs/heads/master"'
|
||||
commit_id: '""'
|
||||
depth: 1
|
||||
needs:
|
||||
- start
|
||||
- ref: docker_image_build_0
|
||||
name: docker镜像构建
|
||||
task: docker_image_build@1.6.0
|
||||
input:
|
||||
docker_username: ((nudt_devops.nudt_devops))
|
||||
docker_password: ((nudt_devops.nudt_devops))
|
||||
image_name: '"registry.cn-guangzhou.aliyuncs.com/nudt_devops/reposync_group5"'
|
||||
image_tag: '"latest"'
|
||||
registry_address: '"registry.cn-guangzhou.aliyuncs.com"'
|
||||
docker_file: '"Dockerfile"'
|
||||
docker_build_path: '"."'
|
||||
workspace: git_clone_0.git_path
|
||||
image_push: true
|
||||
build_args: '""'
|
||||
needs:
|
||||
- git_clone_0
|
||||
- ref: ssh_cmd_0
|
||||
name: ssh执行命令
|
||||
task: ssh_cmd@1.1.1
|
||||
input:
|
||||
ssh_pass: ((ssh_key.ssh_key))
|
||||
ssh_ip: '"47.96.164.145"'
|
||||
ssh_port: '"22"'
|
||||
ssh_user: '"root"'
|
||||
ssh_cmd: '"docker stop abc_group5 && docker rm abc_group5 && docker pull
|
||||
registry.cn-guangzhou.aliyuncs.com/nudt_devops/reposync_group5:latest &&
|
||||
docker run -d -p 3000:3000 --name abc_group5
|
||||
registry.cn-guangzhou.aliyuncs.com/nudt_devops/reposync_group5:latest"'
|
||||
needs:
|
||||
- docker_image_build_0
|
||||
- ref: end
|
||||
name: 结束
|
||||
task: end
|
||||
needs:
|
||||
- ssh_cmd_0
|
||||
- ref: ssh_cmd_0
|
||||
name: ssh执行命令
|
||||
task: ssh_cmd@1.1.1
|
||||
input:
|
||||
ssh_pass: ((yetja.ECS_PASS))
|
||||
ssh_ip: '"39.108.139.73"'
|
||||
ssh_port: '"22"'
|
||||
ssh_user: '"root"'
|
||||
ssh_cmd: "\"echo 'helloworld'\""
|
||||
needs:
|
||||
- start
|
||||
|
||||
|
|
|
|||
|
|
@ -0,0 +1,56 @@
|
|||
version: 2
|
||||
name: 构建部署
|
||||
description: "代码提交自动触发构建部署"
|
||||
global:
|
||||
concurrent: 1
|
||||
trigger:
|
||||
webhook: gitlink@1.0.0
|
||||
event:
|
||||
- ref: push
|
||||
ruleset-operator: AND
|
||||
workflow:
|
||||
- ref: start
|
||||
name: 开始
|
||||
task: start
|
||||
- ref: git_clone_0
|
||||
name: git clone
|
||||
task: git_clone@1.2.9
|
||||
input:
|
||||
remote_url: '"https://gitlink.org.cn/chroe/gitlink_help_center.git"'
|
||||
ref: '"refs/heads/master"'
|
||||
commit_id: '""'
|
||||
depth: 1
|
||||
needs:
|
||||
- start
|
||||
- ref: docker_image_build_0
|
||||
name: docker镜像构建
|
||||
task: docker_image_build@1.6.0
|
||||
input:
|
||||
docker_username: ((aliyun_docker.docker_username))
|
||||
docker_password: ((aliyun_docker.docker_password))
|
||||
image_name: '"crpi-r6c0crt00jo9rvaq.cn-hangzhou.personal.cr.aliyuncs.com/chroe/gitlink_help_center"'
|
||||
image_tag: '"latest"'
|
||||
registry_address: '"crpi-r6c0crt00jo9rvaq.cn-hangzhou.personal.cr.aliyuncs.com"'
|
||||
docker_file: '"Dockerfile"'
|
||||
docker_build_path: '"."'
|
||||
workspace: git_clone_0.git_path
|
||||
image_push: true
|
||||
build_args: '""'
|
||||
needs:
|
||||
- git_clone_0
|
||||
- ref: ssh_cmd_0
|
||||
name: ssh部署到服务器
|
||||
task: ssh_cmd@1.1.1
|
||||
input:
|
||||
ssh_pass: ((deploy_server.server_password))
|
||||
ssh_ip: '"121.41.210.165"'
|
||||
ssh_port: '"22"'
|
||||
ssh_user: '"root"'
|
||||
ssh_cmd: '"docker stop gitlink_help_center || true && docker rm gitlink_help_center || true && docker pull crpi-r6c0crt00jo9rvaq.cn-hangzhou.personal.cr.aliyuncs.com/chroe/gitlink_help_center:latest && docker run -d -p 3000:3000 -e GITLINK_PASS=lhz135874123 --name gitlink_help_center --restart unless-stopped crpi-r6c0crt00jo9rvaq.cn-hangzhou.personal.cr.aliyuncs.com/chroe/gitlink_help_center:latest"'
|
||||
needs:
|
||||
- docker_image_build_0
|
||||
- ref: end
|
||||
name: 结束
|
||||
task: end
|
||||
needs:
|
||||
- ssh_cmd_0
|
||||
10
Dockerfile
10
Dockerfile
|
|
@ -1,10 +1,12 @@
|
|||
FROM node:18-alpine
|
||||
FROM crpi-r6c0crt00jo9rvaq.cn-hangzhou.personal.cr.aliyuncs.com/chroe/node:20-alpine
|
||||
LABEL maintainer="yuankaifneg <2894340009@qq.com>"
|
||||
|
||||
WORKDIR /gitlink_help_center
|
||||
|
||||
COPY ./ /gitlink_help_center/
|
||||
|
||||
RUN yarn install
|
||||
RUN npm run build -- --locale zh-cn
|
||||
CMD ["npm", "run", "serve"]
|
||||
RUN npm install --force
|
||||
RUN npm install express --save --force
|
||||
RUN npm install cheerio@1.0.0-rc.12 --save --force
|
||||
RUN npm run build
|
||||
CMD ["node", "server.js"]
|
||||
|
|
|
|||
|
|
@ -77,12 +77,12 @@ Bot安装是进行bot安装和管理控制的重要模块,主要包括bot安
|
|||
|
||||
在bot详情页,用户点击“安装此Bot”按钮后,可以看到该bot工作所需的各项权限信息。若用户同意授予bot所需的相关权限即可进行安装。用户可选择将bot安装到所有仓库(用户拥有的所有仓库)中,也可以选择指定的仓库进行安装。
|
||||
|
||||

|
||||

|
||||
|
||||
在个人“设置”或者“仓库设置”中,用户可以看到目前已经安装的Bot情况,点击“配置”按钮可以对bot安装情况进行配置,点击“卸载”按钮可以进行卸载。
|
||||
|
||||

|
||||

|
||||
|
||||
在bot安装配置页中,用户可以掌握该bot的安装位置和工作状态。若用户需要更改bot的工作仓库时,可以进行更改安装位置。bot的工作状态包括激活和挂起,用户可根据需要对bot的状态进行调整,将其挂起或者激活,会影响到bot对仓库数据的访问权限。
|
||||
|
||||

|
||||

|
||||
|
|
@ -61,11 +61,11 @@ Bot市场主页中展示了目前所有已经上架市场的bot简要信息,
|
|||
|
||||
用户可结合种类筛选和关键字搜索缩小范围,在市场中快速找到符合项目相关需求的bot。
|
||||
|
||||

|
||||

|
||||
|
||||
在bot市场页中,用户点击指定的bot卡片即可进入该bot的详情页。Bot的详情页包含bot的头像,名称,开发者,种类和详细介绍等信息,用户可在此掌握该bot的各项介绍,进一步判断是否将其安装到指定仓库中。
|
||||
|
||||

|
||||

|
||||
|
||||
在bot详情页中,若用户认为该bot满足自己的项目需求,可点击“安装此Bot”按钮,了解该bot的权限信息,将其安装到指定的仓库中,关于安装的更多介绍可见“Bot安装”部分。
|
||||
|
||||
|
|
|
|||
|
|
@ -55,7 +55,7 @@ Bot开发是开发者进行bot注册的重要模块。
|
|||
|
||||
在个人“设置”中,用户可以看到目前已经注册的bot列表,点击对应bot的“编辑”按钮可以对已注册的bot进行配置;点击“Bot注册”按钮开始注册新的bot。
|
||||
|
||||

|
||||

|
||||
|
||||
在注册页中,开发者需要填写bot注册的相关信息,包括bot的名称、Webhook 地址,详细介绍等,系统将对开发者输入的信息进行合法性校验,确保bot各项信息的完整性和有效性。此外,系统将自动生成bot的唯一标识,同时调用 GitLink 平台的相关接口生成bot的身份凭证信息,包括客户端密钥和私钥等。
|
||||
|
||||
|
|
@ -63,6 +63,6 @@ Bot开发是开发者进行bot注册的重要模块。
|
|||
|
||||
平台开发API链接(待完善):https://www.gitlink.org.cn/docs/api#introduction
|
||||
|
||||

|
||||

|
||||
|
||||

|
||||

|
||||
|
|
@ -55,15 +55,15 @@ Bot配置是开发者进行bot维护和配置的重要模块,主要包括bot
|
|||
|
||||
Bot的基本信息维护中,开发者可以看到bot的各项基本信息,并可以根据需要对bot的头像,名称,Webhook地址等进行修改。
|
||||
|
||||

|
||||

|
||||
|
||||
Bot的权限&订阅事件管理中,开发者可根据对仓库资源的访问需要为bot分配不同的权限和等级,比如增加代码库权限,将拉取请求的写权限变为读权限等。开发者还能更改当前bot订阅的事件列表,比如订阅代码库推送,取消拉取请求分配订阅等,以实现bot功能的更新与升级。
|
||||
|
||||

|
||||

|
||||
|
||||
|
||||
Bot高级选项配置中,开发者可以改变bot的公私有状态,从而影响到bot的使用范围。需要注意的是,公开状态下的bot在已有其他仓库安装的情况下不能变成私有。开发者可选择将bot上架到市场,需要填写上架信息,包括市场简介,主要功能,次要功能等各项信息。
|
||||
|
||||
开发者还能进行bot的删除和转让操作,发起转让意味着更改bot的所有权,需要输入接受者的用户名。在接受者确定接受后,即可完成bot的所有权变更,拒绝则会取消本次的转让操作。
|
||||
|
||||

|
||||

|
||||
|
|
|
|||
|
|
@ -5,8 +5,8 @@ sidebar_position: 5
|
|||
# 代码流水线
|
||||
可以通过代码的形式(YAML格式)来配置流水线,首先选择代码流水线和对应的分支:
|
||||
|
||||

|
||||

|
||||
|
||||
编辑流水线代码,其流水线名称描述、触发器、全局参数、执行串行/并发和流水线编排等概念同图形流水线,具体描述如下:
|
||||
|
||||

|
||||

|
||||
|
|
@ -7,9 +7,9 @@ sidebar_position: 2
|
|||
|
||||
可在流水线中使用,实现动态参数配置;有字符串、数字、布尔三种类型。
|
||||
|
||||

|
||||

|
||||
|
||||
|
||||
在流水线的配置中通过如下方式获取参数:
|
||||
|
||||

|
||||

|
||||
|
|
@ -9,38 +9,38 @@ sidebar_position: 4
|
|||
|
||||
同一仓库下的流水线名称不能重复
|
||||
|
||||

|
||||

|
||||
|
||||
## 触发器
|
||||
注:流水线编排时,触发器要放在开始节点之前;目前一条流水线仅添加支持一个触发器
|
||||
注:流水线编排时,触发器要放在开始节点之前;目前一条流水线仅支持添加一个触发器
|
||||
|
||||
* 定时触发器cron:可通过填写cron表达式设置触发的具体时间
|
||||

|
||||

|
||||
|
||||
* 事件触发器GitLink_Webhook:给出了常见的代码变更事件触发,包括推送代码、合并请求、创建标签
|
||||

|
||||

|
||||
|
||||
## 全局参数
|
||||
|
||||
添加后可在当前流水线中使用
|
||||
|
||||

|
||||

|
||||
|
||||
使用实例
|
||||
|
||||

|
||||

|
||||
|
||||
## 并发执行
|
||||
|
||||

|
||||

|
||||
|
||||
开启后,同一流水线可同时并发执行n个流水线实例(每触发一次我们得到一个流水线实例);
|
||||
|
||||

|
||||

|
||||
|
||||
若未开启,则当前流水线实例执行中,后面的实例处于排队状态(最多可排队5个实例)。当前实例执行完成,下一个实例开始执行。
|
||||
|
||||

|
||||

|
||||
|
||||
|
||||
## 流水线编排
|
||||
|
|
|
|||
|
|
@ -7,10 +7,10 @@ sidebar_position: 3
|
|||
|
||||
将账号密码、密钥、证书等存放到密钥管理里,配置后可直接在流水线中使用,避免因直接填写引起的泄露风险。
|
||||
|
||||

|
||||

|
||||
|
||||
使用示例
|
||||
|
||||
注:节点输入参数中,下拉选项为密钥类型,需要提前配置好密钥在流水线中选择使用
|
||||
|
||||

|
||||

|
||||
|
|
@ -8,6 +8,6 @@ sidebar_position: 1
|
|||
引擎(Engine)是GitLink提供的一款DevOps工具,通过简单的节点编排来构建开发、测试、部署流水线,从而创建自动化的软件交付流程。
|
||||
它可以实现持续的代码集成,让开发者能尽早发现质量问题,快速定位修复,提升软件开发效率和质量;自动化的代码扫描、编译打包、单元测试,把研发团队从重复的工作中解放出来,聚焦到更有价值的事情上。
|
||||
|
||||

|
||||

|
||||
|
||||
在引擎页面中,用户可以创建和编辑图形流水线或代码流水线、设置外部参数、管理密钥等操作。
|
||||
|
|
@ -7,4 +7,4 @@ sidebar_position: 6
|
|||
|
||||
用户可以查看流水线的运行状态
|
||||
|
||||

|
||||

|
||||
|
|
@ -32,7 +32,7 @@ GitLink(确实开源)是CCF官方指定的开源创新服务平台,旨在
|
|||
<article class="col col--6 margin-bottom--lg">
|
||||
<a class="card padding--lg cardContainer" href="/代码库管理/仓库创建">
|
||||
<h2 class="text--truncate cardTitle" title="代码库管理">代码库管理</h2>
|
||||
<p>代码库使用及设置[8个文档]</p>
|
||||
<p>代码库使用及设置[9个文档]</p>
|
||||
</a></article>
|
||||
<article class="col col--6 margin-bottom--lg">
|
||||
<a class="card padding--lg cardContainer" href="/组织管理/组织简介">
|
||||
|
|
|
|||
|
|
@ -6,23 +6,23 @@ sidebar_position: 2
|
|||
|
||||
个人主页建站是一个免费的静态网页托管服务,可用于托管静态个人主页、个人博客等静态页面。个人建站不同工具如下
|
||||
|
||||
### Hugo工具
|
||||
## Hugo工具
|
||||
|
||||
|
||||
使用Hugo 工具创建的仓库,需要将代码仓库中config.toml 文件中的 baseURL 修改
|
||||
将值改成 个人建站服务中显示的网站地址,
|
||||
例如: 现在有一个网站地址为 http://KingChan.gitlink.net
|
||||
那么 config.toml 中的 baseURL 应该为 http://KingChan.gitlink.net
|
||||

|
||||

|
||||
|
||||
修改完毕后点击提交
|
||||

|
||||

|
||||
提交完成后,开始部署
|
||||

|
||||

|
||||
静态页面预览
|
||||

|
||||

|
||||
|
||||
### jekyll工具
|
||||
## jekyll工具
|
||||
|
||||
如果是jekyll项目:
|
||||
使用jekyll工具创建的个人站点,需要对代码仓库中 _config.yml文件中的 baseurl和url两个值进行修改,jekyll的配置文件比较特殊,需要根据 个人建站服务 中显示的 网站地址
|
||||
|
|
@ -32,16 +32,16 @@ sidebar_position: 2
|
|||
baseurl: "/"
|
||||
url: "http://KingChan.gitlink.net"
|
||||
|
||||

|
||||

|
||||
|
||||
修改完成后点击 提交变更
|
||||

|
||||

|
||||
提交完成后,前往建站服务开始部署
|
||||

|
||||

|
||||
|
||||

|
||||

|
||||
|
||||
### hexo工具
|
||||
## hexo工具
|
||||
|
||||
如果是 hexo项目:
|
||||
使用Hexo工具创建的仓库,需要将代码仓库中_config.yml 文件中的 url修改
|
||||
|
|
@ -50,19 +50,19 @@ url: "http://KingChan.gitlink.net"
|
|||
|
||||
那么 _config.toml 中的 url应该为 http://KingChan.gitlink.net
|
||||
|
||||

|
||||

|
||||
|
||||
修改完毕后提交变更
|
||||

|
||||

|
||||
提交完成后,前往建站服务开始部署
|
||||
|
||||

|
||||

|
||||
|
||||

|
||||

|
||||
|
||||

|
||||

|
||||
|
||||
### file 工具
|
||||
## file 工具
|
||||
文档格式工具,使用该工具会部署所选中分支下的所有文件。
|
||||
|
||||
|
||||
|
|
|
|||
|
|
@ -3,16 +3,16 @@ sidebar_label: '建站流程'
|
|||
sidebar_position: 1
|
||||
---
|
||||
# 个人建站流程
|
||||
### 我的站点
|
||||
## 我的站点
|
||||
鼠标移动至右上角头像位置,点击设置进入我的设置界面
|
||||
|
||||

|
||||

|
||||
|
||||
点击左测面板中 个人建站 - 我的站点
|
||||
点击左侧面板中 个人建站 - 我的站点
|
||||
|
||||

|
||||

|
||||
|
||||
### 创建站点
|
||||
## 创建站点
|
||||
|
||||
在我的站点界面点击 新建站点 按钮,进入新建站点界面
|
||||
|
||||
|
|
@ -20,31 +20,31 @@ sidebar_position: 1
|
|||
|
||||
并且选择对应的建站工具与主题,我们为您提供了3种不同的工具,每个工具10种主题,一共30种供您挑选
|
||||
|
||||

|
||||

|
||||
|
||||
填写完毕后,点击页面下方蓝色按钮: 创建站点
|
||||
|
||||

|
||||

|
||||
|
||||
这样您就拥有了一个网站,并且有了一个代码仓库。
|
||||
|
||||
在仓库的 服务 一栏中 个人建站服务的操作界面,这里您可以查看一些您的站点状态、站点名称、网站地址、建站工具、建站时间
|
||||
|
||||
### 部署站点
|
||||
## 部署站点
|
||||
|
||||

|
||||

|
||||
|
||||
点击去部署按钮,选择想要部署的分支后点击确定
|
||||
|
||||

|
||||

|
||||
|
||||
等待程序运行一会儿后,会返回一些服务器部署信息给您
|
||||
|
||||
部署成功后您就可以访问站点了。点击网站地址就可以跳转
|
||||
|
||||

|
||||

|
||||
|
||||
### 部署完成
|
||||
## 部署完成
|
||||
|
||||

|
||||

|
||||
|
||||
|
|
|
|||
|
|
@ -1,41 +1,43 @@
|
|||
---
|
||||
sidebar_label: 'WebIDE'
|
||||
sidebar_position: 9
|
||||
sidebar_label: 'WebIDE使用指南'
|
||||
sidebar_position: 9
|
||||
---
|
||||
|
||||
### **1. 语言服务**
|
||||
|
||||
## 1. 语言服务
|
||||
● 支持近 40 种语言的语法高亮
|
||||
|
||||
● 支持 JavaScript/TypeScript、HTML、CSS、JSON、Markdown 的基于 LSP (Language Server Protocol) 语言特性功能,具备智能提示和大纲信息以及单文件内跳转。
|
||||
|
||||
● 支持 Java、Go、Python、C++、Php 的基于 Tree Sitter 的在线语言服务能力,提供查看引用、符号搜索等特性
|
||||
|
||||
### **2. WebIDE 入口**
|
||||
## 2. WebIDE 入口
|
||||
从 Gitlink 仓库首页 ,点击Web IDE 按键即可进入
|
||||
<br/>
|
||||

|
||||
|
||||
### **3. 分支**
|
||||
## 3. 分支
|
||||
支持分支切换:点击左下角分支名即可切换分支。
|
||||
<br/>
|
||||

|
||||
|
||||
### **4. 搜索**
|
||||
## 4. 搜索
|
||||
当前支持 Gitlink 仓库内代码搜索(支持单词匹配和文件过滤)和文件搜索。
|
||||
<br/>
|
||||

|
||||
|
||||
### **5. 行高亮**
|
||||
## 5. 行高亮
|
||||
支持单行或多行高亮,点击行号即可高亮行,按住 Shift 可选中连续多行。
|
||||
<br/>
|
||||

|
||||
|
||||
### **6. Blame**
|
||||
## 6. Blame
|
||||
支持查看单行 blame 信息,hover 后可展示详细信息。
|
||||
<br/>
|
||||

|
||||
|
||||
### **7. Graph**
|
||||
## 7. Graph
|
||||
支持 graph 视图,可查看分支 commits 历史以及每个 commit 详细文件变更,并支持文件 diff 查看。底部状态栏左下角点击 Git Graph 或在命令面板输入 View Git Graph,即可打开 Git Graph 视图。
|
||||
<br/>
|
||||

|
||||
|
||||
### **8. WebSCM**
|
||||
## 8. WebSCM
|
||||
可以在极速版新建分支,修改代码后在 SCM 面板看到变更文件列表,写完 commit message 后提交到 Gitlink 上。如果想快速修改一些文件可以不用在本地修改,直接通过极速版修改代码一次性提交。
|
||||
|
||||
### **9. 代码在线运行**
|
||||
## 9. 代码在线运行
|
||||
● 集成了基于 skypack 的更加轻量的 CodeSwing 插件,可以在极速版去运行前端代码。
|
||||
● 集成了基于 Pyodide 的 Code-Runner-For-Web 插件,可以将 Python 的运行搬到浏览器上。
|
||||
<br/>
|
||||

|
||||
|
|
@ -4,23 +4,23 @@ sidebar_position: 8
|
|||
---
|
||||
### **1. Webhook模块入口**
|
||||
在项目主页,点击“仓库设置”按键,再点击“网络钩子”按键,即可进入仓库的Webhook模块。
|
||||
<br/>
|
||||

|
||||
|
||||
### **2. 添加Webhook**
|
||||
单击“添加Webhook”按键,可进入配置Webhook页面:
|
||||
|
||||
<br/>
|
||||
<br/>
|
||||

|
||||

|
||||
|
||||
### **3. 编辑Webhook**
|
||||
添加Webhook后,如下图所示,可以通过点击右侧”编辑“按键来对每个Webhook进行编辑操作。
|
||||
|
||||
<br/>
|
||||

|
||||
|
||||
### **4. 删除Webhook**
|
||||
添加Webhook后,如下图所示,可以通过点击右侧”删除“按键来对每个Webhook进行删除操作。
|
||||
|
||||
<br/>
|
||||

|
||||
|
||||
### **5. Webhook支持的事件类型**
|
||||
在GitLink中,Webhook支持的事件类型如下:
|
||||
|
|
|
|||
|
|
@ -4,8 +4,8 @@ sidebar_position: 1
|
|||
---
|
||||
### **1. 仓库创建入口**
|
||||
用户可以通过平台主页右上角的按键以及个人主页参与项目模块的“新建”按键来创建仓库。
|
||||
<br/>
|
||||

|
||||
|
||||
### **2. 填写项目基本信息**
|
||||
进入新建项目页面后,如下图所示,填写拥有者、项目名称、项目标识等信息,单击”创建项目“按键即可完成创建。
|
||||
<br/>
|
||||

|
||||
|
|
@ -2,10 +2,10 @@
|
|||
sidebar_label: '仓库设置'
|
||||
sidebar_position: 2
|
||||
---
|
||||
### **1. 仓库设置入口**
|
||||
## 1. 仓库设置入口
|
||||
在仓库主页,点击“仓库设置”按键即可进入仓库设置模块。仓库设置中可以修改项目的基本信息、进行成员管理、配置webhook、设置分支以及安装bot。
|
||||
<br/>
|
||||

|
||||
|
||||
### **2. 基本设置**
|
||||
## 2. 基本设置
|
||||
进入仓库设置模块后,单击”基本设置“按键,进入基本设置模块,如下图所示,可以对项目的项目名称、项目标识、项目简介、项目类别、项目语言等基本信息进行修改。单击“转移”按键可以将仓库转移给其他用户和组织,单击“删除本仓库“按键可以删除本仓库。
|
||||
<br/>
|
||||

|
||||
|
|
@ -4,8 +4,8 @@ sidebar_position: 3
|
|||
---
|
||||
### **1. 代码提交入口**
|
||||
用户可以通过项目代码库中间的文件下的“上传文件”按键来上传文件。
|
||||
<br/>
|
||||

|
||||
|
||||
### **2. 上传文件**
|
||||
进入上传文件页面后,如下图所示,拖动文件,选择提交变更的分支的单击”创建项目“按键即可完成创建。
|
||||
<br/>
|
||||

|
||||
|
|
@ -4,10 +4,10 @@ sidebar_position: 5
|
|||
---
|
||||
### **1. 查看分支**
|
||||
在代码库栏下,如下图所示,用户可以点击代码库分支从而查看当前项目的所有分支,并且选择对其进行操作。
|
||||
<br/>
|
||||

|
||||
|
||||
### **2. 合并分支**
|
||||
在“和并请求(PR)”下点击“新建合并请求”后,
|
||||
<br/>
|
||||

|
||||
如下图所示,用户可以选择源分支与目标分支以及填写分支信息后提交分支合并请求。
|
||||
<br/>
|
||||

|
||||
|
|
@ -2,22 +2,22 @@
|
|||
sidebar_label: '成员管理'
|
||||
sidebar_position: 7
|
||||
---
|
||||
### **1. 成员管理入口**
|
||||
## 1. 成员管理入口
|
||||
在仓库主页,点击“仓库设置”按键,再点击”成员管理“按键,即可进入成员管理模块,如下图所示。
|
||||
<br/>
|
||||

|
||||
|
||||
### **2. 筛选、搜索项目成员**
|
||||
## 2. 筛选、搜索项目成员
|
||||
进入成员管理模块后,可以通过”角色筛选“按键来筛选项目成员类型,通过”搜索“按键可以检索具体的项目成员,如下图所示。
|
||||
<br/>
|
||||

|
||||
|
||||
### **3. 筛选、搜索项目成员**
|
||||
## 3. 筛选、搜索项目成员
|
||||
进入成员管理模块后,可以通过”添加成员“按键来添加项目成员,左侧搜索框检索到具体用户并选中后,单击”添加成员“按键即可成功添加项目成员。
|
||||
<br/>
|
||||

|
||||
|
||||
### **4. 项目成员权限管理**
|
||||
## 4. 项目成员权限管理
|
||||
进入成员管理模块后,单击项目成员右侧的角色栏,可以选择赋予该名项目成员的权限等级,如下图所示。
|
||||
<br/>
|
||||

|
||||
|
||||
### **5. 删除项目成员**
|
||||
## 5. 删除项目成员
|
||||
进入成员管理模块后,单击项目成员右侧的”删除“按键,可以删除改名项目成员,如下图所示。
|
||||
<br/>
|
||||

|
||||
|
|
|
|||
|
|
@ -2,18 +2,18 @@
|
|||
sidebar_label: '文件管理'
|
||||
sidebar_position: 4
|
||||
---
|
||||
### **1. 文件管理位置**
|
||||
## 1. 文件管理位置
|
||||
在代码库界面,可直接对代码库中该分支下的文件进行操作,如下图所示。
|
||||
<br/>
|
||||

|
||||
|
||||
### **2. 进入目录**
|
||||
## 2. 进入目录
|
||||
点击进入相关目录,找到要编辑的文件,如下图所示。
|
||||
<br/>
|
||||

|
||||
|
||||
### **3. 进入文件编辑页面**
|
||||
## 3. 进入文件编辑页面
|
||||
在线编辑文件,单击文件,即可进入编辑文件页面,如下图所示。
|
||||
<br/>
|
||||

|
||||
|
||||
### **4. 编辑文件**
|
||||
## 4. 编辑文件
|
||||
编辑界面右侧有三个按钮,分别是“下载”、“编辑”和“删除”,点击下载即可将文件下载到本地,编辑则可在线编辑文档,删除则将文件从代码库中删除,按钮位置如下图所示。
|
||||
<br/>
|
||||

|
||||
|
|
@ -2,28 +2,34 @@
|
|||
sidebar_label: '标签和发行版管理'
|
||||
sidebar_position: 6
|
||||
---
|
||||
### **1. 标签和发行版管理入口**
|
||||
在仓库主页,点击“代码库”按键,再点击”标签“按键,即可进入标签和发行版管理模块,如下图所示。
|
||||
<br/>
|
||||
## 1. 标签和发行版管理入口
|
||||
在仓库主页,点击“代码库”按键,再点击“标签“按键,即可进入标签和发行版管理模块,如下图所示。
|
||||

|
||||
|
||||
### **2. 删除标签**
|
||||
进入标签和发行版管理模块后,点击标签右侧“删除”按键,即可实现对标签的删除操作,如下图所示。
|
||||
<br/>
|
||||
|
||||
### **3. 查看发行版**
|
||||
进入标签和发行版管理模块后,点击”发行版”按键即可查看项目的发行版,如下图所示。
|
||||
<br/>
|
||||
## 2. 新增标签
|
||||
进入标签和发行版管理模块后,点击“新增标签”按键,即可新建立标签,如下图所示。打开新建标签对话框后,可填写标签名称、起点和描述后点击确认完成创建。
|
||||

|
||||
|
||||
|
||||
## 3. 删除标签
|
||||
进入标签和发行版管理模块后,点击标签右侧“删除”按键,即可实现对标签的删除操作,如下图所示。
|
||||

|
||||
|
||||
## 4. 查看发行版
|
||||
进入标签和发行版管理模块后,点击“发行版”按键即可查看项目的发行版,如下图所示。
|
||||

|
||||
|
||||
### **4. 创建发行版**
|
||||
进入标签和发行版管理模块后,点击标签右侧”创建发行版”按键,即可快速创建绑定该标签的发行版,如下图所示。
|
||||
<br/>
|
||||
## 5. 创建发行版
|
||||
进入标签和发行版管理模块后,点击标签右侧“创建发行版”按键,即可快速创建绑定该标签的发行版,如下图所示。
|
||||

|
||||
|
||||
### **5. 修改发行版**
|
||||
进入标签和发行版管理模块后,点击发行版右侧的修改按键,即可进入发行版的修改页面,如下图所示。完成发行版的修改后,单击”保存发行版“按键即可保存修改内容。
|
||||
<br/>
|
||||
<br/>
|
||||
## 6. 修改发行版
|
||||
进入标签和发行版管理模块后,点击发行版右侧的修改按键,即可进入发行版的修改页面,如下图所示。完成发行版的修改后,单击“保存发行版”按键即可保存修改内容。
|
||||

|
||||

|
||||
|
||||
### **6. 删除发行版**
|
||||
## 7. 删除发行版
|
||||
进入标签和发行版管理模块后,点击发行版右侧的删除按键,即可进入发行版的删除页面,如下图所示。
|
||||
<br/>
|
||||
|
||||

|
||||
|
||||
|
|
|
|||
|
|
@ -6,8 +6,8 @@ sidebar_position: 3
|
|||
# 代码评审
|
||||
### **1. 进入代码评审**
|
||||
如下图所示,点击“代码评审”按钮可以进入代码评审
|
||||
<br/>
|
||||

|
||||
|
||||
### **2. 代码评审界面**
|
||||
如下图所示,用户可以在该界面下查看该PR操作要合并的新的代码,并对其进行评审。
|
||||
<br/>
|
||||

|
||||
|
|
|
|||
|
|
@ -3,4 +3,25 @@ sidebar_label: '合并请求关联疑修'
|
|||
sidebar_position: 5
|
||||
---
|
||||
|
||||
# 合并请求关联疑修
|
||||
# 合并请求关联疑修
|
||||
|
||||
在 GitLink 中,合并请求可以与一个或多个**疑修(Issue)**进行关联,帮助项目成员快速了解本次代码变更对应的开发任务,并在合并后自动更新疑修状态。
|
||||
|
||||
## 创建时关联疑修
|
||||
|
||||
在“创建合并请求”页面,右侧边栏中提供“**关联疑修**”选项,点击关联疑修区域的输入框,可通过输入疑修编号或关键词搜索已有疑修,从下拉列表中选择一个或多个疑修进行关联,如下图所示:
|
||||

|
||||
|
||||
## 查看关联关系
|
||||
|
||||
在合并请求列表页中,可以查看该请求关联的所有疑修列表。点击疑修,会跳转到对应页面。
|
||||

|
||||
|
||||
## 合并后自动关闭疑修
|
||||
|
||||
当合并请求被合并后,关联的疑修将自动置为"**已关闭**"状态。
|
||||

|
||||
|
||||
|
||||
|
||||
|
||||
|
|
|
|||
|
|
@ -0,0 +1,4 @@
|
|||
{
|
||||
"label": "常见问题",
|
||||
"position": 13
|
||||
}
|
||||
|
|
@ -0,0 +1,98 @@
|
|||
---
|
||||
sidebar_label: '常见问题'
|
||||
sidebar_position: 1
|
||||
---
|
||||
|
||||
# 常见问题(FAQ)
|
||||
|
||||
本文档汇总了 GitLink 平台使用过程中的常见问题及解答,帮助您快速解决遇到的问题。
|
||||
|
||||
## 一、账号相关
|
||||
|
||||
## 1. 如何注册 GitLink 账号?
|
||||
|
||||
访问 [GitLink 官网](https://www.gitlink.org.cn),点击页面右上角的"注册"按钮,支持手机号注册和邮箱注册两种方式。注册完成后需要通过邮箱或手机验证完成激活。
|
||||
|
||||
## 2. 忘记密码怎么办?
|
||||
|
||||
在登录页面点击"忘记密码",通过注册时使用的手机号或邮箱进行密码重置。系统会发送验证码,验证通过后即可设置新密码。
|
||||
|
||||
## 3. 如何修改个人头像和信息?
|
||||
|
||||
登录后点击右上角头像进入"个人设置"页面,可以修改头像、昵称、个人简介等信息。
|
||||
|
||||
## 二、代码库管理
|
||||
|
||||
## 4. 如何创建代码仓库?
|
||||
|
||||
登录后点击右上角"+"号,选择"新建仓库",填写仓库名称、描述、可见性等信息后点击创建即可。详细步骤请参考[仓库创建](../代码库管理/仓库创建.md)文档。
|
||||
|
||||
## 5. 如何将本地代码推送到 GitLink?
|
||||
|
||||
首先在本地初始化 Git 仓库并添加远程地址:
|
||||
```bash
|
||||
git init
|
||||
git remote add origin https://gitlink.org.cn/用户名/仓库名.git
|
||||
git add .
|
||||
git commit -m "首次提交"
|
||||
git push -u origin master
|
||||
```
|
||||
|
||||
## 6. 仓库容量有限制吗?
|
||||
|
||||
GitLink 对单个仓库的容量没有严格限制,但建议单个仓库不超过 1GB,单个文件不超过 100MB,以保证良好的使用体验。
|
||||
|
||||
## 7. 如何导入 GitHub/GitLab 上的项目?
|
||||
|
||||
GitLink 支持从 GitHub、GitLab 等平台导入项目。在创建仓库时选择"导入外部仓库",填写源仓库地址即可完成导入。详细步骤请参考[导入第三方Git项目](../快速开始/导入GitHub等第三方Git项目.md)。
|
||||
|
||||
## 三、协作开发
|
||||
|
||||
## 8. 如何提交合并请求(Pull Request)?
|
||||
|
||||
1. 先 Fork 目标仓库到自己的账号下
|
||||
2. 在 Fork 的仓库中创建新分支并进行修改
|
||||
3. 修改完成后点击"合并请求"提交 PR
|
||||
4. 等待项目维护者审核并通过
|
||||
|
||||
详细流程请参考[创建合并请求](../合并请求/创建合并请求.md)。
|
||||
|
||||
## 9. 如何管理组织成员?
|
||||
|
||||
组织管理员可以在"组织设置"→"成员管理"中添加或移除成员,并设置成员的角色权限。详细说明请参考[组织成员管理](../组织管理/组织成员管理.md)。
|
||||
|
||||
## 10. 如何使用 WebIDE 在线编辑代码?
|
||||
|
||||
在仓库页面点击"Web IDE"按钮即可进入在线开发环境,支持语法高亮、代码提示、分支管理、代码提交等功能。详细介绍请参考[WebIDE使用指南](../代码库管理/WebIDE使用指南.md)。
|
||||
|
||||
## 四、DevOps 引擎
|
||||
|
||||
## 11. 如何创建流水线?
|
||||
|
||||
进入仓库的"引擎"模块,点击"图形流水线"或"代码流水线"创建新的流水线。可以配置自动触发规则,实现代码提交后自动构建和部署。详细步骤请参考[图形流水线](../DevOps引擎/图形流水线.md)。
|
||||
|
||||
## 12. 流水线构建失败怎么办?
|
||||
|
||||
请检查以下常见原因:
|
||||
- Dockerfile 配置是否正确
|
||||
- 依赖是否完整,版本是否兼容
|
||||
- 构建命令是否正确
|
||||
- 密钥(如 Docker 仓库密码)是否正确配置
|
||||
|
||||
可以查看流水线的执行日志定位具体错误原因。
|
||||
|
||||
## 五、其他问题
|
||||
|
||||
## 13. 如何反馈 Bug 或提出功能建议?
|
||||
|
||||
您可以在 [GitLink 帮助中心仓库](https://www.gitlink.org.cn/Gitlink/gitlink_help_center)提交疑修(Issue)来反馈问题或提出建议。
|
||||
|
||||
## 14. 平台支持哪些浏览器?
|
||||
|
||||
GitLink 推荐使用最新版 Chrome、Firefox、Edge 等主流浏览器访问,以获得最佳体验。
|
||||
|
||||
## 15. 如何联系客服?
|
||||
|
||||
如有其他问题,可以通过以下方式联系我们:
|
||||
- 官网邮箱:gitlink@ccf.org.cn
|
||||
- 在帮助中心仓库提交 Issue
|
||||
|
|
@ -1,4 +1,20 @@
|
|||
---
|
||||
sidebar_label: '平台公告'
|
||||
sidebar_position: 1
|
||||
---
|
||||
sidebar_label: '平台公告'
|
||||
sidebar_position: 1
|
||||
---
|
||||
|
||||
# 平台公告
|
||||
|
||||
平台公告模块用于发布 GitLink 平台的重要通知、功能更新、活动信息等内容。
|
||||
|
||||
## 查看公告
|
||||
|
||||
1. 在帮助中心左侧导航栏中,点击「平台公告」即可查看公告列表。
|
||||
2. 点击具体公告标题可查看公告详细内容。
|
||||
|
||||
## 公告类型
|
||||
|
||||
- **功能更新**:平台新功能上线或已有功能优化的通知
|
||||
- **活动通知**:开源夏令营(GLCC)、开源大赛等活动的相关信息
|
||||
- **运维公告**:平台维护、升级等运维相关的通知
|
||||
- **规则变更**:平台服务协议、使用规则等变更的说明
|
||||
|
|
@ -25,7 +25,7 @@ sidebar_position: 5
|
|||
|
||||
下面将列举一些典型开源平台的token获取方式。
|
||||
|
||||
### GitHub token获取方式
|
||||
## GitHub token获取方式
|
||||
|
||||
1. 登录GitHub账号
|
||||
|
||||
|
|
@ -57,7 +57,7 @@ sidebar_position: 5
|
|||
|
||||

|
||||
|
||||
### Gitee token获取方式
|
||||
## Gitee token获取方式
|
||||
|
||||
1. 登录Gitee账号
|
||||
|
||||
|
|
|
|||
|
|
@ -5,13 +5,13 @@ sidebar_position: 3
|
|||
|
||||
# 提交第一行代码
|
||||
|
||||
# 1. 编辑代码
|
||||
## 1. 编辑代码
|
||||
|
||||
点击编辑按钮,开始编辑代码。
|
||||
|
||||

|
||||
|
||||
# 2. 提交代码
|
||||
## 2. 提交代码
|
||||
|
||||
在编辑框中编写代码,编写完成后填写变更信息后提交变更。
|
||||
|
||||
|
|
@ -19,4 +19,4 @@ sidebar_position: 3
|
|||
|
||||
## 3. 代码更新成功
|
||||
|
||||
提交成功后代码代码更新成功。
|
||||
提交成功后代码更新成功。
|
||||
|
|
@ -23,7 +23,7 @@ sidebar_position: 4
|
|||
|
||||
有两处搜索框可以搜索
|
||||
|
||||
### 开源项目搜索框
|
||||
## 开源项目搜索框
|
||||
|
||||
搜索项目:
|
||||
|
||||
|
|
@ -33,7 +33,7 @@ sidebar_position: 4
|
|||
|
||||

|
||||
|
||||
### 菜单栏搜索框
|
||||
## 菜单栏搜索框
|
||||
|
||||
搜索项目:
|
||||
|
||||
|
|
|
|||
|
|
@ -0,0 +1,4 @@
|
|||
{
|
||||
"label": "更新日志",
|
||||
"position": 14
|
||||
}
|
||||
|
|
@ -0,0 +1,55 @@
|
|||
---
|
||||
sidebar_label: '更新日志'
|
||||
sidebar_position: 1
|
||||
---
|
||||
|
||||
# 更新日志
|
||||
|
||||
本页面记录 GitLink 帮助中心的文档更新历史,方便用户了解平台功能的最新变化。
|
||||
|
||||
## 2025年
|
||||
|
||||
## v1.1.0(2025年)
|
||||
|
||||
**新增功能:**
|
||||
- 新增 WebIDE 使用指南文档,介绍在线编辑器的使用方法
|
||||
- 新增 WebIDE 功能介绍文档,详细说明 WebIDE 的核心能力
|
||||
- 新增平台公告模块,支持平台公告的发布与设置
|
||||
- 新增 DevOps 引擎图形流水线文档
|
||||
|
||||
**功能改进:**
|
||||
- 优化帮助中心搜索功能,支持中英文搜索
|
||||
- 改进文档分类结构,新增"快速开始"分类便于新手入门
|
||||
- 更新页脚链接,统一使用 gitlink.org.cn 域名
|
||||
- 完善个人主页建站流程说明
|
||||
|
||||
**问题修复:**
|
||||
- 修复部分文档中图片链接无法显示的问题
|
||||
- 修复维基页面管理文档中图片引用格式错误
|
||||
- 修复提交第一行代码文档中的文字重复问题
|
||||
- 修复站点创建流程文档中的错别字
|
||||
|
||||
## v1.0.0(2024年)
|
||||
|
||||
**初始版本发布:**
|
||||
- 完成帮助中心基础框架搭建
|
||||
- 完成以下模块的文档编写:
|
||||
- 快速开始(注册账号、提交代码、创建项目等)
|
||||
- 代码库管理(仓库创建、分支管理、成员管理等)
|
||||
- 组织管理(组织创建、团队管理、项目管理等)
|
||||
- 疑修管理(疑修创建、状态变更、里程碑等)
|
||||
- 合并请求(创建请求、代码评审、合并模式等)
|
||||
- DevOps 引擎(流水线、参数配置、密钥设置等)
|
||||
- 第三方服务(代码同步、代码溯源等)
|
||||
- 维基(页面管理、模板导入导出等)
|
||||
- Bot 市场(Bot 安装、开发、配置等)
|
||||
- 通知管理(通知简介、通知设置等)
|
||||
- 个人主页建站(站点创建、建站工具等)
|
||||
- 服务协议
|
||||
- 集成本地搜索功能
|
||||
- 支持中英双语切换
|
||||
- 集成图片缩放功能
|
||||
|
||||
---
|
||||
|
||||
> 如需了解 GitLink 平台自身的功能更新,请关注[平台公告](../平台公告/平台公告.md)页面。
|
||||
|
|
@ -5,7 +5,7 @@ sidebar_position: 6
|
|||
|
||||
# 标记管理
|
||||
|
||||
在疑修的内容编辑页面可以根据疑修的类型对其设置标记,标记的存在方便了在疑修列表中筛选目标疑修,提高项目开发管理效率。<br/>
|
||||
在疑修的内容编辑页面可以根据疑修的类型对其设置标记,标记的存在方便了在疑修列表中筛选目标疑修,提高项目开发管理效率。
|
||||
GitLink默认疑修共有缺陷、功能、疑问、支持、任务、协助、搁置、文档、测试和重复共计十种标记类型,分别具有不同的含义和颜色标志:
|
||||
|
||||
- **缺陷:** 表示存在意外问题或错误;
|
||||
|
|
|
|||
|
|
@ -4,15 +4,15 @@ sidebar_position: 5
|
|||
---
|
||||
|
||||
# 评论及操作记录
|
||||
### 评论
|
||||
## 评论
|
||||
每个疑修都相当于一个可以进度追踪的帖子,因此支持评论和回复,不仅仅是项目成员,所有人都可以在某个疑修下进行评论和回复,发表疑问或是见解,进行交流。
|
||||

|
||||
|
||||
### 疑修声明
|
||||
## 疑修声明
|
||||
用户可以对任意疑修发布“疑修声明”,留言自己对于该疑修的解决思路。点击疑修详情右侧的“声明”后,可以编辑留言,编辑完成后点击“确认”即可发布声明,如下图所示:
|
||||

|
||||
|
||||
### 操作记录
|
||||
## 操作记录
|
||||
所有人都可以创建疑修,但是要注意,非项目成员仅可以修改自己创建的疑修,而项目成员有权限修改所有的疑修。
|
||||
对于某个疑修的所有编辑操作,包括**创建疑修、添加负责人、移除负责人、更改状态、更改优先级、添加标记、移除标记、添加里程碑、移除里程碑、设置关联分支、移除关联分支、设置开始日期和设置结束日期**,均被记录在操作记录中。
|
||||

|
||||
|
|
@ -5,10 +5,10 @@ sidebar_position: 7
|
|||
|
||||
# 里程碑管理
|
||||
|
||||
### 里程碑简介
|
||||
## 里程碑简介
|
||||
里程碑主要用于项目组对项目开发和版本发布提供支持,每一个里程碑可以关联多个开发任务。
|
||||
|
||||
### 创建里程碑
|
||||
## 创建里程碑
|
||||
项目成员可以基于以下步骤创建里程碑:
|
||||
1. 进入目标项目的 **“里程碑”** 界面,此时界面所示为已创建的里程碑的列表,所有已创建里程碑分为 **“已关闭”** 和 **“开启中”** 两类;
|
||||
2. 点击上方的 **“+创建里程碑”** 按钮即可进入里程碑创建界面;
|
||||
|
|
@ -17,13 +17,13 @@ sidebar_position: 7
|
|||
3. 填写标题(必填)、描述(必填)、截止日期(选填)后,点击右下角的 **“创建里程碑”** 即可以完成一个新的里程碑的创建。
|
||||

|
||||
|
||||
### 关联里程碑
|
||||
## 关联里程碑
|
||||
项目成员可以将疑修关联到里程碑,从而使里程碑包含明确的疑修列表,主要步骤如下:
|
||||
1. 在疑修列表中点击目标疑修;
|
||||
2. 编辑“里程碑”属性,选择需要关联的里程碑。
|
||||

|
||||
|
||||
### 其他操作
|
||||
## 其他操作
|
||||
- **开启里程碑**
|
||||
- **关闭里程碑**
|
||||
- **编辑里程碑**
|
||||
|
|
|
|||
|
|
@ -1,6 +1,6 @@
|
|||
---
|
||||
sidebar_label: 'WebIDE'
|
||||
sidebar_position: 9
|
||||
sidebar_label: 'WebIDE功能介绍'
|
||||
sidebar_position: 9
|
||||
|
||||
---
|
||||
## WebIDE背景
|
||||
|
|
@ -59,14 +59,14 @@ Gitlink 通过实现 Blame 插件,完成了编辑器 Blame 查看的能力:
|
|||
Gitlink 代码阅读场景虽然接入极速版 IDE 编辑器,但文件树、代码搜索、快捷键、IDE 皮肤、等均和平时开发时使用习惯的 IDE 差异较大,更有大部分用户仅仅是为了代码阅读将代码克隆到本地,尽管保证了一致的体验,但整个链路繁琐费时。
|
||||
基于这个洞察,蚂蚁云研发团队和 Gitlink 推出 Gitlink Web IDE,可以一键快速打开 Web IDE 访问阅读项目仓库代码,实现项目与 IDE 的无缝衔接,保持研发同学的日常偏好习惯,同时完美兼容 Gitlink 代码托管平台。更重要的是,通过无容器在浏览器上直接运行一个极速版 IDE,确保「秒开」的即时体验。
|
||||
|
||||
#### **1. 快速体验**
|
||||
## 1. 快速体验
|
||||
从 Gitlink 仓库首页 Web IDE 入口即可体验
|
||||

|
||||
<center>Gitlink WebIDE 入口</center>
|
||||
|
||||
#### **2. 代码浏览体验**
|
||||
## 2. 代码浏览体验
|
||||
与传统 IDE 一致的代码浏览体验。文件树、皮肤样式、快捷键一应俱全。
|
||||
#### **3. 语言功能**
|
||||
## 3. 语言功能
|
||||
- 1.支持近 40 种语言的语法高亮
|
||||
- 2.支持 JavaScript/TypeScript、HTML、CSS、JSON、Markdown 的基于 LSP (Language Server Protocol) 语言特性功能,具备智能提示和大纲信息以及单文件内跳转。
|
||||

|
||||
|
|
@ -77,42 +77,42 @@ Gitlink 代码阅读场景虽然接入极速版 IDE 编辑器,但文件树、
|
|||

|
||||
<center>Python 查看引用</center>
|
||||
|
||||
#### **4. 分支新建与切换**
|
||||
## 4. 分支新建与切换
|
||||
点击左下角分支名即可新建/切换分支。
|
||||
|
||||

|
||||
<center>分支新建与切换</center>
|
||||
|
||||
|
||||
#### **5. 文件搜索**
|
||||
## 5. 文件搜索
|
||||
使用 CMD/Ctrl + P 唤起文件搜索面板
|
||||
|
||||

|
||||
<center>文件搜索面板</center>
|
||||
|
||||
#### **6. 行高亮**
|
||||
## 6. 行高亮
|
||||
持单行或多行高亮,点击行号即可高亮行,按住 Shift 可选中连续多行。
|
||||

|
||||
<center>多选行高亮</center>
|
||||
|
||||
#### **7. Blame**
|
||||
## 7. Blame
|
||||
支持查看单行 blame 信息,hover 后可展示详细信息。
|
||||

|
||||
<center>Blame详细信息</center>
|
||||
|
||||
#### **8. Graph**
|
||||
## 8. Graph
|
||||
支持 graph 视图,可查看分支 commits 历史以及每个 commit 详细文件变更,并支持文件 diff 查看。底部状态栏左下角点击 Git Graph 或在命令面板输入 View Git Graph,即可打开 Git Graph 视图。
|
||||

|
||||
<center>Graph 详细信息</center>
|
||||
|
||||
|
||||
#### **9.WebSCM**
|
||||
## 9.WebSCM
|
||||
对于开发来说日常多个需求并行开发是非常常见的事,经常修改一些很小但必要的逻辑,而也许你本地环境已经在开发下一个需求,频繁的分支切换并行修改又容易出错。通过 Gitlink Web IDE 极速切换分支修改提交一气呵成,无需打断本地开发流程。
|
||||

|
||||
<center>WebSCM</center>
|
||||
|
||||
|
||||
#### **10.代码在线运行**
|
||||
## 10.代码在线运行
|
||||
目前如果在没有容器的情况下,大部分应用只能运行前端代码。Gitlink Web IDE 集成了基于 skypack 的更加轻量的 CodeSwing 插件,可以在极速版去运行前端代码,并且代码版本是使用 Gitlink 来管理。结合上述 WebSCM 能力,甚至能在一分钟完成前端代码初始化、编写、预览和代码提交。
|
||||

|
||||
<center>前端代码运行</center>
|
||||
|
|
@ -3,51 +3,51 @@ sidebar_label: '跨平台代码同步服务'
|
|||
sidebar_position: 2
|
||||
---
|
||||
|
||||
### 功能简介
|
||||
## 功能简介
|
||||
|
||||
跨平台仓库代码同步服务用于不同代码托管平台之间的仓库代码双向同步功能。用户将不同平台的仓库分支进行绑定,当任意仓库分支有push事件被webhook监听时,代码推送将实时自动同步至另一个仓库,以实现不同平台之间分支、提交信息的自动同步(代码托管平台仅限于github与gitee)。
|
||||
|
||||
|
||||

|
||||

|
||||
|
||||
同步服务既满足双平台代码库分支同步需求,也支持最多创建三个平台的代码仓库同步,如下图所示
|
||||
|
||||

|
||||

|
||||
|
||||
### 配置双向同步
|
||||
## 配置双向同步
|
||||
|
||||
1、进入需要创建同步的代码库“服务”tab,开通跨平台代码同步服务。
|
||||
|
||||

|
||||

|
||||
|
||||
2、配置跨平台的同步仓库,支持github和gitee。需输入代码库地址(git地址和网站访问地址均支持),以及配置对应token用于授权同步,此处须注意token的权限以及是否过期。<br />
|
||||
Github配置方式为:个人头像→Settings→Developer Settings→Personal access tokens (classic)→Generate new token→勾选repo按钮→保存<br />
|
||||
Gitee配置方式为:个人头像→设置→私人令牌→生成新令牌→勾选projects权限→提交
|
||||
|
||||

|
||||

|
||||
|
||||
3、在首次创建同步仓库时,需要用户手动在目标仓库的代码库创建一条webhook,用于监听仓库push事件,从而向其他同步仓库推送代码完成同步,同步步骤如下:
|
||||
|
||||
①点击“复制链接”按钮,复制平台用于接收webhook请求的地址
|
||||
|
||||

|
||||

|
||||
|
||||
|
||||
②访问点击前往按钮前往目标仓库webhook页新建一个webhook,以github为例
|
||||
|
||||

|
||||

|
||||
|
||||
③粘贴链接,并确保该webhook支持push事件的监听,并已经成功激活
|
||||
|
||||

|
||||

|
||||
|
||||
4、完成仓库配置绑定后,需要绑定这两个仓库的指定同步分支,建立首次同步方向。<font color="red">注:首次同步的策略为单向代码强推,请谨慎选择同步方向开启同步以避免代码被覆盖</font>
|
||||
|
||||

|
||||

|
||||
|
||||
5、完成分支的绑定,在绑定后会根据选择的同步方向立即执行一次同步。后续webhook监听到任意分支有代码推送,会实时向另一个绑定分支同步代码推送代码
|
||||
|
||||

|
||||

|
||||
|
||||
### 管理同步分支
|
||||
|
||||
|
|
@ -60,7 +60,7 @@ Gitee配置方式为:个人头像→设置→私人令牌→生成新令牌→
|
|||
⑤查询同步记录,包括查看历次同步的代码变更方,同步时间,同步状态及对应commt id,查询同步日志。<br />
|
||||
⑥中止、开启同步,相当于同步开关,可随时启停
|
||||
|
||||

|
||||

|
||||
|
||||
### 注意事项
|
||||
|
||||
|
|
|
|||
|
|
@ -5,63 +5,90 @@ sidebar_position: 1
|
|||
|
||||
## 代码分析入口
|
||||
|
||||
<br/>
|
||||

|
||||
|
||||
<center>代码分析入口</center><br/>
|
||||
页面说明:<br/>
|
||||
1、用户可点击"服务"菜单 tab 进入服务页面。<br/>
|
||||
2、仓库管理员可在"仓库设置" tab 中项目导航处开启/关闭代码分析菜单可见性,如下图:<br/>
|
||||
<center>代码分析入口</center>
|
||||
|
||||
<br/>
|
||||
页面说明:
|
||||
|
||||
1、用户可点击"服务"菜单 tab 进入服务页面。
|
||||
|
||||
2、仓库管理员可在"仓库设置" tab 中项目导航处开启/关闭代码分析菜单可见性,如下图:
|
||||
|
||||
|
||||

|
||||
|
||||
<center>项目导航</center>
|
||||
|
||||
<center>项目导航</center><br/>
|
||||
|
||||
## 代码分析检测
|
||||
|
||||
<br/>
|
||||

|
||||
|
||||
<center>代码分析检测</center><br/>
|
||||
<center>代码分析检测</center>
|
||||
|
||||
<br/>
|
||||
|
||||
<center>新建分析</center><br/>
|
||||
页面说明:<br/>
|
||||
1、此页面为暂无历史分析记录时页面展示。<br/>
|
||||
2、"新建分析"按钮仅对仓库管理员可见。仓库开发者、观察者、游客访问此页面时,"新建分析"按钮不可见。<br/>
|
||||
3、点击"新建分析"按钮,需判断是否开启代码分析功能。<br/>
|
||||

|
||||
|
||||
<center>新建分析</center>
|
||||
|
||||
页面说明:
|
||||
|
||||
1、此页面为暂无历史分析记录时页面展示。
|
||||
|
||||
2、"新建分析"按钮仅对仓库管理员可见。仓库开发者、观察者、游客访问此页面时,"新建分析"按钮不可见。
|
||||
|
||||
3、点击"新建分析"按钮,需判断是否开启代码分析功能。
|
||||
|
||||
|
||||
## 分支选择
|
||||
|
||||
<br/>
|
||||

|
||||
|
||||
<center>分支选择</center>
|
||||
|
||||
页面说明:
|
||||
|
||||
1、用户点击“新建分析”按钮,弹出新建分析需要选择填写分支。
|
||||
|
||||
2、图中检测类型、检测参数均为默认值,不允许用户修改,此处展示在界面上,仅起到提示用户,让用户知晓作用。
|
||||
|
||||
3、点击此处“开始检测”即开启基于选中分支的检测,新建一个检测列表。
|
||||
|
||||
<center>分支选择</center><br/>
|
||||
页面说明:<br/>
|
||||
1、用户点击“新建分析”按钮,弹出新建分析需要选择填写分支。<br/>
|
||||
2、图中检测类型、检测参数均为默认值,不允许用户修改,此处展示在界面上,仅起到提示用户,让用户知晓作用。<br/>
|
||||
3、点击此处“开始检测”即开启基于选中分支的检测,新建一个检测列表。<br/>
|
||||
|
||||
## 列表展示
|
||||
|
||||
<br/>
|
||||

|
||||
|
||||
<center>列表展示</center>
|
||||
|
||||
页面说明:
|
||||
|
||||
1、当检测列表行数超过一行时,“新建分析”按钮左侧提供分支名称的筛选下拉框,下拉框内选项为列表中分支的集合。若本仓库有分支1、2、3、4、5,此列表中有分支3、4,则此处下拉框中分支类型仅为3、4。
|
||||
|
||||
2、当新建分析任务正在检测中时,检测状态处有百分比进度条展示现有进度。
|
||||
|
||||
3、点击“重新扫描”按钮,将弹出一条新建分析的弹窗,此弹窗保存所有上次已配置的分支信息,检测分支不可修改(分支下拉选中框置灰)。确认新建后,将新增一条检测数据。
|
||||
|
||||
<center>列表展示</center><br/>
|
||||
页面说明:<br/>
|
||||
1、当检测列表行数超过一行时,“新建分析”按钮左侧提供分支名称的筛选下拉框,下拉框内选项为列表中分支的集合。若本仓库有分支1、2、3、4、5,此列表中有分支3、4,则此处下拉框中分支类型仅为3、4。<br/>
|
||||
2、当新建分析任务正在检测中时,检测状态处有百分比进度条展示现有进度。<br/>
|
||||
3、点击“重新扫描”按钮,将弹出一条新建分析的弹窗,此弹窗保存所有上次已配置的分支信息,检测分支不可修改(分支下拉选中框置灰)。确认新建后,将新增一条检测数据。<br/>
|
||||
|
||||
## 结果展示
|
||||
|
||||
<br/>
|
||||

|
||||
|
||||
<center>结果展示</center>
|
||||
|
||||
页面说明:
|
||||
|
||||
1、用户在代码检测"操作"列表点击"查看"按钮,将在当前页面展开结果展示页面。当用户再次点击"查看"按钮后,结果展示页面收回;当用户点击其他检测记录"查看"按钮后,将展开其他检测记录的结果页,收回当前已展开的结果展示页;
|
||||
|
||||
2、当检测状态为"失败"状态,或当前处于"正在检测"状态时,"查看"按钮将置灰,处于无法点击状态;
|
||||
|
||||
3、结果展示页取代码溯源已有页面,嵌入至 GitLink 即可,无需再次设计。
|
||||
|
||||
<center>结果展示</center><br/>
|
||||
页面说明:<br/>
|
||||
1、用户在代码检测"操作"列表点击"查看"按钮,将在当前页面展开结果展示页面。当用户再次点击"查看"按钮后,结果展示页面收回;当用户点击其他检测记录"查看"按钮后,将展开其他检测记录的结果页,收回当前已展开的结果展示页;<br/>
|
||||
2、当检测状态为"失败"状态,或当前处于"正在检测"状态时,"查看"按钮将置灰,处于无法点击状态;<br/>
|
||||
3、结果展示页取代码溯源已有页面,嵌入至 GitLink 即可,无需再次设计。<br/>
|
||||
|
||||
## 用户操作流程
|
||||
|
||||
.png)<br/>
|
||||
.png)
|
||||
|
||||
<center>用户操作流程</center>
|
||||
|
||||
<center>用户操作流程</center><br/>
|
||||
|
|
|
|||
|
|
@ -3,13 +3,14 @@ sidebar_label: '模板导入及导出'
|
|||
sidebar_position: 2
|
||||
---
|
||||
|
||||
# 确实开源帮助中心
|
||||
|
||||
## 模板的导入及导出管理
|
||||
#### 1.模板导入
|
||||
通过点击wiki界面的**导入模板**按钮即可导入本地的txt,markdown等格式文件进行Wiki文档的创建,当前平台此项功能尚在开发测试环节
|
||||
[](/img/wiki/img4.png)
|
||||
#### 2.模板导出
|
||||
当前平台此项功能尚在开发测试环节
|
||||
<br/>
|
||||
## 1.模板导入
|
||||
通过点击wiki界面的**导入模板**按钮即可导入本地的txt,markdown等格式文件进行Wiki文档的创建。
|
||||

|
||||
## 2.模板导出
|
||||
点击wiki界面的**导出**按钮,可导出markdown、html、pdf等格式文件。
|
||||

|
||||
|
||||
|
||||
|
||||
|
|
|
|||
|
|
@ -4,20 +4,19 @@ sidebar_position: 1
|
|||
---
|
||||
|
||||
|
||||
# 确实开源帮助中心
|
||||
|
||||
## 维基界面管理
|
||||
#### 1.维基界面
|
||||
## 1.维基界面
|
||||
GitLink项目安排了专门的**维基(Wiki)界面**来展示项目的一些情况
|
||||
[](/img/wiki/img1.png)
|
||||

|
||||
|
||||
#### 2.创建维基内容
|
||||
## 2.创建维基内容
|
||||
在初始化的维基界面当中点击**创建Wiki文档**或者**导入模板**即可进行Wiki文档的编辑
|
||||
<br/>
|
||||
|
||||
#### 3.进行Wiki文档的编辑
|
||||
|
||||
## 3.进行Wiki文档的编辑
|
||||
点击**创建Wiki文档**后即跳转到编辑界面,初始内容为空白的文档
|
||||
[](/img/wiki/img3.png)
|
||||

|
||||
也可以通过勾选*添加模板*来进行模板的导入,平台提供的模板包括*周报*和*月报*的格式
|
||||
[](/img/wiki/img2.png)
|
||||

|
||||
完成编辑后点击左下角的的保存即可
|
||||
|
|
@ -3,10 +3,9 @@ sidebar_label: '通知简介'
|
|||
sidebar_position: 1
|
||||
---
|
||||
|
||||
# 确实开源帮助中心
|
||||
|
||||
## 通知简介
|
||||
#### 1.通知类型
|
||||
## 1.通知类型
|
||||
GitLink将通知分为“系统通知”和“@我”的两种类型:
|
||||
* 系统通知包括“我的状态”、“我创建的或负责的”、“我管理的仓库”三种类型的通知:
|
||||
|
||||
|
|
@ -19,10 +18,10 @@ GitLink将通知分为“系统通知”和“@我”的两种类型:
|
|||
例,在项目首页提交疑修时,输入@后可以通过下拉列表选择@其他用户。
|
||||

|
||||
|
||||
#### 2.查看通知
|
||||
## 2.查看通知
|
||||
登录后在平台右上角个人头像旁即可查看收到的通知数量;移动光标至通知按钮出现下拉列表可以分别查看“系统通知”和“@我”的通知;下拉列表右下角可以对所有消息进行一键已读;点击通知即可跳转至通知详情界面。
|
||||

|
||||
<br/>
|
||||
|
||||
|
||||
|
||||
点击通知按钮可以进入消息通知界面,“我的通知”界面可以进行“进查看未读消息”和“所有消息一键已读”的选择。
|
||||
|
|
|
|||
|
|
@ -4,18 +4,17 @@ sidebar_position: 2
|
|||
---
|
||||
|
||||
|
||||
# 确实开源帮助中心
|
||||
|
||||
## 通知设置
|
||||
#### 1.进入通知设置界面
|
||||
## 1.进入通知设置界面
|
||||
通过点击首页的通知按钮进入通知设置界面;
|
||||

|
||||
<br/>
|
||||
|
||||
或在头像下拉列表中选择设置可以进入消息通知设置界面;
|
||||
|
||||

|
||||
|
||||
#### 2.进行通知设置
|
||||
## 2.进行通知设置
|
||||
通过“通知管理”可以对接受通知的方式进行设置,默认所有通知都是通过站内信的方式接受,可以通过勾选为重要的通知类型增加邮件接受方式。
|
||||
|
||||

|
||||
|
|
@ -19,6 +19,13 @@ module.exports = {
|
|||
scripts: [],
|
||||
// stylesheets: ['styles/dark-mode.css'],
|
||||
themeConfig: {
|
||||
announcementBar: {
|
||||
id: 'gitlink_announcement',
|
||||
content: '🎉 欢迎使用 GitLink 帮助中心!如遇问题请先查看 <a href="/%E5%B8%B8%E8%A7%81%E9%97%AE%E9%A2%98/">常见问题</a>,或在 <a href="https://www.gitlink.org.cn/Gitlink/gitlink_help_center" target="_blank">帮助中心仓库</a> 提交 Issue 反馈。',
|
||||
backgroundColor: '#20232a',
|
||||
textColor: '#ffffff',
|
||||
isCloseable: true,
|
||||
},
|
||||
docs:{
|
||||
sidebar:{
|
||||
hideable:true,
|
||||
|
|
@ -72,10 +79,10 @@ module.exports = {
|
|||
position: 'left',
|
||||
dropdownActiveClassDisabled: true
|
||||
},
|
||||
// {
|
||||
// type: 'localeDropdown',
|
||||
// position: 'right',
|
||||
// },
|
||||
{
|
||||
type: 'localeDropdown',
|
||||
position: 'right',
|
||||
},
|
||||
// {
|
||||
// position: 'right',
|
||||
// component:'./src/components/LanguageSwitcher',
|
||||
|
|
@ -122,7 +129,7 @@ module.exports = {
|
|||
},
|
||||
{
|
||||
label: '合作伙伴',
|
||||
to: 'https://forum.trustie.net/forums/5030/detail',
|
||||
to: 'https://forum.gitlink.org.cn/forums/5030/detail',
|
||||
},
|
||||
],
|
||||
},
|
||||
|
|
@ -131,7 +138,7 @@ module.exports = {
|
|||
items: [
|
||||
{
|
||||
label: 'API文档',
|
||||
to: 'https://forgeplus.trustie.net/docs/api',
|
||||
to: 'https://www.gitlink.org.cn/docs/api',
|
||||
},
|
||||
{
|
||||
label: 'Git常用命令',
|
||||
|
|
@ -143,7 +150,7 @@ module.exports = {
|
|||
},
|
||||
{
|
||||
label: '服务协议',
|
||||
to: 'https://forum.trustie.net/forums/5029/detail',
|
||||
to: 'https://forum.gitlink.org.cn/forums/5029/detail',
|
||||
},
|
||||
],
|
||||
},
|
||||
|
|
|
|||
|
|
@ -0,0 +1,88 @@
|
|||
---
|
||||
sidebar_label: 'Bot Installation'
|
||||
sidebar_position: 1
|
||||
---
|
||||
import MyButton from './mybutton';
|
||||
|
||||
<MyButton onClick={() => {
|
||||
var pElements = document.getElementsByTagName('p');
|
||||
var hElements = document.getElementsByTagName('h1');
|
||||
var aElements = document.getElementsByTagName('a');
|
||||
var hzh = ['bot安装','bot安装'];
|
||||
var hen = ['Bot Installation','Bot Installation'];
|
||||
var azh = ['跳到主要内容','','帮助中心','','','','','','','','','','','','','','','','','','','','','机器人(Bot)','编辑此页','上一页 bot市场','下一页bot 配置','网站首页','关于我们','教学实践','合作伙伴','API文档','Git常用命令','引擎使用手册','服务协议','官网邮箱:gitlink@ccf.org.cn','QQ群','公众号'];
|
||||
var aen = ['Jump to main content','','Help Center','','','','','','','','','','','','','','','','','','','','','Robot (Bot)','Edit this page','last page Bot market','next page Bot configuration','Website homepage','About Us','Teaching practice','Partners','API documentation','Common Git commands','Engine User Manual','Service Agreement','Official website email: gitlink@ccf.org.cn','QQ group','Official Account'];
|
||||
var zhtranalate = ['Bot安装是进行bot安装和管理控制的重要模块,主要包括bot安装、安装查询、安装管理等功能。','在bot详情页,用户点击"安装此Bot"按钮后,可以看到该bot工作所需的各项权限信息。若用户同意授予bot所需的相关权限即可进行安装。用户可选择将bot安装到所有仓库(用户拥有的所有仓库)中,也可以选择指定的仓库进行安装。','','在个人"设置"或者"仓库设置"中,用户可以看到目前已经安装的Bot情况,点击"配置"按钮可以对bot安装情况进行配置,点击"卸载"按钮可以进行卸载。','','在bot安装配置页中,用户可以掌握该bot的安装位置和工作状态。若用户需要更改bot的工作仓库时,可以进行更改安装位置。bot的工作状态包括激活和挂起,用户可根据需要对bot的状态进行调整,将其挂起或者激活,会影响到bot对仓库数据的访问权限。','','©Copyright 2024 CCF 开源发展委员会','Powered by Trustie& IntelliDE 京ICP备13000930号'];
|
||||
var entranslate = ['Bot installation is an important module for bot installation and management control, which mainly includes functions such as bot installation, installation queries, and installation management.','On the bot details page, after clicking the "Install this bot" button, users can see the necessary permission information for the bot to work. If the user agrees to grant the necessary permissions to the bot, installation can proceed. Users can choose to install the bot in all warehouses (all warehouses owned by the user) or select a specified warehouse for installation.','','In personal "settings" or "warehouse settings", users can see the current installation status of bots. Click the "configure" button to configure the bot installation status, and click the "uninstall" button to uninstall.','','In the bot installation configuration page, users can grasp the installation location and working status of the bot. If the user needs to change the workspace of the bot, they can change the installation location. The working status of bots includes activation and suspension. Users can adjust the status of bots as needed. Suspending or activating bots can affect their access to warehouse data.','','© Copyright 2024 CCF Open Source Development Committee','Powered by Trust&IntelliDE Beijing ICP Preparation No. 13000930'];
|
||||
if (pElements[0].innerText == zhtranalate[0]){
|
||||
for (var i = 0; i < pElements.length; i++) {
|
||||
if (pElements[i].innerText != ''){
|
||||
if (i < pElements.length){
|
||||
pElements[i].innerText = entranslate[i];
|
||||
}
|
||||
}
|
||||
}
|
||||
}
|
||||
else{
|
||||
for (var i = 0; i < pElements.length; i++) {
|
||||
if (pElements[i].innerText != ''){
|
||||
if (i < pElements.length){
|
||||
pElements[i].innerText = zhtranalate[i];
|
||||
}
|
||||
}
|
||||
}
|
||||
}
|
||||
if (hElements[0].innerText == hzh[0]){
|
||||
for (var i = 0; i < hElements.length; i++) {
|
||||
if (hElements[i].innerText != ''){
|
||||
if (i < hElements.length){
|
||||
hElements[i].innerText = hen[i];
|
||||
}
|
||||
}
|
||||
}
|
||||
}
|
||||
else{
|
||||
for (var i = 0; i < hElements.length; i++) {
|
||||
if (hElements[i].innerText != ''){
|
||||
if (i < hElements.length){
|
||||
hElements[i].innerText = hzh[i];
|
||||
}
|
||||
}
|
||||
}
|
||||
}
|
||||
if (aElements[0].innerText == azh[0]){
|
||||
for (var i = 0; i < aElements.length; i++) {
|
||||
if (aElements[i].innerText != ''){
|
||||
if (i < aElements.length){
|
||||
aElements[i].innerText = aen[i];
|
||||
}
|
||||
}
|
||||
}
|
||||
}
|
||||
else{
|
||||
for (var i = 0; i < aElements.length; i++) {
|
||||
if (aElements[i].innerText != ''){
|
||||
if (i < aElements.length){
|
||||
aElements[i].innerText = azh[i];
|
||||
}
|
||||
}
|
||||
}
|
||||
}
|
||||
}}>EN/CN</MyButton>
|
||||
|
||||
|
||||
# Bot Installation
|
||||
|
||||
Bot Installation is an important module for bot installation and management control, primarily including features such as bot installation, installation query, and installation management.
|
||||
|
||||
On the bot detail page, after clicking the "Install this Bot" button, users can see the various permission information required for the bot to function. If the user agrees to grant the bot the required permissions, installation can proceed. Users can choose to install the bot in all repositories (all repositories owned by the user) or select a specific repository for installation.
|
||||
|
||||

|
||||
|
||||
In personal "Settings" or "Repository Settings", users can view the currently installed bots. Click the "Configure" button to configure the bot installation, and click the "Uninstall" button to uninstall.
|
||||
|
||||

|
||||
|
||||
On the bot installation configuration page, users can see the bot's installation location and working status. If users need to change the bot's working repository, they can modify the installation location. The bot's working status includes active and suspended. Users can adjust the bot's status as needed; suspending or activating it will affect the bot's access to repository data.
|
||||
|
||||

|
||||
|
|
@ -0,0 +1,81 @@
|
|||
---
|
||||
sidebar_label: 'Bot Market'
|
||||
sidebar_position: 4
|
||||
---
|
||||
import MyButton from './mybutton';
|
||||
|
||||
<MyButton onClick={() => {
|
||||
var pElements = document.getElementsByTagName('p');
|
||||
var hElements = document.getElementsByTagName('h1');
|
||||
var hzh = ['bot市场','bot市场'];
|
||||
var hen = ['Bot Market','Bot Market'];
|
||||
var zhtranalate = ['Bot市场是进行Bot分享与复用的重要模块,主要包括bot的搜索发现,详情查看等功能。','Bot市场主页中展示了目前所有已经上架市场的bot简要信息,包括bot的头像,名称,开发者,简介和安装次数等信息,用户可根据这些基本信息初步判断该bot是否符合自己的项目需求。','在bot市场主页中,用户可以选择指定的bot种类,筛选出特定分类的bot,在这个种类范围内进行搜索与选择。','此外,用户通过在搜索栏中输入关键字进行搜索,可检索出内容包含指定关键字的相关bot。','用户可结合种类筛选和关键字搜索缩小范围,在市场中快速找到符合项目相关需求的bot。','','在bot市场页中,用户点击指定的bot卡片即可进入该bot的详情页。Bot的详情页包含bot的头像,名称,开发者,种类和详细介绍等信息,用户可在此掌握该bot的各项介绍,进一步判断是否将其安装到指定仓库中。','','在bot详情页中,若用户认为该bot满足自己的项目需求,可点击"安装此Bot"按钮,了解该bot的权限信息,将其安装到指定的仓库中,关于安装的更多介绍可见"Bot安装"部分。','去市场看看吧!','©Copyright 2024 CCF 开源发展委员会','Powered by Trustie& IntelliDE 京ICP备13000930号'];
|
||||
var entranslate = ['The bot market is an important module for sharing and reusing bots, mainly including functions such as searching, discovering, and viewing details of bots.' , 'The Bot Market homepage displays brief information about all bots that have been put on the market, including their avatars, names, developers, introductions, and installation times. Users can use this basic information to preliminarily determine whether the bot meets their project requirements.' , 'On the bot market homepage, users can select a specific type of bot, filter out specific categories of bots, and search and select within this category range.' , 'In addition, users can search for relevant bots containing specified keywords by entering keywords in the search bar.' , 'Users can combine category filtering and keyword search to narrow down the scope and quickly find bots that meet project related needs in the market.' , '' , 'In the bot market page, users can click on the specified bot card to enter the details page of the bot. The details page of the bot includes information such as the bot avatar, name, developer, type, and detailed introduction. Users can grasp the various introductions of the bot here and further determine whether to install it in the designated warehouse.' , '' , 'In the bot details page, if users believe that the bot meets their project requirements, they can click the "Install this bot" button to learn about the bots permission information and install it in the designated warehouse. For more information on installation, please refer to the "Bot Installation" section' , 'Go take a look at the market!' , '©Copyright 2024 CCF Open Source Development Committee' , 'Powered by Trustie& IntelliDE 京ICP备13000930号'];
|
||||
if (pElements[0].innerText == zhtranalate[0]){
|
||||
for (var i = 0; i < pElements.length; i++) {
|
||||
if (pElements[i].innerText != ''){
|
||||
if (i < pElements.length){
|
||||
pElements[i].innerText = entranslate[i];
|
||||
}
|
||||
}
|
||||
}
|
||||
}
|
||||
else{
|
||||
for (var i = 0; i < pElements.length; i++) {
|
||||
if (pElements[i].innerText != ''){
|
||||
if (i < pElements.length){
|
||||
pElements[i].innerText = zhtranalate[i];
|
||||
}
|
||||
}
|
||||
}
|
||||
}
|
||||
if (hElements[0].innerText == hzh[0]){
|
||||
for (var i = 0; i < hElements.length; i++) {
|
||||
if (hElements[i].innerText != ''){
|
||||
if (i < hElements.length){
|
||||
hElements[i].innerText = hen[i];
|
||||
}
|
||||
}
|
||||
}
|
||||
}
|
||||
else{
|
||||
for (var i = 0; i < hElements.length; i++) {
|
||||
if (hElements[i].innerText != ''){
|
||||
if (i < hElements.length){
|
||||
hElements[i].innerText = hzh[i];
|
||||
}
|
||||
}
|
||||
}
|
||||
}
|
||||
}}>EN/CN</MyButton>
|
||||
|
||||
# Bot Market
|
||||
|
||||
The Bot Market is an important module for sharing and reusing bots, primarily including features such as bot search and discovery, and detail viewing.
|
||||
|
||||
The Bot Market homepage displays brief information about all bots currently listed on the market, including the bot's avatar, name, developer, description, and installation count. Users can use this basic information to make an initial judgment on whether a bot meets their project requirements.
|
||||
|
||||
On the Bot Market homepage, users can select a specific bot category to filter bots of that type, and search and select within that category.
|
||||
|
||||
Additionally, users can search by entering keywords in the search bar to find bots whose content contains the specified keywords.
|
||||
|
||||
Users can combine category filtering and keyword search to narrow down results and quickly find bots in the market that meet their project needs.
|
||||
|
||||

|
||||
|
||||
On the Bot Market page, users can click a specific bot card to enter its detail page. The bot's detail page includes the bot's avatar, name, developer, category, and detailed description, allowing users to review all the bot's information and further determine whether to install it in a designated repository.
|
||||
|
||||

|
||||
|
||||
On the bot detail page, if users believe the bot meets their project requirements, they can click the "Install this Bot" button to review the bot's permission information and install it in a designated repository. For more information on installation, see the "Bot Installation" section.
|
||||
|
||||
|
||||
|
||||
|
||||
|
||||
Go take a look at the market!
|
||||
|
||||
<MyButton onClick={() => {
|
||||
location.href = "https://www.gitlink.org.cn/softbot";
|
||||
}}>Bot Market</MyButton>
|
||||
|
||||
|
|
@ -0,0 +1,68 @@
|
|||
---
|
||||
sidebar_label: 'Bot Development'
|
||||
sidebar_position: 3
|
||||
---
|
||||
import MyButton from './mybutton';
|
||||
|
||||
<MyButton onClick={() => {
|
||||
var pElements = document.getElementsByTagName('p');
|
||||
var hElements = document.getElementsByTagName('h1');
|
||||
var hzh = ['bot开发','bot开发'];
|
||||
var hen = ['Bot Development','Bot Development'];
|
||||
var zhtranalate = ['Bot开发是开发者进行bot注册的重要模块。' , '在个人"设置"中,用户可以看到目前已经注册的bot列表,点击对应bot的"编辑"按钮可以对已注册的bot进行配置;点击"Bot注册"按钮开始注册新的bot。' , '' , '在注册页中,开发者需要填写bot注册的相关信息,包括bot的名称、Webhook 地址,详细介绍等,系统将对开发者输入的信息进行合法性校验,确保bot各项信息的完整性和有效性。此外,系统将自动生成bot的唯一标识,同时调用 GitLink 平台的相关接口生成bot的身份凭证信息,包括客户端密钥和私钥等。' , '开发者需通过这些身份信息结合平台接口进行bot身份认证后,调用相关接口完成bot的相关功能。' , '平台开发API链接(待完善):https://www.gitlink.org.cn/docs/api#introduction' , '' , '' , '©Copyright 2024 CCF 开源发展委员会' , 'Powered by Trustie& IntelliDE 京ICP备13000930号'];
|
||||
var entranslate = ['Bot development is an important module for developers to register their bots.' , 'In personal settings, users can see a list of registered bots and click the "Edit" button on the corresponding bot to configure the registered bots; Click the "Bot Registration" button to start registering a new bot.' , '' , 'In the registration page, developers need to fill in the relevant information for bot registration, including the name of the bot, Webhook address, detailed introduction, etc. The system will verify the legality of the information entered by the developer to ensure the completeness and validity of all bot information. In addition, the system will automatically generate a unique identifier for the bot, and call the relevant interfaces of the GitLink platform to generate the identity credential information of the bot, including the client key and private key.' , 'Developers need to use these identity information in combination with the platform interface for bot identity authentication, and then call the relevant interface to complete the relevant functions of the bot.' , 'Platform development API link (to be improved): https://www.gitlink.org.cn/docs/api#introduction' , '' , '' , '© Copyright 2024 CCF Open Source Development Committee' , 'Powered by Trust&IntelliDE Beijing ICP Preparation No. 13000930'];
|
||||
if (pElements[0].innerText == zhtranalate[0]){
|
||||
for (var i = 0; i < pElements.length; i++) {
|
||||
if (pElements[i].innerText != ''){
|
||||
if (i < pElements.length){
|
||||
pElements[i].innerText = entranslate[i];
|
||||
}
|
||||
}
|
||||
}
|
||||
}
|
||||
else{
|
||||
for (var i = 0; i < pElements.length; i++) {
|
||||
if (pElements[i].innerText != ''){
|
||||
if (i < pElements.length){
|
||||
pElements[i].innerText = zhtranalate[i];
|
||||
}
|
||||
}
|
||||
}
|
||||
}
|
||||
if (hElements[0].innerText == hzh[0]){
|
||||
for (var i = 0; i < hElements.length; i++) {
|
||||
if (hElements[i].innerText != ''){
|
||||
if (i < hElements.length){
|
||||
hElements[i].innerText = hen[i];
|
||||
}
|
||||
}
|
||||
}
|
||||
}
|
||||
else{
|
||||
for (var i = 0; i < hElements.length; i++) {
|
||||
if (hElements[i].innerText != ''){
|
||||
if (i < hElements.length){
|
||||
hElements[i].innerText = hzh[i];
|
||||
}
|
||||
}
|
||||
}
|
||||
}
|
||||
}}>EN/CN</MyButton>
|
||||
|
||||
# Bot Development
|
||||
|
||||
Bot Development is an important module for developers to register bots.
|
||||
|
||||
In personal "Settings", users can view the list of currently registered bots. Click the "Edit" button on a corresponding bot to configure it; click the "Bot Registration" button to start registering a new bot.
|
||||
|
||||

|
||||
|
||||
On the registration page, developers need to fill in relevant information for bot registration, including the bot's name, Webhook address, detailed description, etc. The system will validate the legality of the information entered by the developer to ensure the completeness and validity of all bot information. Additionally, the system will automatically generate a unique identifier for the bot and call relevant GitLink platform APIs to generate the bot's identity credentials, including a client key and private key.
|
||||
|
||||
Developers must use these credentials combined with platform APIs for bot identity authentication, and then call the relevant APIs to implement the bot's functionality.
|
||||
|
||||
Platform development API link (to be improved): https://www.gitlink.org.cn/docs/api#introduction
|
||||
|
||||

|
||||
|
||||

|
||||
|
|
@ -0,0 +1,69 @@
|
|||
---
|
||||
sidebar_label: 'Bot Configuration'
|
||||
sidebar_position: 2
|
||||
---
|
||||
import MyButton from './mybutton';
|
||||
|
||||
<MyButton onClick={() => {
|
||||
var pElements = document.getElementsByTagName('p');
|
||||
var hElements = document.getElementsByTagName('h1');
|
||||
var hzh = ['bot配置','bot配置'];
|
||||
var hen = ['Bot Configure','Bot Configure'];
|
||||
var zhtranalate = ['Bot配置是开发者进行bot维护和配置的重要模块,主要包括bot基本信息维护、权限&订阅事件管理、高级选项配置等功能。','Bot的基本信息维护中,开发者可以看到bot的各项基本信息,并可以根据需要对bot的头像,名称,Webhook地址等进行修改。','','Bot的权限&订阅事件管理中,开发者可根据对仓库资源的访问需要为bot分配不同的权限和等级,比如增加代码库权限,将拉取请求的写权限变为读权限等。开发者还能更改当前bot订阅的事件列表,比如订阅代码库推送,取消拉取请求分配订阅等,以实现bot功能的更新与升级。','','Bot高级选项配置中,开发者可以改变bot的公私有状态,从而影响到bot的使用范围。需要注意的是,公开状态下的bot在已有其他仓库安装的情况下不能变成私有。开发者可选择将bot上架到市场,需要填写上架信息,包括市场简介,主要功能,次要功能等各项信息。','开发者还能进行bot的删除和转让操作,发起转让意味着更改bot的所有权,需要输入接受者的用户名。在接受者确定接受后,即可完成bot的所有权变更,拒绝则会取消本次的转让操作。','','©Copyright 2024 CCF 开源发展委员会','Powered by Trustie& IntelliDE 京ICP备13000930号'];
|
||||
var entranslate = ['Bot configuration is an important module for developers to maintain and configure bots, mainly including basic bot information maintenance, permission&subscription event management, advanced option configuration, and other functions.' , 'In the basic information maintenance of bots, developers can see various basic information of bots and modify their avatars, names, Webhook addresses, etc. as needed.' , '' , 'In the permission and subscription event management of bots, developers can assign different permissions and levels to bots based on their access needs to warehouse resources, such as adding code library permissions, changing write permissions for pull requests to read permissions, etc. Developers can also modify the event list of the current bot subscription, such as subscribing to code library push notifications, canceling pull request allocation subscriptions, etc., to achieve updates and upgrades of bot functionality.' , '' , 'In the advanced options configuration of bots, developers can change the public and private status of bots, thereby affecting their usage scope. It should be noted that bots in public status cannot become private when installed in other warehouses. Developers can choose to put their bots on the market and need to fill in the listing information, including market introduction, main functions, secondary functions, and other related information.' , 'Developers can also perform bot deletion and transfer operations, initiating transfer means changing the ownership of the bot, and the recipients username needs to be entered. After the recipient confirms acceptance, the ownership change of the bot can be completed. Refusal will cancel the transfer operation.' , '' , '© Copyright 2024 CCF Open Source Development Committee' , 'Powered by Trust&IntelliDE Beijing ICP Preparation No. 13000930'];
|
||||
if (pElements[0].innerText == zhtranalate[0]){
|
||||
for (var i = 0; i < pElements.length; i++) {
|
||||
if (pElements[i].innerText != ''){
|
||||
if (i < pElements.length){
|
||||
pElements[i].innerText = entranslate[i];
|
||||
}
|
||||
}
|
||||
}
|
||||
}
|
||||
else{
|
||||
for (var i = 0; i < pElements.length; i++) {
|
||||
if (pElements[i].innerText != ''){
|
||||
if (i < pElements.length){
|
||||
pElements[i].innerText = zhtranalate[i];
|
||||
}
|
||||
}
|
||||
}
|
||||
}
|
||||
if (hElements[0].innerText == hzh[0]){
|
||||
for (var i = 0; i < hElements.length; i++) {
|
||||
if (hElements[i].innerText != ''){
|
||||
if (i < hElements.length){
|
||||
hElements[i].innerText = hen[i];
|
||||
}
|
||||
}
|
||||
}
|
||||
}
|
||||
else{
|
||||
for (var i = 0; i < hElements.length; i++) {
|
||||
if (hElements[i].innerText != ''){
|
||||
if (i < hElements.length){
|
||||
hElements[i].innerText = hzh[i];
|
||||
}
|
||||
}
|
||||
}
|
||||
}
|
||||
}}>EN/CN</MyButton>
|
||||
|
||||
# Bot Configuration
|
||||
|
||||
Bot Configuration is an important module for developers to maintain and configure bots, primarily including basic bot information maintenance, permission & subscription event management, and advanced option configuration.
|
||||
|
||||
In basic bot information maintenance, developers can view various basic information about the bot and can modify the bot's avatar, name, Webhook address, etc., as needed.
|
||||
|
||||

|
||||
|
||||
In bot permission & subscription event management, developers can assign different permissions and levels to the bot based on access needs to repository resources, such as adding code repository permissions or changing pull request write permissions to read permissions. Developers can also modify the list of events the current bot is subscribed to, such as subscribing to code repository pushes or unsubscribing from pull request assignment subscriptions, to update and upgrade the bot's functionality.
|
||||
|
||||

|
||||
|
||||
|
||||
In bot advanced option configuration, developers can change the bot's public/private status, thereby affecting the bot's scope of use. Note that a public bot cannot be made private if it is already installed in other repositories. Developers can choose to list the bot on the market and need to fill in listing information, including market description, primary functions, secondary functions, and other relevant information.
|
||||
|
||||
Developers can also perform bot deletion and transfer operations. Initiating a transfer means changing the ownership of the bot, requiring the recipient's username to be entered. Once the recipient confirms acceptance, the ownership transfer is completed; refusal will cancel the transfer operation.
|
||||
|
||||

|
||||
|
|
@ -0,0 +1,13 @@
|
|||
import React from 'react';
|
||||
import styles from './mybutton.module.css'; // 假设你有一个CSS模块文件来定义样式
|
||||
|
||||
const MyButton = ({ onClick, children, className = '' }) => (
|
||||
<button
|
||||
onClick={onClick}
|
||||
className={`${styles.myButton} ${className}`} // 使用CSS模块样式
|
||||
>
|
||||
{children}
|
||||
</button>
|
||||
);
|
||||
|
||||
export default MyButton;
|
||||
|
|
@ -0,0 +1,21 @@
|
|||
.myButton {
|
||||
background-color: #30a834; /* Green */
|
||||
border: none;
|
||||
color: #fff; /* 改为白色或其他与绿色背景对比明显的颜色 */
|
||||
padding: 15px 32px;
|
||||
text-align: center;
|
||||
text-decoration: none;
|
||||
display: inline-block;
|
||||
font-size: 16px;
|
||||
margin: 4px 2px;
|
||||
cursor: pointer;
|
||||
position: absolute;
|
||||
right: 0;
|
||||
/* 还可以添加其他样式,比如过渡效果、阴影等 */
|
||||
transition: background-color 0.3s ease; /* 背景色变化的过渡效果 */
|
||||
box-shadow: 0 4px 8px rgba(0, 0, 0, 0.1); /* 简单的阴影效果 */
|
||||
}
|
||||
|
||||
.myButton:hover {
|
||||
background-color: #288f2c; /* 鼠标悬停时改变背景色 */
|
||||
}
|
||||
|
|
@ -0,0 +1,12 @@
|
|||
---
|
||||
sidebar_label: 'Code Pipeline'
|
||||
sidebar_position: 5
|
||||
---
|
||||
# Code Pipeline
|
||||
Pipelines can be configured in code form (YAML format). First, select the code pipeline and the corresponding branch:
|
||||
|
||||

|
||||
|
||||
Edit the pipeline code. The concepts of pipeline name, description, triggers, global parameters, serial/concurrent execution, and pipeline orchestration are the same as those in graphical pipelines, as described below:
|
||||
|
||||

|
||||
|
|
@ -0,0 +1,15 @@
|
|||
---
|
||||
sidebar_label: 'Parameter Configuration'
|
||||
sidebar_position: 2
|
||||
---
|
||||
|
||||
# Parameter Configuration
|
||||
|
||||
Parameters can be used within pipelines to enable dynamic parameter configuration. There are three types: string, number, and boolean.
|
||||
|
||||

|
||||
|
||||
|
||||
Parameters can be obtained in the pipeline configuration as follows:
|
||||
|
||||

|
||||
|
|
@ -0,0 +1,49 @@
|
|||
---
|
||||
sidebar_label: 'Graphical Pipeline'
|
||||
sidebar_position: 4
|
||||
---
|
||||
|
||||
# Graphical Pipeline
|
||||
## Basic Information
|
||||
You can edit the name and description of the pipeline.
|
||||
|
||||
Pipeline names under the same repository cannot be duplicated.
|
||||
|
||||

|
||||
|
||||
## Triggers
|
||||
Note: When orchestrating a pipeline, the trigger must be placed before the start node. Currently, a pipeline only supports adding one trigger.
|
||||
|
||||
* Cron trigger: You can set the specific trigger time by filling in a cron expression.
|
||||

|
||||
|
||||
* Event trigger GitLink_Webhook: Provides common code change event triggers, including push code, merge request, and create tag.
|
||||

|
||||
|
||||
## Global Parameters
|
||||
|
||||
Once added, they can be used within the current pipeline.
|
||||
|
||||

|
||||
|
||||
Usage example
|
||||
|
||||

|
||||
|
||||
## Concurrent Execution
|
||||
|
||||

|
||||
|
||||
When enabled, the same pipeline can concurrently execute n pipeline instances (each trigger yields one pipeline instance).
|
||||
|
||||

|
||||
|
||||
If not enabled, while the current pipeline instance is executing, subsequent instances are queued (up to 5 instances can be queued). Once the current instance completes, the next instance begins execution.
|
||||
|
||||

|
||||
|
||||
|
||||
## Pipeline Orchestration
|
||||
|
||||
Each pipeline must have a start node, an end node, and at least one task node. Both serial and parallel orchestration are supported.
|
||||
|
||||
|
|
@ -0,0 +1,16 @@
|
|||
---
|
||||
sidebar_label: 'Secret Settings'
|
||||
sidebar_position: 3
|
||||
---
|
||||
|
||||
# Secret Settings
|
||||
|
||||
Store account credentials, keys, certificates, and other sensitive information in secret management. Once configured, they can be used directly in pipelines, avoiding the risk of leakage caused by directly entering them in plain text.
|
||||
|
||||

|
||||
|
||||
Usage example
|
||||
|
||||
Note: In the node input parameters, the dropdown options correspond to secret types. Secrets need to be configured in advance before they can be selected and used in the pipeline.
|
||||
|
||||

|
||||
|
|
@ -0,0 +1,13 @@
|
|||
---
|
||||
sidebar_label: 'Engine Introduction'
|
||||
sidebar_position: 1
|
||||
---
|
||||
|
||||
# Engine
|
||||
|
||||
The Engine is a DevOps tool provided by GitLink that builds development, testing, and deployment pipelines through simple node orchestration, thereby creating an automated software delivery process.
|
||||
It enables continuous code integration, allowing developers to detect quality issues early, quickly locate and fix them, and improve software development efficiency and quality. Automated code scanning, compilation and packaging, and unit testing free R&D teams from repetitive work, allowing them to focus on more valuable tasks.
|
||||
|
||||

|
||||
|
||||
On the Engine page, users can create and edit graphical pipelines or code pipelines, set external parameters, manage secrets, and perform other operations.
|
||||
|
|
@ -0,0 +1,10 @@
|
|||
---
|
||||
sidebar_label: 'Execution Record Query'
|
||||
sidebar_position: 6
|
||||
---
|
||||
|
||||
# Execution Record Query
|
||||
|
||||
Users can view the running status of pipelines.
|
||||
|
||||

|
||||
|
|
@ -0,0 +1,93 @@
|
|||
---
|
||||
sidebar_label: "介绍"
|
||||
label: "介绍"
|
||||
sidebar_position: 1
|
||||
slug: /
|
||||
---
|
||||
|
||||
# About GitLink
|
||||
GitLink (确实开源) is the official open-source innovation service platform designated by CCF, with the mission of "serving open-source innovation" and the vision of "becoming a hub for open-source innovation." Adhering to the values of "innovation, openness, collaboration, and sharing," GitLink is committed to empowering large-scale open-source collaborative innovation, building an open-source innovation ecosystem that fosters the incubation of innovative achievements and the cultivation of new engineering talent!
|
||||
|
||||

|
||||
|
||||
# Platform Features
|
||||
|
||||
- **Distributed Collaborative Development**: Supports online file editing, branch management, contribution statistics, repository forking, and merge requests;
|
||||
- **One-Stop Process Management**: Supports issue tracking, milestones, notification reminders, label archiving, Wiki documentation, and organization management;
|
||||
- **Efficient Pipeline Operations**: Provides a lightweight workflow engine with support for custom configuration, static scanning, and artifact building;
|
||||
- **Multi-Level Code Analysis**: Supports code provenance analysis, license risk analysis, open-source vulnerability detection, and hardening recommendations;
|
||||
- **Multi-Dimensional User Profiling**: Supports development activity statistics, contribution calendar, capability modeling, and role and specialization positioning analysis.
|
||||
|
||||
# Help Documentation
|
||||
The help documentation assists you in fully understanding the GitLink platform. Let's contribute to open-source innovation together!
|
||||
|
||||
<div class="row">
|
||||
<div class="col col--12">
|
||||
<section class="row list">
|
||||
<article class="col col--6 margin-bottom--lg">
|
||||
<a class="card padding--lg cardContainer" href="/快速开始/注册GitLink账号">
|
||||
<h2 class="text--truncate cardTitle" title="快速开始">Quick Start</h2>
|
||||
<p>Help users quickly register and use the platform [5 documents]</p>
|
||||
</a></article>
|
||||
<article class="col col--6 margin-bottom--lg">
|
||||
<a class="card padding--lg cardContainer" href="/代码库管理/仓库创建">
|
||||
<h2 class="text--truncate cardTitle" title="代码库管理">Repository Management</h2>
|
||||
<p>Repository usage and settings [9 documents]</p>
|
||||
</a></article>
|
||||
<article class="col col--6 margin-bottom--lg">
|
||||
<a class="card padding--lg cardContainer" href="/组织管理/组织简介">
|
||||
<h2 class="text--truncate cardTitle" title="组织管理">Organization Management</h2>
|
||||
<p>Organization usage and settings [5 documents]</p>
|
||||
</a></article>
|
||||
<article class="col col--6 margin-bottom--lg">
|
||||
<a class="card padding--lg cardContainer" href="/疑修/疑修简介">
|
||||
<h2 class="text--truncate cardTitle" title="疑修">Issues</h2>
|
||||
<p>Issue usage and settings [7 documents]</p>
|
||||
</a></article>
|
||||
<article class="col col--6 margin-bottom--lg">
|
||||
<a class="card padding--lg cardContainer" href="/合并请求/合并请求简介">
|
||||
<h2 class="text--truncate cardTitle" title="合并请求">Merge Requests</h2>
|
||||
<p>Merge Request (Pull Request) usage and settings [5 documents]</p>
|
||||
</a></article>
|
||||
<article class="col col--6 margin-bottom--lg">
|
||||
<a class="card padding--lg cardContainer" href="/DevOps引擎/引擎简介">
|
||||
<h2 class="text--truncate cardTitle" title="DevOps引擎">DevOps Engine</h2>
|
||||
<p>DevOps Engine usage and settings [6 documents]</p>
|
||||
</a></article>
|
||||
<article class="col col--6 margin-bottom--lg">
|
||||
<a class="card padding--lg cardContainer" href="/维基/模板导入及导出">
|
||||
<h2 class="text--truncate cardTitle" title="维基">Wiki</h2>
|
||||
<p>Wiki usage and settings [2 documents]</p>
|
||||
</a></article>
|
||||
<article class="col col--6 margin-bottom--lg">
|
||||
<a class="card padding--lg cardContainer" href="/Bot市场/bot安装">
|
||||
<h2 class="text--truncate cardTitle" title="Bot市场">Bot Marketplace</h2>
|
||||
<p>Bot Marketplace usage and settings [4 documents]</p>
|
||||
</a></article>
|
||||
<article class="col col--6 margin-bottom--lg">
|
||||
<a class="card padding--lg cardContainer" href="/第三方服务/跨平台代码同步">
|
||||
<h2 class="text--truncate cardTitle" title="第三方服务">Third-Party Services</h2>
|
||||
<p>Third-party service usage and settings [3 documents]</p>
|
||||
</a></article>
|
||||
<article class="col col--6 margin-bottom--lg">
|
||||
<a class="card padding--lg cardContainer" href="/通知/通知简介">
|
||||
<h2 class="text--truncate cardTitle" title="通知">Notifications</h2>
|
||||
<p>Notification introduction and settings [2 documents]</p>
|
||||
</a></article>
|
||||
<article class="col col--6 margin-bottom--lg">
|
||||
<a class="card padding--lg cardContainer" href="/个人主页建站/建站流程">
|
||||
<h2 class="text--truncate cardTitle" title="个人主页建站">Personal Page Builder</h2>
|
||||
<p>Personal page builder usage and settings [2 documents]</p>
|
||||
</a></article>
|
||||
<article class="col col--6 margin-bottom--lg">
|
||||
<a class="card padding--lg cardContainer" href="/平台公告">
|
||||
<h2 class="text--truncate cardTitle" title="平台公告">Platform Announcements</h2>
|
||||
</a></article>
|
||||
<article class="col col--6 margin-bottom--lg">
|
||||
<a class="card padding--lg cardContainer" href="/服务协议/GitLink服务协议">
|
||||
<h2 class="text--truncate cardTitle" title="服务协议">Terms of Service</h2>
|
||||
<p>GitLink Terms of Service [1 document]</p>
|
||||
</a></article>
|
||||
</section>
|
||||
</div>
|
||||
</div>
|
||||
|
|
@ -0,0 +1,66 @@
|
|||
---
|
||||
sidebar_label: '建站工具'
|
||||
sidebar_position: 2
|
||||
---
|
||||
# Site Builder Tools
|
||||
|
||||
Personal Site Builder is a free static web page hosting service that can be used to host static personal homepages, personal blogs, and other static pages. The different site builder tools are as follows:
|
||||
|
||||
## Hugo
|
||||
|
||||
When using the Hugo tool to create a repository, you need to modify the `baseURL` value in the `config.toml` file of your code repository.
|
||||
Change the value to the website URL displayed in the Personal Site Builder service.
|
||||
For example: If your website URL is `http://KingChan.gitlink.net`,
|
||||
then the `baseURL` in `config.toml` should be `http://KingChan.gitlink.net`.
|
||||

|
||||
|
||||
After making the changes, click Submit.
|
||||

|
||||
Once submitted, start the deployment.
|
||||

|
||||
Static page preview:
|
||||

|
||||
|
||||
## Jekyll
|
||||
|
||||
If you have a Jekyll project:
|
||||
When using the Jekyll tool to create a personal site, you need to modify both the `baseurl` and `url` values in the `_config.yml` file of your code repository. The Jekyll configuration file is somewhat unique and requires adjusting both values based on the website URL displayed in the Personal Site Builder service.
|
||||
For example: If your website URL is `http://KingChan.gitlink.net`,
|
||||
the configuration should be:
|
||||
baseurl: "/"
|
||||
url: "http://KingChan.gitlink.net"
|
||||
|
||||

|
||||
|
||||
After making the changes, click **Commit Changes**.
|
||||

|
||||
Once submitted, go to the site builder service to start deployment.
|
||||

|
||||
|
||||

|
||||
|
||||
## Hexo
|
||||
|
||||
If you have a Hexo project:
|
||||
When using the Hexo tool to create a repository, you need to modify the `url` value in the `_config.yml` file of your code repository.
|
||||
Change the value to the website URL displayed in the Personal Site Builder service.
|
||||
For example: If your website URL is `http://KingChan.gitlink.net`,
|
||||
|
||||
then the `url` in `_config.yml` should be `http://KingChan.gitlink.net`.
|
||||
|
||||

|
||||
|
||||
After making the changes, click **Commit Changes**.
|
||||

|
||||
Once submitted, go to the site builder service to start deployment.
|
||||
|
||||

|
||||
|
||||

|
||||
|
||||

|
||||
|
||||
## File Tool
|
||||
A document format tool. Using this tool will deploy all files in the selected branch.
|
||||
|
||||
Note: All of the above tools support using the `gh-pages` branch. When you select the `gh-pages` branch during deployment, it will deploy using the document format tool, meaning all files in the branch will be deployed.
|
||||
|
|
@ -0,0 +1,50 @@
|
|||
---
|
||||
sidebar_label: '建站流程'
|
||||
sidebar_position: 1
|
||||
---
|
||||
# Site Creation Process
|
||||
## My Sites
|
||||
Hover over your avatar in the upper-right corner and click **Settings** to enter the My Settings interface.
|
||||
|
||||

|
||||
|
||||
Click **Personal Site Builder - My Sites** in the left panel.
|
||||
|
||||

|
||||
|
||||
## Create a Site
|
||||
|
||||
On the My Sites page, click the **New Site** button to enter the new site creation interface.
|
||||
|
||||
Enter a site name on the New Site page. This name will be displayed in your site list.
|
||||
|
||||
Then select your preferred site builder tool and theme. We provide 3 different tools, each with 10 themes, giving you a total of 30 options to choose from.
|
||||
|
||||

|
||||
|
||||
After filling in the information, click the blue **Create Site** button at the bottom of the page.
|
||||
|
||||

|
||||
|
||||
You now have a website along with a code repository.
|
||||
|
||||
In the repository's **Services** tab, you can find the Personal Site Builder operation interface where you can view your site status, site name, website URL, site builder tool, and creation time.
|
||||
|
||||
## Deploy the Site
|
||||
|
||||

|
||||
|
||||
Click the **Deploy** button, select the branch you want to deploy, then click Confirm.
|
||||
|
||||

|
||||
|
||||
Wait a moment for the process to run. Some server deployment information will be returned to you.
|
||||
|
||||
Once deployment is successful, you can access your site. Click the website URL to visit it.
|
||||
|
||||

|
||||
|
||||
## Deployment Complete
|
||||
|
||||

|
||||
|
||||
|
|
@ -0,0 +1,43 @@
|
|||
---
|
||||
sidebar_label: 'WebIDE User Guide'
|
||||
sidebar_position: 9
|
||||
---
|
||||
|
||||
## 1. Language Services
|
||||
- Supports syntax highlighting for nearly 40 languages
|
||||
|
||||
- Supports LSP (Language Server Protocol) based language features for JavaScript/TypeScript, HTML, CSS, JSON, and Markdown, featuring intelligent hints, outline information, and single-file navigation.
|
||||
|
||||
- Supports Tree Sitter based online language service capabilities for Java, Go, Python, C++, and PHP, providing features such as reference lookup and symbol search
|
||||
|
||||
## 2. WebIDE Entry Point
|
||||
From the GitLink repository homepage, click the Web IDE button to enter.
|
||||

|
||||
|
||||
## 3. Branches
|
||||
Supports branch switching: click the branch name in the lower left corner to switch branches.
|
||||

|
||||
|
||||
## 4. Search
|
||||
Currently supports code search within GitLink repositories (word matching and file filtering) and file search.
|
||||

|
||||
|
||||
## 5. Line Highlighting
|
||||
Supports single-line or multi-line highlighting. Click a line number to highlight the line, and hold Shift to select consecutive multiple lines.
|
||||

|
||||
|
||||
## 6. Blame
|
||||
Supports viewing single-line blame information. Hover to display detailed information.
|
||||

|
||||
|
||||
## 7. Graph
|
||||
Supports the graph view, allowing you to view branch commit history and detailed file changes for each commit, with support for file diff viewing. Click "Git Graph" in the bottom left corner of the status bar, or enter "View Git Graph" in the command palette to open the Git Graph view.
|
||||

|
||||
|
||||
## 8. WebSCM
|
||||
You can create new branches in the quick edition, and after modifying code, view the list of changed files in the SCM panel. After writing the commit message, commit it to GitLink. If you want to quickly modify some files, you can do it without local modification — directly modify the code through the quick edition and submit it in one go.
|
||||
|
||||
## 9. Online Code Execution
|
||||
- Integrated with the lighter-weight CodeSwing plugin based on skypack, allowing you to run front-end code in the quick edition.
|
||||
- Integrated with the Pyodide-based Code-Runner-For-Web plugin, enabling Python execution right in the browser.
|
||||

|
||||
|
|
@ -0,0 +1,38 @@
|
|||
---
|
||||
sidebar_label: 'Webhook'
|
||||
sidebar_position: 8
|
||||
---
|
||||
### **1. Webhook Module Entry Point**
|
||||
On the project homepage, click the "Repository Settings" button, then click the "Webhooks" button to enter the repository's Webhook module.
|
||||

|
||||
|
||||
### **2. Add a Webhook**
|
||||
Click the "Add Webhook" button to enter the Webhook configuration page:
|
||||
|
||||

|
||||

|
||||
|
||||
### **3. Edit a Webhook**
|
||||
After adding a webhook, as shown below, you can click the "Edit" button on the right to edit each webhook.
|
||||
|
||||

|
||||
|
||||
### **4. Delete a Webhook**
|
||||
After adding a webhook, as shown below, you can click the "Delete" button on the right to delete each webhook.
|
||||
|
||||

|
||||
|
||||
### **5. Webhook Supported Event Types**
|
||||
In GitLink, the webhook supported event types are as follows:
|
||||
- Push: Git push to the repository
|
||||
- Repository: Create or delete a repository
|
||||
- Create: Create a branch or tag
|
||||
- Delete: Delete a branch or tag
|
||||
- Merge Request: A merge request is opened, closed, reopened, or edited
|
||||
- Merge Request Assignment: A merge request is assigned or unassigned
|
||||
- Merge Request Milestone: A merge request is added to or removed from a milestone
|
||||
- Merge Request Comment: A merge request comment is created, edited, or deleted
|
||||
- Merge Request Label: A merge request's labels are updated or cleared
|
||||
- Merge Request Review: A merge request is approved, rejected, or review comments are made, reviewer modifications, review threads resolved or unresolved
|
||||
- Merge Request Sync: A merge request is synced
|
||||
|
||||
|
|
@ -0,0 +1,11 @@
|
|||
---
|
||||
sidebar_label: 'Repository Creation'
|
||||
sidebar_position: 1
|
||||
---
|
||||
### **1. Repository Creation Entry Point**
|
||||
Users can create a repository via the button in the upper right corner of the platform homepage, or through the "New" button in the participating projects section of the personal homepage.
|
||||

|
||||
|
||||
### **2. Fill in Project Basic Information**
|
||||
After entering the new project page, as shown below, fill in the owner, project name, project identifier, and other information, then click the "Create Project" button to complete the creation.
|
||||

|
||||
|
|
@ -0,0 +1,11 @@
|
|||
---
|
||||
sidebar_label: 'Repository Settings'
|
||||
sidebar_position: 2
|
||||
---
|
||||
## 1. Repository Settings Entry Point
|
||||
On the repository homepage, click the "Repository Settings" button to enter the repository settings module. In the repository settings, you can modify basic project information, manage members, configure webhooks, set branches, and install bots.
|
||||

|
||||
|
||||
## 2. Basic Settings
|
||||
After entering the repository settings module, click the "Basic Settings" button to enter the basic settings module. As shown below, you can modify basic information such as the project name, project identifier, project description, project category, and project language. Click the "Transfer" button to transfer the repository to another user or organization, and click the "Delete This Repository" button to delete the repository.
|
||||

|
||||
|
|
@ -0,0 +1,11 @@
|
|||
---
|
||||
sidebar_label: 'Code Commit'
|
||||
sidebar_position: 3
|
||||
---
|
||||
### **1. Code Commit Entry Point**
|
||||
Users can upload files via the "Upload File" button located under the files section in the middle of the project repository.
|
||||

|
||||
|
||||
### **2. Upload Files**
|
||||
After entering the upload file page, as shown below, drag files, select the branch for committing changes, and click the "Create Project" button to complete the upload.
|
||||

|
||||
|
|
@ -0,0 +1,13 @@
|
|||
---
|
||||
sidebar_label: 'Branch Management'
|
||||
sidebar_position: 5
|
||||
---
|
||||
### **1. View Branches**
|
||||
Under the repository section, as shown below, users can click on the repository branches to view all branches of the current project and choose to perform operations on them.
|
||||

|
||||
|
||||
### **2. Merge Branches**
|
||||
After clicking "New Merge Request" under "Pull Requests (PR)":
|
||||

|
||||
As shown below, users can select the source branch and target branch, fill in branch information, and then submit the merge request.
|
||||

|
||||
|
|
@ -0,0 +1,23 @@
|
|||
---
|
||||
sidebar_label: 'Member Management'
|
||||
sidebar_position: 7
|
||||
---
|
||||
## 1. Member Management Entry Point
|
||||
On the repository homepage, click the "Repository Settings" button, then click the "Member Management" button to enter the member management module, as shown below.
|
||||

|
||||
|
||||
## 2. Filter and Search Project Members
|
||||
After entering the member management module, you can use the "Role Filter" button to filter project member types, and use the "Search" button to find specific project members, as shown below.
|
||||

|
||||
|
||||
## 3. Add Project Members
|
||||
After entering the member management module, you can use the "Add Member" button to add project members. After searching for and selecting a specific user in the left search box, click the "Add Member" button to successfully add the project member.
|
||||

|
||||
|
||||
## 4. Project Member Permission Management
|
||||
After entering the member management module, click the role column to the right of a project member to assign a permission level to that project member, as shown below.
|
||||

|
||||
|
||||
## 5. Remove Project Members
|
||||
After entering the member management module, click the "Remove" button to the right of a project member to remove that project member, as shown below.
|
||||

|
||||
|
|
@ -0,0 +1,19 @@
|
|||
---
|
||||
sidebar_label: 'File Management'
|
||||
sidebar_position: 4
|
||||
---
|
||||
## 1. File Management Location
|
||||
In the repository interface, you can directly perform operations on files under a branch in the repository, as shown below.
|
||||

|
||||
|
||||
## 2. Enter Directory
|
||||
Click to enter the relevant directory and locate the file you want to edit, as shown below.
|
||||

|
||||
|
||||
## 3. Enter File Edit Page
|
||||
To edit a file online, click on the file to enter the file editing page, as shown below.
|
||||

|
||||
|
||||
## 4. Edit File
|
||||
There are three buttons on the right side of the editing interface: "Download", "Edit", and "Delete". Click "Download" to download the file locally, "Edit" to edit the document online, and "Delete" to remove the file from the repository. The button positions are shown below.
|
||||

|
||||
|
|
@ -0,0 +1,34 @@
|
|||
---
|
||||
sidebar_label: 'Tags and Releases Management'
|
||||
sidebar_position: 6
|
||||
---
|
||||
## 1. Tags and Releases Management Entry Point
|
||||
On the repository homepage, click the "Repository" button, then click the "Tags" button to enter the tags and releases management module, as shown below.
|
||||

|
||||
|
||||
|
||||
## 2. Create a New Tag
|
||||
After entering the tags and releases management module, click the "New Tag" button to create a new tag, as shown below. Once the new tag dialog opens, fill in the tag name, starting point, and description, then click "Confirm" to complete the creation.
|
||||

|
||||
|
||||
|
||||
## 3. Delete a Tag
|
||||
After entering the tags and releases management module, click the "Delete" button to the right of a tag to delete the tag, as shown below.
|
||||

|
||||
|
||||
## 4. View Releases
|
||||
After entering the tags and releases management module, click the "Releases" button to view the project's releases, as shown below.
|
||||

|
||||
|
||||
## 5. Create a Release
|
||||
After entering the tags and releases management module, click the "Create Release" button to the right of a tag to quickly create a release bound to that tag, as shown below.
|
||||

|
||||
|
||||
## 6. Edit a Release
|
||||
After entering the tags and releases management module, click the edit button to the right of a release to enter the release editing page, as shown below. After completing the release modifications, click the "Save Release" button to save your changes.
|
||||

|
||||

|
||||
|
||||
## 7. Delete a Release
|
||||
After entering the tags and releases management module, click the delete button to the right of a release to enter the release deletion page, as shown below.
|
||||

|
||||
|
|
@ -0,0 +1,13 @@
|
|||
---
|
||||
sidebar_label: '代码评审'
|
||||
sidebar_position: 3
|
||||
---
|
||||
|
||||
# Code Review
|
||||
### **1. Entering Code Review**
|
||||
As shown below, clicking the "Code Review" button will take you to the code review interface.
|
||||

|
||||
|
||||
### **2. Code Review Interface**
|
||||
As shown below, users can view the new code to be merged by this PR and review it in this interface.
|
||||

|
||||
|
|
@ -0,0 +1,22 @@
|
|||
---
|
||||
sidebar_label: '创建合并请求'
|
||||
sidebar_position: 2
|
||||
---
|
||||
|
||||
# Creating a Pull Request
|
||||
|
||||
1. Go to the "**Pull Request (PR)**" page of the project where you want to initiate a pull request, and click the "**New Pull Request**" button at the top to enter the pull request creation interface, as shown below:
|
||||
|
||||

|
||||
|
||||

|
||||
|
||||
2. Select the **source branch** and **target branch** to merge. The source branch is the branch where code development is complete and whose code changes need to be merged. The target branch is the branch into which the code changes will be merged, which can be another branch within the same repository or a branch in the forked source repository;
|
||||
|
||||
3. After selecting the branches, fill in the title and description of this pull request to provide reviewers with information that helps them understand the pull request, thereby speeding up the pull request review process (see the ***Code Review*** section);
|
||||
|
||||
4. Additionally, users can specify reviewers, add milestones, labels, and priority in the right sidebar (a pull request is essentially an issue, so these operations have the same or similar meanings as those in the issue module; you can refer to the issue chapter for additional understanding);
|
||||
|
||||
5. Finally, after filling in all the information, click the "**Create**" button at the bottom to submit your first pull request!
|
||||
|
||||

|
||||
|
|
@ -0,0 +1,98 @@
|
|||
---
|
||||
sidebar_label: '合并模式简介'
|
||||
sidebar_position: 4
|
||||
---
|
||||
|
||||
# Merge Mode Introduction
|
||||
|
||||
After reviewers have examined the code changes submitted by the developer, they can decide whether to merge these commits into the main branch `master`.
|
||||
|
||||
However, there are multiple merge modes for merging commits between different branches. The following image shows the merge modes supported by GitLink, including **Merge Commit**, **Rebase and Merge**, **Rebase Merge --no-ff**, and **Squash Commits and Merge**.
|
||||
|
||||

|
||||
|
||||
1. **Merge Commit**
|
||||
|
||||
**Merge Commit** is the most commonly used merge mode. Taking the following diagram as an example, the developer created the development branch `dev` from commit 3 on the main branch `master`, then made commits A, B, and C respectively, and then merged them onto the `master` branch.
|
||||
|
||||
Before Fast-Forward Merge:
|
||||
|
||||

|
||||
|
||||
After Fast-Forward Merge:
|
||||
|
||||

|
||||
|
||||
**Note**: As you can see, the merge process simply moves the `master` pointer to the `dev` pointer. This type of merge is called **fast-forward**. This occurs because after commit 3, there are no new commits on the `master` branch, so the merge can be completed by simply fast-forwarding the `master` pointer. However, if there are also new commits on the `master` branch, a substantive merge is required, as shown in the following two diagrams:
|
||||
|
||||
Before the merge, after commit A on the `dev` branch and before commit B, commit 4 was made on the `master` branch. At this point, merging the `dev` branch cannot simply fast-forward. Instead, the changes on both branches must be compared and then merged.
|
||||
|
||||
Before Non-Fast-Forward Merge:
|
||||
|
||||

|
||||
|
||||
After the merge, commits A, B, and C will all be added to the `master` commit history in chronological order, and a new commit D will be generated to record the merge event. Additionally, if conflicts occur during the merge process -- i.e., both branches modified the same file -- the conflicts need to be resolved manually. This merge method is called **non-fast-forward**, which is also the default method in **Merge Commit** mode!
|
||||
|
||||
After Non-Fast-Forward Merge:
|
||||
|
||||

|
||||
|
||||
For easier understanding, you can view the merged `master` branch commit history in a linear fashion:
|
||||
|
||||

|
||||
|
||||
**Summary**: In **Merge Commit** mode, the development branch is merged into the `master` branch using **non-fast-forward** by default, and the **non-fast-forward** method generates a special commit to record this merge event!
|
||||
|
||||
2. **Rebase and Merge**
|
||||
|
||||
From the commit history on the `master` branch after a **Merge Commit**, it can be seen that the commit records of two branches may be interleaved, which could cause confusion for subsequent development. **Rebase and Merge** can solve this problem.
|
||||
|
||||
**Rebase and Merge** includes two operations: **rebase** and **merge**. First is rebasing. Taking the following diagram as an example, the `dev` branch was created from commit 3, so commit 3 is the base of `dev`. The rebase operation changes the base of `dev` to the latest commit on the `master` branch. Of course, conflicts may arise during the rebase process and need to be resolved manually.
|
||||
|
||||
Before Rebase:
|
||||
|
||||

|
||||
|
||||
After Rebase, Before Merge:
|
||||
|
||||

|
||||
|
||||
After the `dev` branch is rebased, there are no "newer" commits on the `master` branch, so merging at this point yields the following result:
|
||||
|
||||
After Merge:
|
||||
|
||||

|
||||
|
||||
**Summary**: In **Rebase and Merge** mode, the development branch `dev` can first be rebased so that its commits appear to be based on the latest commit of the `master` branch, and then be merged back into the `master` branch via **fast-forward**, thereby organizing the commit history!
|
||||
|
||||
3. **Rebase Merge --no-ff**
|
||||
|
||||
Because **Rebase and Merge** defaults to **fast-forward** when merging, there is no special commit on the `master` branch to record this merge event. Therefore, the `--no-ff` (**no fast-forward**) option can be used to explicitly declare the use of **non-fast-forward** for merging.
|
||||
|
||||
Before `--no-ff` Merge:
|
||||
|
||||

|
||||
|
||||
After `--no-ff` Merge:
|
||||
|
||||

|
||||
|
||||
**Summary**: With the `--no-ff` option, you can explicitly declare the use of **non-fast-forward** when merging, so that a commit recording the merge event is added to the `master` branch!
|
||||
|
||||
4. **Squash Commits and Merge**
|
||||
|
||||
In development branches such as `dev` or `feature`, developers may make multiple commits to complete a certain requirement. However, these trivial commit messages, when merged back into the `master` branch, can make the commit history on `master` bloated and messy. Therefore, these commits need to be squashed before merging. As shown, the squash operation is performed on the `master` branch. Essentially, it applies the changes made on the `dev` branch to the files maintained by the `master` branch, then saves these modifications with a new commit 5, and finally commits.
|
||||
|
||||
Before Squash:
|
||||
|
||||

|
||||
|
||||
After Squash, Before Commit:
|
||||
|
||||

|
||||
|
||||
After Commit:
|
||||
|
||||

|
||||
|
||||
**Summary**: Squashing trivial commits on the development branch before merging makes the commit information on the `master` branch more concise. However, note that this merge mode essentially saves the changes from `dev` onto the `master` branch in one go and creates a new commit to record these changes, so the committer has changed!
|
||||
|
|
@ -0,0 +1,23 @@
|
|||
---
|
||||
sidebar_label: '合并请求关联疑修'
|
||||
sidebar_position: 5
|
||||
---
|
||||
|
||||
# Pull Request Linking Issues
|
||||
|
||||
In GitLink, a pull request can be associated with one or more **Issues**, helping project members quickly understand the development tasks corresponding to this code change and automatically updating issue statuses after merging.
|
||||
|
||||
## Associating Issues During Creation
|
||||
|
||||
On the "Create Pull Request" page, the right sidebar provides the "**Link Issues**" option. Click the input field in the link issues area to search for existing issues by entering an issue number or keywords, and select one or more issues from the dropdown list to associate, as shown below:
|
||||

|
||||
|
||||
## Viewing Association Relationships
|
||||
|
||||
On the pull request list page, you can view all issues associated with a pull request. Clicking an issue will navigate to the corresponding page.
|
||||

|
||||
|
||||
## Auto-Closing Issues After Merge
|
||||
|
||||
When a pull request is merged, the associated issues will automatically be set to the "**Closed**" status.
|
||||

|
||||
|
|
@ -0,0 +1,18 @@
|
|||
---
|
||||
sidebar_label: '合并请求简介'
|
||||
sidebar_position: 1
|
||||
---
|
||||
|
||||
# Pull Request Introduction
|
||||
|
||||
**Pull Request** (PR) is a method for merging code changes between two software repositories in modern distributed software development. It is typically used for submitting code changes from a forked repository to the original (source) repository, and is also an excellent team collaboration method for contributing to team projects or open-source projects. When you pull and modify someone else's repository code, then notify the original repository manager of your modifications and request that they merge your changes, this process is called a **Pull Request**.
|
||||
|
||||
The **Pull Request (PR)** module in GitLink provides two aspects of functionality:
|
||||
|
||||
- On one hand, it supports creating (initiating) code merge requests to the source repository or to other branches of the same repository;
|
||||
|
||||
- On the other hand, it enables repository managers to manage, review, and ultimately decide whether to incorporate pull requests sent by others into the repository.
|
||||
|
||||
The following image shows the Pull Request (PR) management module:
|
||||
|
||||

|
||||
|
|
@ -0,0 +1,98 @@
|
|||
---
|
||||
sidebar_label: '常见问题'
|
||||
sidebar_position: 1
|
||||
---
|
||||
|
||||
# Frequently Asked Questions (FAQ)
|
||||
|
||||
This document compiles common questions and answers about using the GitLink platform to help you quickly resolve issues you may encounter.
|
||||
|
||||
## I. Account-Related
|
||||
|
||||
## 1. How do I register a GitLink account?
|
||||
|
||||
Visit the [GitLink Official Website](https://www.gitlink.org.cn) and click the "Sign Up" button in the upper-right corner. Both phone number registration and email registration are supported. After registration, you must complete verification via email or phone to activate your account.
|
||||
|
||||
## 2. What should I do if I forget my password?
|
||||
|
||||
Click "Forgot Password" on the login page and reset your password using the phone number or email you registered with. The system will send a verification code, and once verified, you can set a new password.
|
||||
|
||||
## 3. How do I change my profile picture and information?
|
||||
|
||||
After logging in, click your avatar in the upper-right corner to enter the "Personal Settings" page, where you can modify your avatar, nickname, bio, and other information.
|
||||
|
||||
## II. Repository Management
|
||||
|
||||
## 4. How do I create a code repository?
|
||||
|
||||
After logging in, click the "+" icon in the upper-right corner, select "New Repository", fill in the repository name, description, visibility, and other details, then click Create. For detailed steps, please refer to the [Repository Creation](../代码库管理/仓库创建.md) documentation.
|
||||
|
||||
## 5. How do I push local code to GitLink?
|
||||
|
||||
First, initialize a local Git repository and add the remote URL:
|
||||
```bash
|
||||
git init
|
||||
git remote add origin https://gitlink.org.cn/用户名/仓库名.git
|
||||
git add .
|
||||
git commit -m "首次提交"
|
||||
git push -u origin master
|
||||
```
|
||||
|
||||
## 6. Are there repository storage limits?
|
||||
|
||||
GitLink does not impose strict limits on individual repository storage, but it is recommended that a single repository not exceed 1GB and a single file not exceed 100MB to ensure a good user experience.
|
||||
|
||||
## 7. How do I import projects from GitHub/GitLab?
|
||||
|
||||
GitLink supports importing projects from platforms such as GitHub and GitLab. When creating a repository, select "Import External Repository" and provide the source repository URL to complete the import. For detailed steps, please refer to [Importing Third-Party Git Projects](../快速开始/导入GitHub等第三方Git项目.md).
|
||||
|
||||
## III. Collaborative Development
|
||||
|
||||
## 8. How do I submit a Merge Request (Pull Request)?
|
||||
|
||||
1. First, fork the target repository to your own account
|
||||
2. Create a new branch in the forked repository and make your changes
|
||||
3. Once finished, click "Merge Request" to submit the PR
|
||||
4. Wait for the project maintainer to review and approve it
|
||||
|
||||
For the detailed process, please refer to [Creating a Merge Request](../合并请求/创建合并请求.md).
|
||||
|
||||
## 9. How do I manage organization members?
|
||||
|
||||
Organization administrators can add or remove members and set member role permissions in "Organization Settings" -> "Member Management". For details, please refer to [Organization Member Management](../组织管理/组织成员管理.md).
|
||||
|
||||
## 10. How do I use WebIDE to edit code online?
|
||||
|
||||
On the repository page, click the "Web IDE" button to enter the online development environment, which supports syntax highlighting, code suggestions, branch management, code committing, and more. For details, please refer to the [WebIDE User Guide](../代码库管理/WebIDE使用指南.md).
|
||||
|
||||
## IV. DevOps Engine
|
||||
|
||||
## 11. How do I create a pipeline?
|
||||
|
||||
Go to the "Engine" module of the repository and click "Graphical Pipeline" or "Code Pipeline" to create a new pipeline. You can configure automatic trigger rules to enable automatic builds and deployments after code commits. For detailed steps, please refer to [Graphical Pipeline](../DevOps引擎/图形流水线.md).
|
||||
|
||||
## 12. What should I do if a pipeline build fails?
|
||||
|
||||
Please check the following common causes:
|
||||
- Whether the Dockerfile configuration is correct
|
||||
- Whether dependencies are complete and versions are compatible
|
||||
- Whether the build commands are correct
|
||||
- Whether credentials (such as Docker registry passwords) are correctly configured
|
||||
|
||||
You can view the pipeline execution log to identify the specific cause of the error.
|
||||
|
||||
## V. Other Questions
|
||||
|
||||
## 13. How do I report a bug or suggest a feature?
|
||||
|
||||
You can submit an issue in the [GitLink Help Center Repository](https://www.gitlink.org.cn/Gitlink/gitlink_help_center) to report problems or suggest features.
|
||||
|
||||
## 14. Which browsers does the platform support?
|
||||
|
||||
GitLink recommends using the latest versions of mainstream browsers such as Chrome, Firefox, and Edge for the best experience.
|
||||
|
||||
## 15. How do I contact customer support?
|
||||
|
||||
If you have other questions, you can contact us through the following channels:
|
||||
- Official email: gitlink@ccf.org.cn
|
||||
- Submit an issue in the Help Center repository
|
||||
|
|
@ -0,0 +1,20 @@
|
|||
---
|
||||
sidebar_label: '平台公告'
|
||||
sidebar_position: 1
|
||||
---
|
||||
|
||||
# Platform Announcements
|
||||
|
||||
The Platform Announcements module is used to publish important notifications, feature updates, event information, and other content related to the GitLink platform.
|
||||
|
||||
## Viewing Announcements
|
||||
|
||||
1. In the left sidebar of the Help Center, click "Platform Announcements" to view the list of announcements.
|
||||
2. Click on a specific announcement title to view its detailed content.
|
||||
|
||||
## Announcement Types
|
||||
|
||||
- **Feature Updates**: Notifications about new platform features or optimizations to existing features
|
||||
- **Event Notifications**: Information about events such as the Open Source Summer Camp (GLCC) and Open Source Competitions
|
||||
- **Operations Announcements**: Notifications related to platform maintenance, upgrades, and other operational matters
|
||||
- **Policy Changes**: Explanations of changes to platform terms of service, usage rules, and other policies
|
||||
|
|
@ -0,0 +1,24 @@
|
|||
---
|
||||
sidebar_label: '创建第一个开源项目'
|
||||
sidebar_position: 2
|
||||
---
|
||||
|
||||
# Create Your First Open-Source Project
|
||||
|
||||
## 1. Create a new project
|
||||
|
||||
The platform provides a "New" button, allowing users to quickly create a new public or private project from scratch.
|
||||
|
||||

|
||||
|
||||
## 2. Fill in project information
|
||||
|
||||
Fill in the basic project information.
|
||||
|
||||

|
||||
|
||||
## 3. Creation successful
|
||||
|
||||
Click Create Project. Once created successfully, you will be directed to the project homepage.
|
||||
|
||||

|
||||
|
|
@ -0,0 +1,92 @@
|
|||
---
|
||||
sidebar_label: '导入GitHub等第三方Git项目'
|
||||
sidebar_position: 5
|
||||
---
|
||||
|
||||
# Import GitHub and Other Third-Party Git Projects
|
||||
|
||||
## 1. Import a project
|
||||
|
||||
Select **Import Project** on the homepage
|
||||
|
||||

|
||||
|
||||
## 2. Fill in information
|
||||
|
||||
Enter the third-party Git project URL and project information to import. If the project is a private repository, you will need to provide the target platform user token for authorization.
|
||||
|
||||

|
||||
|
||||
## 3. Authorization verification
|
||||
|
||||
When using the GitLink platform to import open-source projects from other platforms (such as GitHub or Gitee), if the project is private, it cannot be imported through the normal process. You will need to enter a valid token with appropriate permissions from the corresponding platform for verification.
|
||||
|
||||

|
||||
|
||||
The following outlines how to obtain tokens from some typical open-source platforms.
|
||||
|
||||
## How to obtain a GitHub token
|
||||
|
||||
1. Log in to your GitHub account
|
||||
|
||||
2. Go to the Settings menu under your profile avatar
|
||||
|
||||
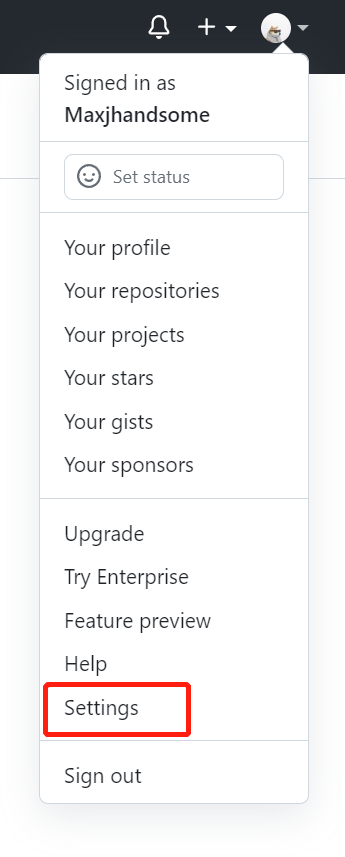
|
||||
|
||||
3. Go to Developer settings at the bottom
|
||||
|
||||
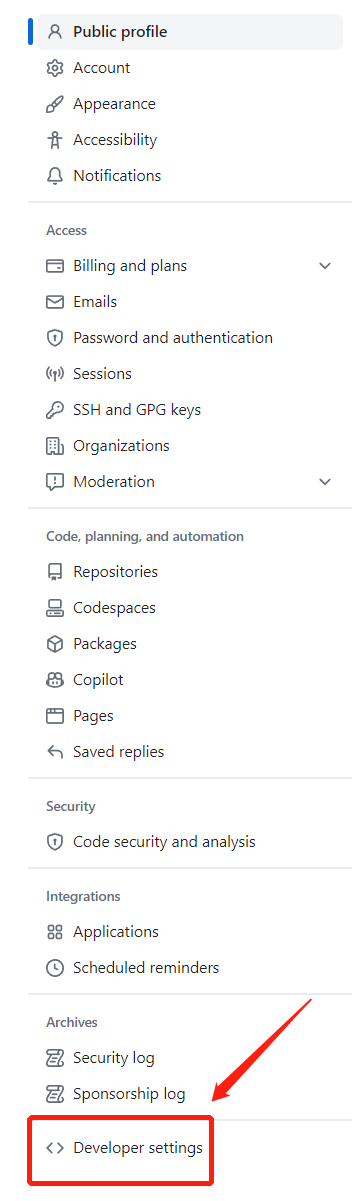
|
||||
|
||||
4. On the redirected page, access Token (classic) and create a new classic token (or use an existing saved token)
|
||||
|
||||
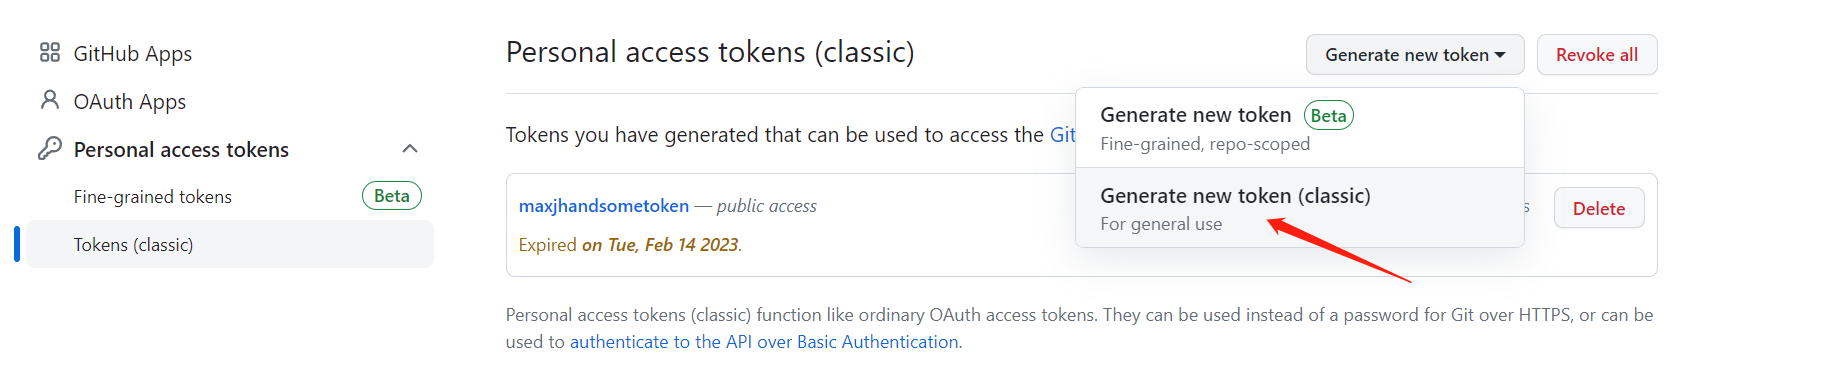
|
||||
|
||||
5. On the token configuration page, enter the token's purpose and ensure that the "repo" option is checked, otherwise the import will fail
|
||||
|
||||
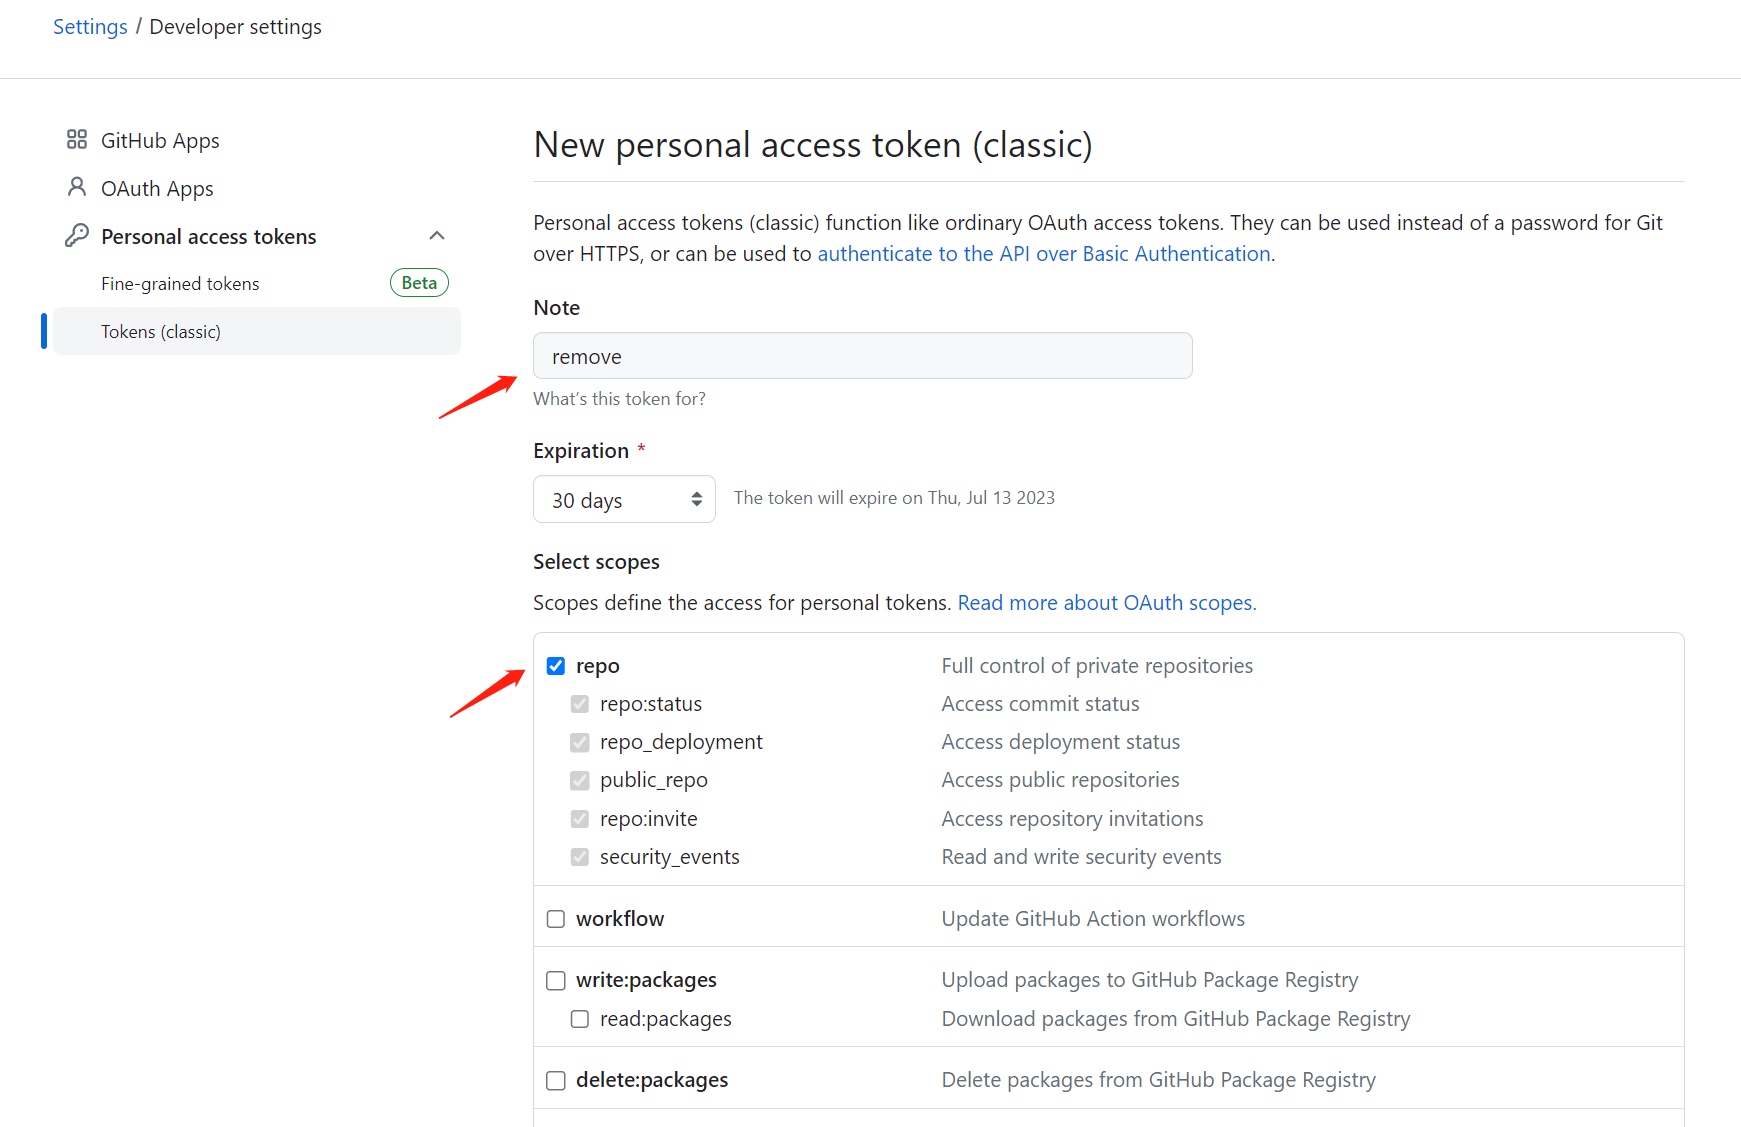
|
||||
|
||||
Click the Create button
|
||||
|
||||
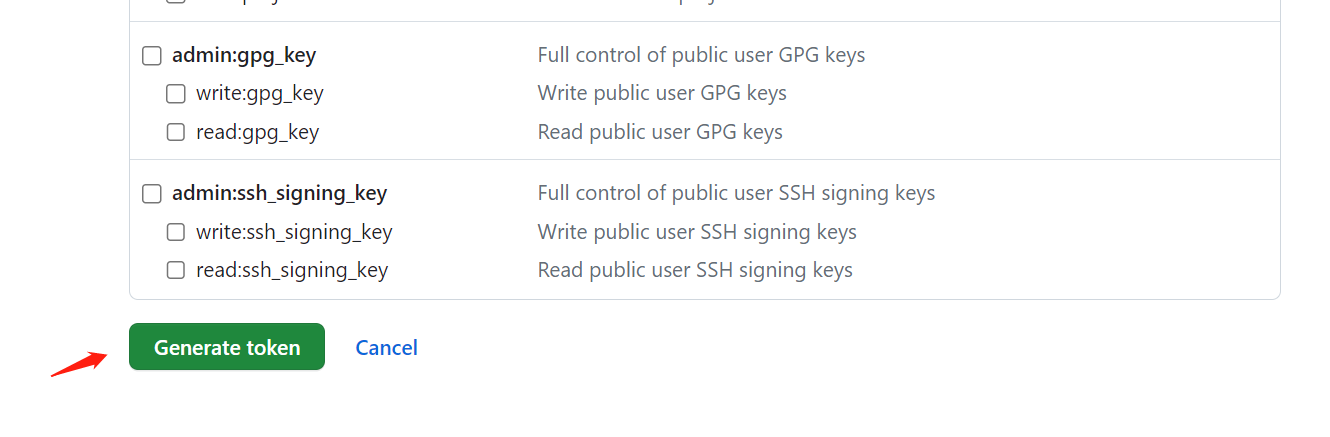
|
||||
|
||||
6. Copy the token
|
||||
|
||||
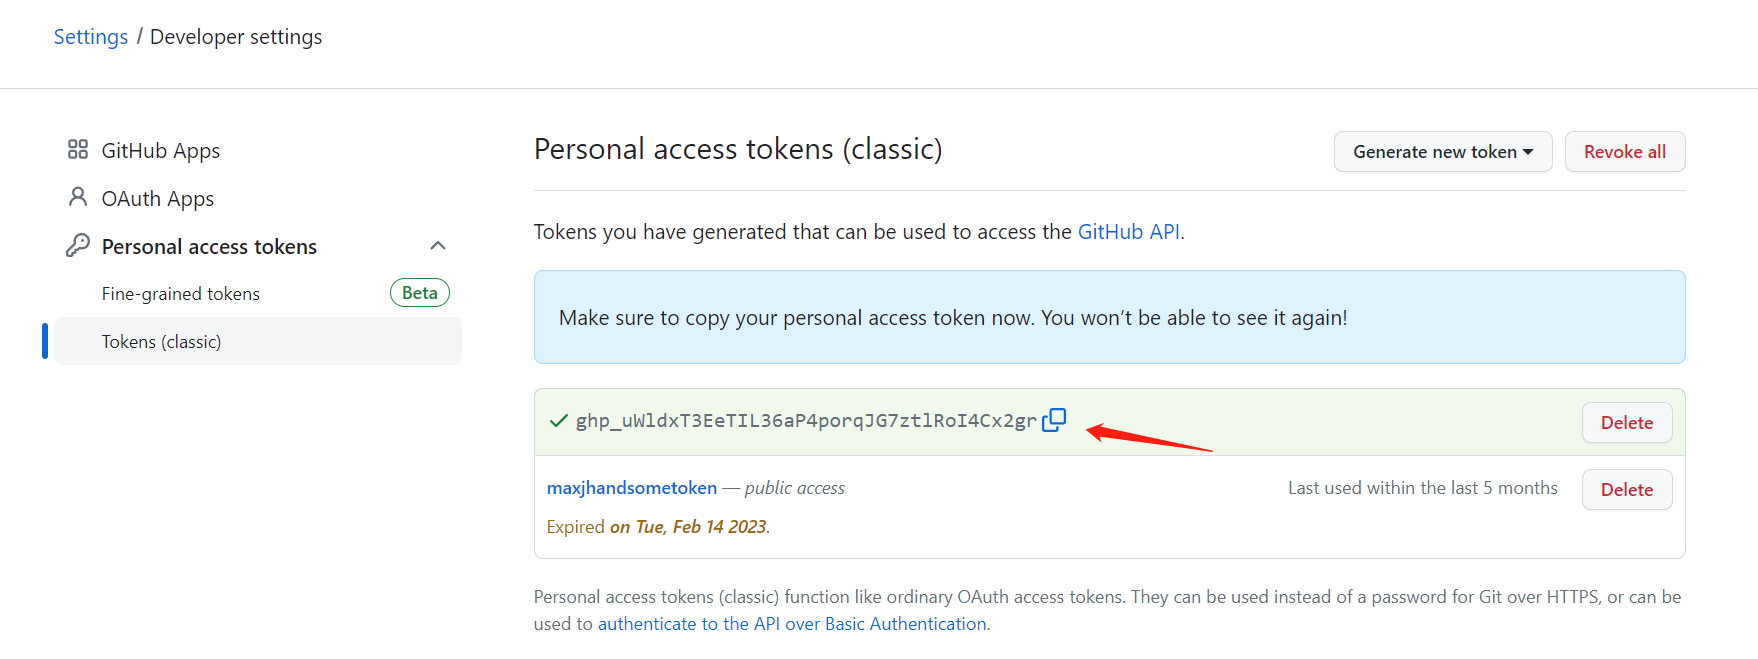
|
||||
|
||||
Then enter this token into the GitLink import project authentication field
|
||||
|
||||

|
||||
|
||||
## How to obtain a Gitee token
|
||||
|
||||
1. Log in to your Gitee account
|
||||
|
||||
2. Go to the Settings menu under your profile avatar
|
||||
|
||||
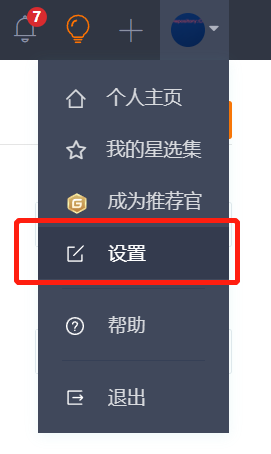
|
||||
|
||||
3. Go to the "Private Token" menu under the "Security Settings" section
|
||||
|
||||
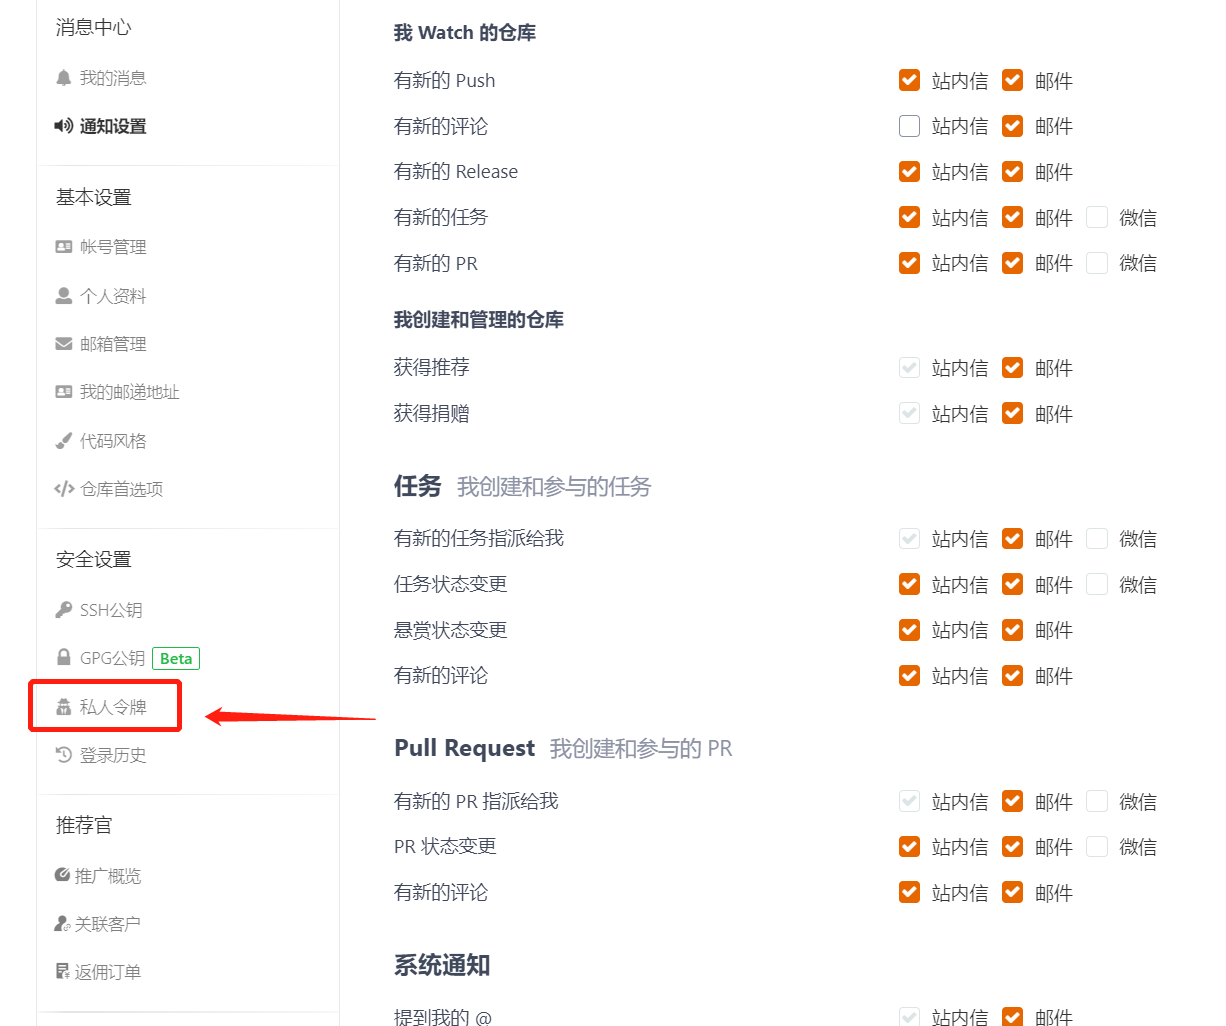
|
||||
|
||||
4. Click Generate New Token. On the token generation page, configure the token name and ensure the "project" permission option is checked, then save the token
|
||||
|
||||
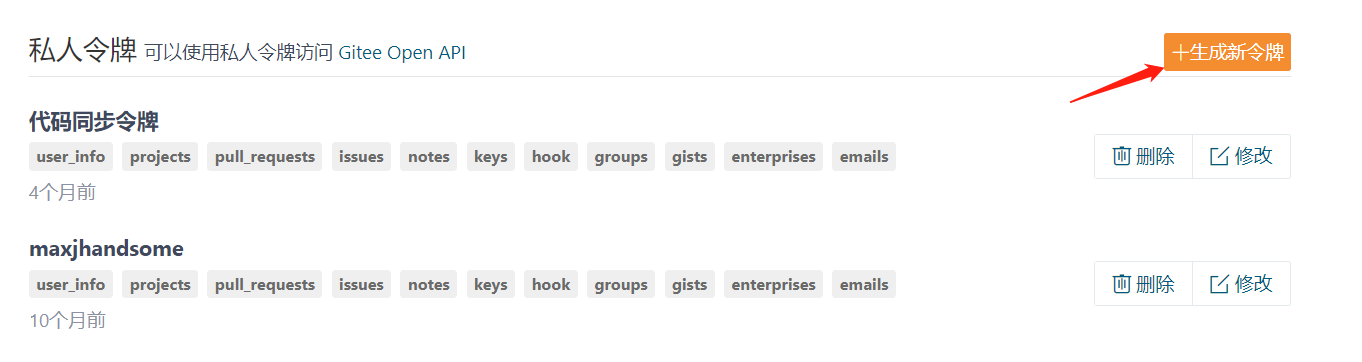
|
||||
|
||||
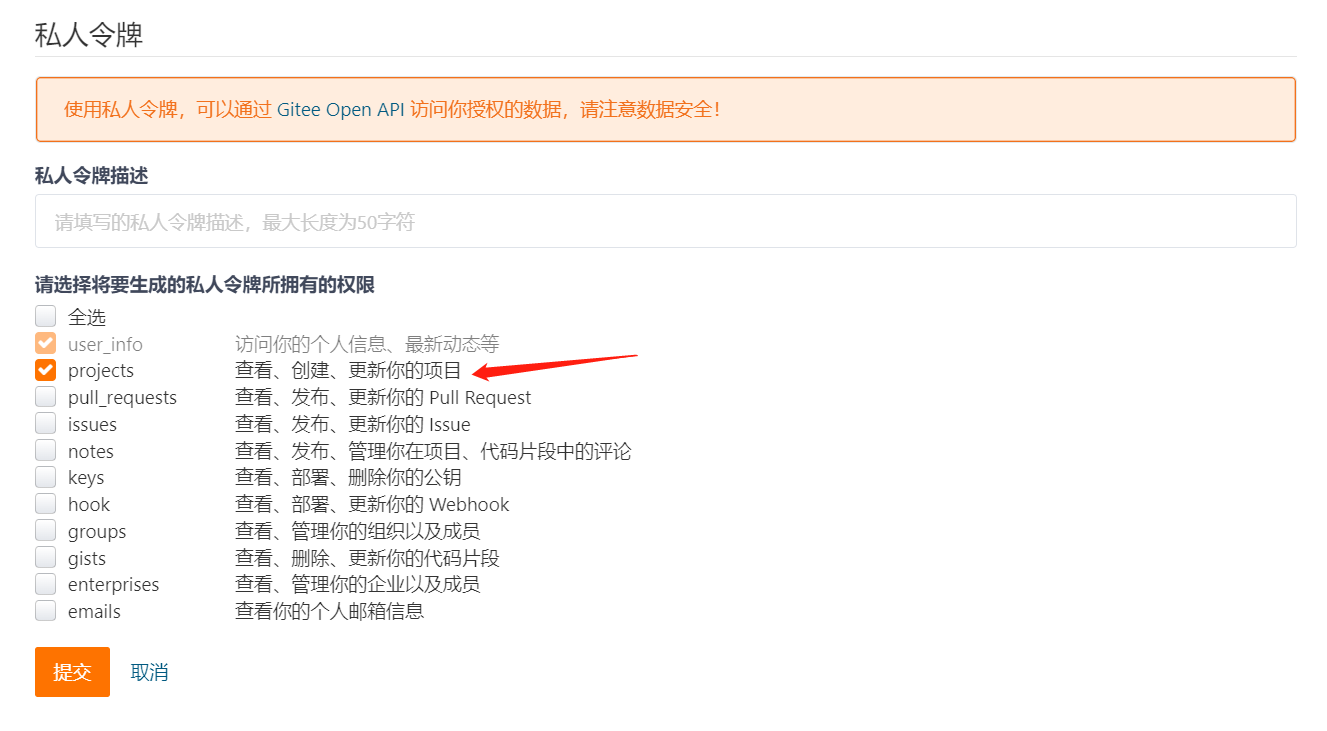
|
||||
|
||||
5. In the token generation success popup, copy the token and enter it into the GitLink import project authentication field
|
||||
|
||||
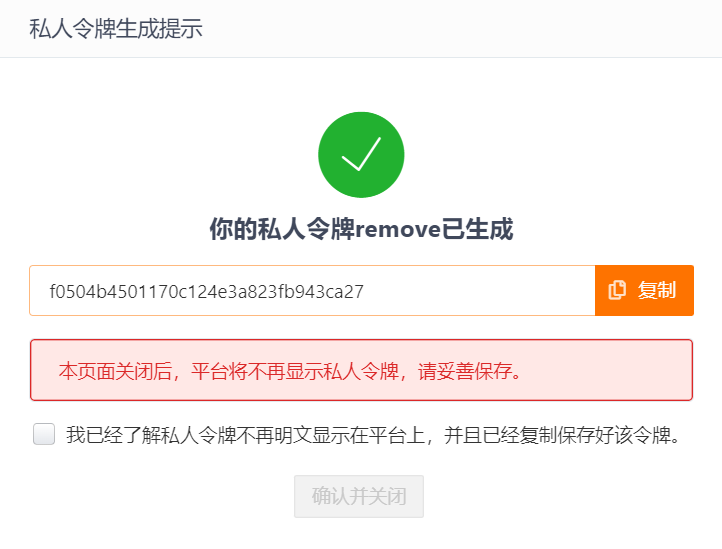
|
||||
|
||||
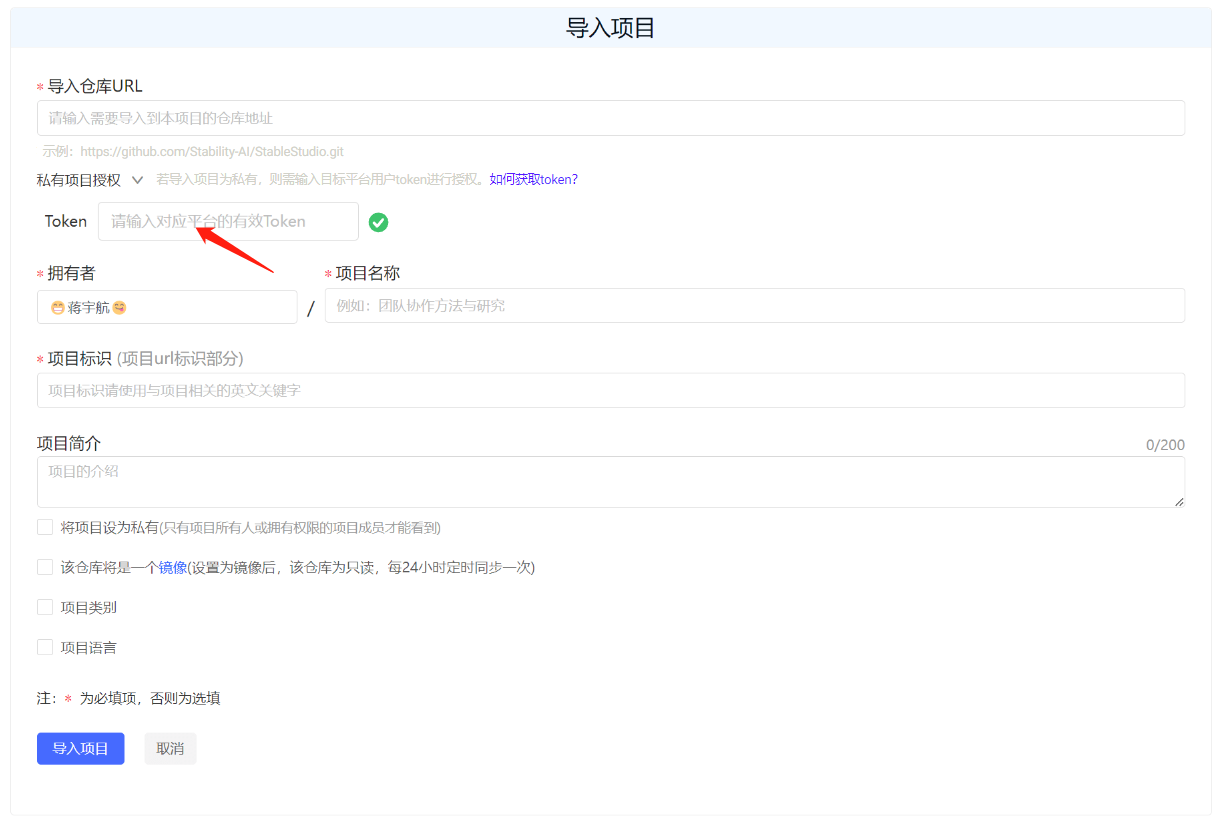
|
||||
|
||||
## 4. Import successful
|
||||
|
||||
The system indicates that it is migrating from the third-party Git project URL
|
||||
|
||||

|
||||
|
||||
If the migration is successful, the project import is complete
|
||||
|
||||

|
||||
|
|
@ -0,0 +1,22 @@
|
|||
---
|
||||
sidebar_label: '提交第一行代码'
|
||||
sidebar_position: 3
|
||||
---
|
||||
|
||||
# Submit Your First Line of Code
|
||||
|
||||
## 1. Edit code
|
||||
|
||||
Click the Edit button to start editing code.
|
||||
|
||||

|
||||
|
||||
## 2. Commit code
|
||||
|
||||
Write your code in the editor. Once finished, fill in the change information and submit the changes.
|
||||
|
||||

|
||||
|
||||
## 3. Code updated successfully
|
||||
|
||||
After a successful commit, the code has been updated successfully. 
|
||||
|
|
@ -0,0 +1,44 @@
|
|||
---
|
||||
sidebar_label: '搜索开源项目'
|
||||
sidebar_position: 4
|
||||
---
|
||||
|
||||
# Search for Open-Source Projects
|
||||
|
||||
## 1. Open-Source Project Page Overview
|
||||
|
||||
The "Projects" module aggregates and manages all hosted projects and mirrored projects on the GitLink platform. Users can search by entering project name keywords or filter projects by project category.
|
||||
|
||||
Entering the "Projects" module, the left side lists project types and project categories. Project types primarily include open-source hosted projects and open-source mirrored projects. Project categories mainly include: Cloud Computing, Big Data, Blockchain, IoT, Machine Learning, Artificial Intelligence, Smart Healthcare, and Others.
|
||||
|
||||

|
||||
|
||||
The right side displays basic information for all projects, including creator, project name, project description, page views, project category, update time, number of likes, number of forks, and more. Users can find specific projects through keyword search or sort projects by update time, creation time, number of forks, number of likes, and other criteria.
|
||||
|
||||

|
||||
|
||||
By clicking on a project name, users can enter the project details to view and participate in open-source project development.
|
||||
|
||||
## 2. Search for Open-Source Projects
|
||||
|
||||
There are two search boxes available for searching
|
||||
|
||||
## Open-Source Project Search Box
|
||||
|
||||
Search for a project:
|
||||
|
||||

|
||||
|
||||
Search results:
|
||||
|
||||

|
||||
|
||||
## Navigation Bar Search Box
|
||||
|
||||
Search for a project:
|
||||
|
||||

|
||||
|
||||
Search results:
|
||||
|
||||

|
||||
|
|
@ -0,0 +1,27 @@
|
|||
---
|
||||
sidebar_label: '注册GitLink账号'
|
||||
sidebar_position: 1
|
||||
---
|
||||
|
||||
# Register a GitLink Account
|
||||
|
||||
## 1. Click the **Register Now** button
|
||||
|
||||

|
||||
|
||||
## 2. Fill in registration information
|
||||
|
||||
- Register with phone number
|
||||
|
||||

|
||||
|
||||
- Register with email
|
||||
|
||||

|
||||
|
||||
## 3. Registration complete
|
||||
|
||||
After filling in the required information, click Register. Once registration is successful, you will be directed to your personal homepage.
|
||||
|
||||

|
||||
|
||||
|
|
@ -0,0 +1,55 @@
|
|||
---
|
||||
sidebar_label: '更新日志'
|
||||
sidebar_position: 1
|
||||
---
|
||||
|
||||
# Changelog
|
||||
|
||||
This page records the documentation update history for the GitLink Help Center, helping users stay informed about the latest platform feature changes.
|
||||
|
||||
## 2025
|
||||
|
||||
## v1.1.0 (2025)
|
||||
|
||||
**New Features:**
|
||||
- Added WebIDE User Guide documentation, introducing how to use the online editor
|
||||
- Added WebIDE Feature Overview documentation, detailing the core capabilities of WebIDE
|
||||
- Added Platform Announcements module, supporting the publishing and management of platform announcements
|
||||
- Added DevOps Engine Graphical Pipeline documentation
|
||||
|
||||
**Improvements:**
|
||||
- Optimized the Help Center search functionality, now supporting both Chinese and English search
|
||||
- Improved documentation category structure, adding a "Quick Start" category for new user onboarding
|
||||
- Updated footer links to uniformly use the gitlink.org.cn domain
|
||||
- Enhanced the Personal Site Builder workflow documentation
|
||||
|
||||
**Bug Fixes:**
|
||||
- Fixed an issue where image links in some documents were not displaying
|
||||
- Fixed incorrect image reference formatting in the Wiki Page Management documentation
|
||||
- Fixed duplicate text in the "Submitting Your First Line of Code" documentation
|
||||
- Fixed typos in the Site Creation Process documentation
|
||||
|
||||
## v1.0.0 (2024)
|
||||
|
||||
**Initial Release:**
|
||||
- Completed the foundational framework of the Help Center
|
||||
- Completed documentation for the following modules:
|
||||
- Quick Start (account registration, code submission, project creation, etc.)
|
||||
- Repository Management (repository creation, branch management, member management, etc.)
|
||||
- Organization Management (organization creation, team management, project management, etc.)
|
||||
- Issue Management (issue creation, status changes, milestones, etc.)
|
||||
- Merge Requests (creating requests, code review, merge modes, etc.)
|
||||
- DevOps Engine (pipelines, parameter configuration, credential settings, etc.)
|
||||
- Third-Party Services (code synchronization, code tracing, etc.)
|
||||
- Wiki (page management, template import/export, etc.)
|
||||
- Bot Marketplace (bot installation, development, configuration, etc.)
|
||||
- Notification Management (notification overview, notification settings, etc.)
|
||||
- Personal Site Builder (site creation, site builder tools, etc.)
|
||||
- Terms of Service
|
||||
- Integrated local search functionality
|
||||
- Support for Chinese-English bilingual switching
|
||||
- Integrated image zoom functionality
|
||||
|
||||
---
|
||||
|
||||
> For updates to the GitLink platform itself, please follow the [Platform Announcements](../平台公告/平台公告.md) page.
|
||||
|
|
@ -0,0 +1,34 @@
|
|||
---
|
||||
sidebar_label: 'GitLink服务协议'
|
||||
sidebar_position: 1
|
||||
---
|
||||
|
||||
Dear User,
|
||||
|
||||
Welcome to the GitLink platform. Before using the GitLink platform, please carefully read and comply with the "GitLink Terms of Service" (hereinafter referred to as "this Agreement"). Please be sure to carefully review and fully understand the content of each clause of this Agreement.
|
||||
When you click "I have read and agree to this Terms of Service" during the registration process and successfully register as a user of the GitLink platform, it means that you have fully read, understood, and completely accepted all terms of this Agreement. You promise to accept and abide by the terms of this Agreement, and you shall not claim that this Agreement or any of its terms are invalid, or request the revocation of this Agreement, on the grounds that you have not read the content of this Agreement.
|
||||
|
||||
## I. Rights and Obligations of the GitLink Platform
|
||||
1. Respect for User Privacy: Respecting user privacy and ensuring the security of user privacy is a fundamental policy of the GitLink platform;
|
||||
2. Platform User Management: The GitLink platform manages registered users in accordance with the standards of national laws, local laws, international laws, and the rules of this industry;
|
||||
3. Handling User Feedback: Relevant personnel of the GitLink platform will promptly address user feedback and provide timely responses.
|
||||
|
||||
## II. User Rights and Obligations
|
||||
When using the GitLink platform, users must comply with the following principles:
|
||||
|
||||
1. Comply with the relevant laws and regulations of China;
|
||||
2. Do not use network services for illegal purposes;
|
||||
3. Do not interfere with or disrupt network services;
|
||||
4. Comply with all network protocols, regulations, procedures, and practices governing the use of network services;
|
||||
5. Do not transmit any illegal, harassing, defamatory, abusive, threatening, harmful, vulgar, obscene, or otherwise objectionable information;
|
||||
6. Do not transmit any materials that incite others to commit criminal acts;
|
||||
7. Users shall not intentionally or negligently harm the legitimate rights and interests of the GitLink platform.
|
||||
|
||||
## III. Regarding Liability
|
||||
In view of the particular nature of network services, users agree that the GitLink team has the right to change, suspend, or upgrade certain network services with prior notice. The GitLink team does not guarantee that network services will not be interrupted, but promises to restore services as quickly as reasonably possible while ensuring the security and reliability of user data.
|
||||
|
||||
## IV. Modification of Terms of Service
|
||||
The GitLink team reserves the right to modify this Agreement when necessary. Once changes occur, these terms may be updated by the GitLink team in a timely manner without further notice. The modified terms will effectively replace the original terms of service once published on the website. You may consult the latest version of the terms of service at any time.
|
||||
|
||||
|
||||
The final right of interpretation of this Agreement belongs to the GitLink team.
|
||||
|
|
@ -0,0 +1,24 @@
|
|||
---
|
||||
sidebar_label: '标记管理'
|
||||
sidebar_position: 6
|
||||
---
|
||||
|
||||
# Label Management
|
||||
|
||||
On the issue content editing page, you can assign labels to issues based on their type. Labels make it convenient to filter target issues in the issue list, improving project development and management efficiency.
|
||||
GitLink provides ten default issue label types: Bug, Feature, Question, Support, Task, Assistance, On Hold, Documentation, Testing, and Duplicate, each with different meanings and color markers:
|
||||
|
||||
- **Bug:** Indicates an unexpected problem or error;
|
||||
- **Feature:** Indicates a new feature request;
|
||||
- **Question:** Indicates a question or confusion;
|
||||
- **Support:** Indicates a specific function or specific requirement;
|
||||
- **Task:** Indicates a task to be assigned;
|
||||
- **Assistance:** Indicates that community user assistance is needed;
|
||||
- **On Hold:** Indicates that this issue will not be processed for the time being;
|
||||
- **Documentation:** Indicates documentation material supplementation;
|
||||
- **Testing:** Indicates a requirement that needs testing;
|
||||
- **Duplicate:** Indicates that a similar issue already exists.
|
||||

|
||||
|
||||
Additionally, **project members** can modify label meanings or color markers, create new labels, and delete labels based on their needs or habits.
|
||||

|
||||
|
|
@ -0,0 +1,13 @@
|
|||
---
|
||||
sidebar_label: '疑修列表'
|
||||
sidebar_position: 4
|
||||
---
|
||||
# Issue List
|
||||
|
||||
All issues created during the project development process can be viewed in a unified **Issue** interface. The following image shows the issue list for the [ForgePlus](https://www.gitlink.org.cn/Gitlink/forgeplus) project.
|
||||
|
||||

|
||||
|
||||
+ **Create Issue**: In the issue list interface, click the "**Create Issue**" button to create an issue as well. See the ***Issue Creation*** section for details.
|
||||
|
||||
+ **Filter Issues**: The issue list supports filtering by various criteria, including publisher, label (see ***Label Management*** section), milestone (see ***Milestone Management*** section), assignee, status, and start/end dates. It also supports keyword search and sorting by multiple sorting rules.
|
||||
|
|
@ -0,0 +1,19 @@
|
|||
---
|
||||
sidebar_label: '疑修创建'
|
||||
sidebar_position: 2
|
||||
---
|
||||
# Issue Creation
|
||||
|
||||
1. Go to the "**Repository**" page of the project where you want to publish an issue, and click the "**+Issue**" button at the top to enter the issue publishing interface, as shown below:
|
||||
|
||||

|
||||
|
||||
2. Start creating the issue, including the issue title and content. When entering issue content, you can use the simple and flexible [Markdown syntax](https://markdown.com.cn/), as well as click the function buttons above. Then upload any necessary attachments. Finally, click the "**Create**" button to submit your first issue!
|
||||
|
||||

|
||||
|
||||
3. Additionally, when creating an issue, you can use the **`#`** symbol to quickly add a reference to another issue, providing supplementary information for the current issue. As shown below, typing **`#`** will bring up a list of referenceable issues. After selecting the desired issue by scrolling with the mouse or typing the issue number, a link to the referenced issue will be automatically added.
|
||||
|
||||

|
||||
|
||||

|
||||
|
|
@ -0,0 +1,19 @@
|
|||
---
|
||||
sidebar_label: '疑修状态变更'
|
||||
sidebar_position: 3
|
||||
---
|
||||
# Issue Status Changes
|
||||
|
||||
An **Issue** is essentially a development task, and as development activities progress, its status will change. The "**Status**" field is used to track and record changes in development activities. As shown, GitLink issue **statuses** include five types: "New", "In Progress", "Resolved", "Closed", and "Rejected", representing the processing progress of development tasks.
|
||||
|
||||

|
||||
|
||||
+ **New**: The default status of a newly created issue is "New";
|
||||
|
||||
+ **In Progress**: If a created issue is currently being resolved, the issue status can be changed to "In Progress";
|
||||
|
||||
+ **Resolved**: When an issue has been resolved by a developer, its status can be changed to "Resolved";
|
||||
|
||||
+ **Closed**: Issues that have been resolved or no longer need to remain open can be set to "Closed";
|
||||
|
||||
+ **Rejected**: If the developer assigned to resolve the issue refuses to handle it, the issue can be set to "Rejected" status.
|
||||
|
|
@ -0,0 +1,17 @@
|
|||
---
|
||||
sidebar_label: '疑修简介'
|
||||
sidebar_position: 1
|
||||
---
|
||||
# Issue Introduction
|
||||
|
||||
The **Issue** management module primarily provides project team members with services for publishing, assigning, and tracking **development tasks**.
|
||||
|
||||

|
||||
|
||||
**Notes**
|
||||
|
||||
1. An **Issue** is a thread that can track the progress of development tasks, therefore it supports participant replies and comments. See the ***Comments and Operation Records*** section;
|
||||
|
||||
2. The default types (labels) of **Issues** include Bug, Feature, Task, Support, Weekly Report, etc. See the ***Label Management*** section for details;
|
||||
|
||||
3. You can set start and end times for an **Issue**, and assign a person responsible for resolving the task. One day before the issue deadline, the system will automatically send reminder messages to the task publisher and the assignee.
|
||||
|
|
@ -0,0 +1,18 @@
|
|||
---
|
||||
sidebar_label: '评论及操作记录'
|
||||
sidebar_position: 5
|
||||
---
|
||||
|
||||
# Comments and Operation Records
|
||||
## Comments
|
||||
Each issue is equivalent to a thread that can track progress, so it supports comments and replies. Not only project members, but anyone can comment and reply on an issue, express questions or insights, and communicate.
|
||||

|
||||
|
||||
## Issue Statement
|
||||
Users can publish an "Issue Statement" on any issue, leaving their thoughts on how to resolve the issue. After clicking "Statement" on the right side of the issue details, you can edit the message. Once editing is complete, click "Confirm" to publish the statement, as shown below:
|
||||

|
||||
|
||||
## Operation Records
|
||||
Anyone can create an issue, but please note that non-project members can only modify their own issues, while project members have permission to modify all issues.
|
||||
All editing operations on an issue, including **creating an issue, adding an assignee, removing an assignee, changing status, changing priority, adding labels, removing labels, adding milestones, removing milestones, setting an associated branch, removing an associated branch, setting a start date, and setting an end date**, are recorded in the operation records.
|
||||

|
||||
|
|
@ -0,0 +1,34 @@
|
|||
---
|
||||
sidebar_label: '里程碑管理'
|
||||
sidebar_position: 7
|
||||
---
|
||||
|
||||
# Milestone Management
|
||||
|
||||
## Milestone Introduction
|
||||
Milestones are primarily used to support project development and version releases. Each milestone can be associated with multiple development tasks.
|
||||
|
||||
## Creating a Milestone
|
||||
Project members can create milestones by following these steps:
|
||||
1. Go to the **"Milestones"** page of the target project. The page displays a list of created milestones, categorized into **"Closed"** and **"Open"**;
|
||||
2. Click the **"+Create Milestone"** button at the top to enter the milestone creation interface;
|
||||

|
||||
|
||||
3. Fill in the title (required), description (required), and due date (optional), then click **"Create Milestone"** in the bottom right corner to complete the creation of a new milestone.
|
||||

|
||||
|
||||
## Associating a Milestone
|
||||
Project members can associate issues with milestones, so that milestones contain a clear list of issues. The main steps are:
|
||||
1. Click the target issue in the issue list;
|
||||
2. Edit the "Milestone" property and select the milestone to associate.
|
||||

|
||||
|
||||
## Other Operations
|
||||
- **Open Milestone**
|
||||
- **Close Milestone**
|
||||
- **Edit Milestone**
|
||||
- **Delete Milestone**
|
||||
|
||||
All of the above operations can be performed on target milestones in the milestone list, as shown below:
|
||||

|
||||

|
||||
|
|
@ -0,0 +1,122 @@
|
|||
---
|
||||
sidebar_label: 'WebIDE Feature Introduction'
|
||||
sidebar_position: 9
|
||||
|
||||
---
|
||||
## WebIDE Background
|
||||
Traditional code hosting platforms provide Git/SVN management of code repositories, allowing users to perform code-related activities on the platform such as code browsing, code review, defect management, and CI pipelines. The editor components used for code browsing and code review are typically CodeMirror, with syntax highlighting using highlight.js, often only supporting code reading scenarios. The Cloud R&D team of Ant Group's R&D Efficiency Department, through their self-developed OpenSumi framework and a specialized high-speed Web IDE framework designed for Web IDE scenarios (without remote containers), collaborated with the internal code hosting platform to create innovative, browser-only, IDE-style scenarios for code reading, code writing, code committing, code running, and code review. This greatly improved the efficiency of users in reading code, reviewing code, and conducting lightweight development on code hosting platforms. Through this collaboration between Ant Group's Cloud R&D team and CCF (China Computer Federation) GitLink code hosting platform, the internal high-speed Web IDE has been applied to the GitLink code hosting platform, addressing many long-standing user experience issues.
|
||||
|
||||
## Web IDE Core Capabilities
|
||||
Compared to the standard version with containers, the high-speed IDE primarily explores capabilities in reading, writing, running, and committing:
|
||||
|
||||
**1. Reading:**
|
||||
- a. Adapted for multiple code hosting platforms, such as GitLink, GitHub, GitLab, etc., allowing businesses to conveniently use code service capabilities.
|
||||
- b. Built-in syntax highlighting support for dozens of common languages including Java, TS/JS, C++, Go, Python, Rust, etc.
|
||||
- c. Supports code reading assistance plugins such as Git Blame and GitGraph.
|
||||
|
||||
**2. Writing:**
|
||||
- a. Supports online language service capabilities for HTML/CSS/JS/Markdown, with error diagnostics.
|
||||
- b. Browser file system.
|
||||
|
||||
**3. Running:**
|
||||
- a. Supports frontend code execution based on Skypack.
|
||||
- b. Supports Python execution based on Pyodide.
|
||||
|
||||
**4. Committing:**
|
||||
- a. Supports WebSCM, providing branch switching/creation, code committing, and other capabilities.
|
||||
|
||||
If browser IDE components like CodeMirror and Monaco represent Web IDE 1.0, then the high-speed Web IDE with the above capabilities is Web IDE 2.0. The high-speed Web IDE solution was launched internally at Ant Group in April 2021, supporting numerous scenarios such as code reading, code review, online exams, code inspection result feedback, and lightweight online development. In August of the same year, vscode.dev and github.dev were launched. Compared to those, the high-speed Web IDE leverages the high extensibility of the OpenSumi framework, allowing businesses to more deeply customize modules and plugins, giving them more room for imagination.
|
||||
|
||||
## Code Reading
|
||||
When reading code on a code hosting platform, users often need to see where a method is referenced or where an interface is implemented. The high-speed Web IDE provides editor + plugin capabilities to address these user needs:
|
||||

|
||||
|
||||
<center>Code Reference View</center>
|
||||
GitLink has implemented Blame functionality through a Blame plugin, providing the ability to view Blame information in the editor:
|
||||
|
||||

|
||||
<center>View Author and Modification Date of Current Code Line</center>
|
||||
|
||||
|
||||
## Code Review
|
||||
Users have long reported the following issues with the code review functionality:
|
||||
|
||||
- 1. Lack of language services, low reading efficiency: missing syntax highlighting, hints, navigation, reference viewing, and outline functionality.
|
||||
- 2. Poor browsing experience for large PRs: Statistics show that GitLink PRs average 14-17 changed files. Traditional code review interaction generally presents code diffs in a streaming list format, providing a poor review experience for scenarios with many changed files or large files, often requiring long waits.
|
||||
- 3. Heavy code modification process, time-consuming: Code diff components only have read capabilities and cannot quickly fix spelling or lint errors, requiring you to find the corresponding file locally, modify it, and then commit. In response to these needs, the Ant Group Cloud R&D team and GitLink have created an IDE-style code review scenario:
|
||||

|
||||
|
||||
<center>IDE-Style Code Review</center>
|
||||
- 1. Change Tree: a. Provides both flat and tree browsing modes. b. The change tree uses the OpenSumi Recycle component, enabling high-performance viewing of changed files for large PRs through virtual scrolling.
|
||||
- 2. Toolbar: a. Provides basic IDE editor settings such as font size, encoding, ignoring trailing whitespace, etc. b. Quickly switch between the current branch's historical version and the baseline comparison. c. Quickly locate changed files, mark as viewed, and supports quick execution via keyboard shortcuts.
|
||||
- 3. Editor: a. Folds non-changed content using Monaco's folding capability. b. Custom comment components embedded in the editor.
|
||||
- 4. Plugins: a. Reuses the Blame plugin capability from code browsing to view Git information for code lines. In addition to the above capabilities, GitLink also supports quickly modifying code during code review:
|
||||
|
||||

|
||||
<center>Code Can Be Modified During Code Review</center>
|
||||
|
||||
## GitLink Web IDE
|
||||
Although GitLink's code reading scenario uses the high-speed IDE editor, the file tree, code search, keyboard shortcuts, IDE themes, etc., differ significantly from the IDEs users are accustomed to in their daily development. Furthermore, many users clone code locally just for code reading, which, while ensuring a consistent experience, makes the entire process cumbersome and time-consuming.
|
||||
Based on this insight, the Ant Group Cloud R&D team and GitLink launched GitLink Web IDE, which allows users to quickly open the Web IDE with one click to access and read project repository code, achieving seamless integration between projects and the IDE, maintaining developers' daily habits and preferences, while being fully compatible with the GitLink code hosting platform. More importantly, by running a high-speed IDE directly in the browser without containers, it ensures an instant "second-open" experience.
|
||||
|
||||
## 1. Quick Experience
|
||||
Experience it from the Web IDE entry on the GitLink repository homepage.
|
||||

|
||||
<center>GitLink WebIDE Entry</center>
|
||||
|
||||
## 2. Code Browsing Experience
|
||||
A code browsing experience consistent with traditional IDEs. File tree, themes, and keyboard shortcuts are all available.
|
||||
## 3. Language Features
|
||||
- 1. Supports syntax highlighting for nearly 40 languages.
|
||||
- 2. Supports LSP (Language Server Protocol) based language features for JavaScript/TypeScript, HTML, CSS, JSON, and Markdown, with intelligent hints, outline information, and single-file navigation.
|
||||

|
||||
<center>JS Language Service Hints</center>
|
||||
|
||||
- 3. Provides online language service capabilities for Java, Go, Python, C++, and PHP, supporting simple definition navigation, reference lookup, and other features, making it more convenient for everyone to read code.
|
||||
|
||||

|
||||
<center>Python Reference View</center>
|
||||
|
||||
## 4. Branch Creation and Switching
|
||||
Click the branch name in the bottom-left corner to create or switch branches.
|
||||
|
||||

|
||||
<center>Branch Creation and Switching</center>
|
||||
|
||||
|
||||
## 5. File Search
|
||||
Use CMD/Ctrl + P to bring up the file search panel.
|
||||
|
||||

|
||||
<center>File Search Panel</center>
|
||||
|
||||
## 6. Line Highlighting
|
||||
Supports single-line or multi-line highlighting. Click a line number to highlight the line, and hold Shift to select consecutive lines.
|
||||

|
||||
<center>Multi-Line Highlighting</center>
|
||||
|
||||
## 7. Blame
|
||||
Supports viewing single-line blame information. Hover to display detailed information.
|
||||

|
||||
<center>Blame Detailed Information</center>
|
||||
|
||||
## 8. Graph
|
||||
Supports graph view, allowing you to view branch commit history and detailed file changes for each commit, with file diff viewing support. Click Git Graph in the bottom-left corner of the status bar or enter View Git Graph in the command palette to open the Git Graph view.
|
||||

|
||||
<center>Graph Detailed Information</center>
|
||||
|
||||
|
||||
## 9. WebSCM
|
||||
For developers, it is very common to work on multiple requirements in parallel. They often need to modify some small but necessary logic, while their local environment may already be developing the next requirement. Frequent branch switching for parallel modifications can easily lead to errors. With GitLink Web IDE, you can rapidly switch branches, make modifications, and commit seamlessly without interrupting your local development workflow.
|
||||

|
||||
<center>WebSCM</center>
|
||||
|
||||
|
||||
## 10. Online Code Execution
|
||||
Currently, without containers, most applications can only run frontend code. GitLink Web IDE integrates the lighter-weight CodeSwing plugin based on Skypack, allowing frontend code to be run in the high-speed version, with code versions managed by GitLink. Combined with the WebSCM capabilities mentioned above, you can even complete frontend code initialization, writing, previewing, and committing within one minute.
|
||||

|
||||
<center>Frontend Code Execution</center>
|
||||
|
||||
With the development of WebAssembly technology, some backend languages can also run in the browser. At the 2021 Google I/O conference, StackBlitz demonstrated their latest technology: WebContainer, which can compile language runtimes into WebAssembly to run in the browser. The Code-Runner-For-Web plugin, combined with Pyodide, has already brought Python execution to the browser, and the new high-speed version also integrates this plugin by default.
|
||||

|
||||
<center>Python Code Execution</center>
|
||||
|
|
@ -0,0 +1,68 @@
|
|||
---
|
||||
sidebar_label: 'Cross-Platform Code Sync Service'
|
||||
sidebar_position: 2
|
||||
---
|
||||
|
||||
## Feature Overview
|
||||
|
||||
The cross-platform repository code sync service is used for bidirectional code synchronization between repositories on different code hosting platforms. Users bind repository branches from different platforms. When a push event on any repository branch is detected by a webhook, the code push is automatically synchronized to the other repository in real time, enabling automatic synchronization of branches and commit information between different platforms (code hosting platforms are limited to GitHub and Gitee).
|
||||
|
||||

|
||||
|
||||
The sync service not only meets the needs of dual-platform codebase branch synchronization but also supports creating code repository synchronization for up to three platforms, as shown below:
|
||||
|
||||

|
||||
|
||||
## Configuring Bidirectional Sync
|
||||
|
||||
1. Enter the "Services" tab of the code repository where you want to create synchronization, and enable the cross-platform code sync service.
|
||||
|
||||

|
||||
|
||||
2. Configure the cross-platform sync repository, supporting GitHub and Gitee. You need to enter the repository address (both git address and website access address are supported), and configure the corresponding token for authorizing synchronization. Please pay attention to the token permissions and whether it has expired.<br />
|
||||
GitHub configuration: Profile Avatar -> Settings -> Developer Settings -> Personal access tokens (classic) -> Generate new token -> Check the repo option -> Save<br />
|
||||
Gitee configuration: Profile Avatar -> Settings -> Private Token -> Generate New Token -> Check the projects permission -> Submit
|
||||
|
||||

|
||||
|
||||
3. When creating a sync repository for the first time, you need to manually create a webhook in the target repository's codebase to listen for push events, so that code can be pushed to other sync repositories to complete synchronization. The sync steps are as follows:
|
||||
|
||||
1. Click the "Copy Link" button to copy the platform's URL for receiving webhook requests.
|
||||
|
||||

|
||||
|
||||
2. Click the "Go" button to navigate to the target repository's webhook page and create a new webhook. Here is an example using GitHub:
|
||||
|
||||

|
||||
|
||||
3. Paste the link and ensure the webhook supports listening for push events and has been successfully activated.
|
||||
|
||||

|
||||
|
||||
4. After completing the repository configuration binding, you need to bind the specified sync branches of the two repositories and establish the initial sync direction. <font color="red">Note: The initial sync strategy is a one-way force push. Please carefully choose the sync direction to avoid code being overwritten.</font>
|
||||
|
||||

|
||||
|
||||
5. Complete the branch binding. After binding, a sync will be executed immediately based on the chosen sync direction. Subsequently, when a webhook detects a code push on any branch, it will push the code to the other bound branch in real time to synchronize.
|
||||
|
||||

|
||||
|
||||
### Managing Sync Branches
|
||||
|
||||
After sync branches are configured, users can perform a series of operations in the sync branch list:<br />
|
||||
1. Add and bind new sync branches. For example, if two repositories have already established a Develop branch sync and need to also sync a feature branch, it can be added in real time.<br />
|
||||
2. Query the latest sync time and sync status between the two branches. If synchronization fails, you can check the logs in the sync records to analyze the cause of failure.<br />
|
||||
3. Add a sync repository. If a GitHub sync repository is already bound and you want to import a repository from Gitee for development while achieving real-time branch synchronization across multiple repositories.<br />
|
||||
4. View sync configuration, which can be used to check the sync repository address, the GitLink address for receiving third-party webhook requests, and update tokens to prevent token expiration.<br />
|
||||
5. Query sync records, including viewing the code change initiator for each sync, sync time, sync status, corresponding commit ID, and sync logs.<br />
|
||||
6. Pause and resume sync, acting as a sync switch that can be toggled at any time.
|
||||
|
||||

|
||||
|
||||
### Important Notes
|
||||
|
||||
1. When establishing synchronization, the tool will force push code once based on the initial sync direction you choose. Please carefully select the sync direction to avoid the risk of code being overwritten. After synchronization is established, whichever side's push event triggers the webhook will sync to the other side. Please do not commit code simultaneously in multiple repositories to avoid conflicts.<br />
|
||||
2. Currently, only personal repository synchronization is supported. Organization repository synchronization is not yet supported. Stay tuned.<br />
|
||||
3. During the configuration process, carefully check whether the token permissions include repository read and write access. Also check whether the token has expired. If it has expired, click the [View Sync Configuration] button to enter the page and update the token.<br />
|
||||
4. During the configuration process, carefully check that the webhook on the other platform includes push events in its listening events and that the webhook is activated.
|
||||
|
||||
|
|
@ -0,0 +1,94 @@
|
|||
---
|
||||
sidebar_label: "Chongjingniao Code Traceability"
|
||||
sidebar_position: 1
|
||||
---
|
||||
|
||||
## Code Analysis Entry
|
||||
|
||||

|
||||
|
||||
<center>Code Analysis Entry</center>
|
||||
|
||||
Page Description:
|
||||
|
||||
1. Users can click the "Services" menu tab to enter the services page.
|
||||
|
||||
2. Repository administrators can enable/disable the visibility of the code analysis menu in the project navigation within the "Repository Settings" tab, as shown below:
|
||||
|
||||
|
||||

|
||||
|
||||
<center>Project Navigation</center>
|
||||
|
||||
|
||||
## Code Analysis Detection
|
||||
|
||||

|
||||
|
||||
<center>Code Analysis Detection</center>
|
||||
|
||||
|
||||

|
||||
|
||||
<center>New Analysis</center>
|
||||
|
||||
Page Description:
|
||||
|
||||
1. This page is displayed when there are no historical analysis records.
|
||||
|
||||
2. The "New Analysis" button is only visible to repository administrators. When repository developers, observers, and visitors access this page, the "New Analysis" button is not visible.
|
||||
|
||||
3. When clicking the "New Analysis" button, the system needs to check whether the code analysis feature is enabled.
|
||||
|
||||
|
||||
## Branch Selection
|
||||
|
||||

|
||||
|
||||
<center>Branch Selection</center>
|
||||
|
||||
Page Description:
|
||||
|
||||
1. When a user clicks the "New Analysis" button, a dialog pops up requiring the selection of a branch.
|
||||
|
||||
2. The detection type and detection parameters shown in the figure are default values and cannot be modified by the user. They are displayed on the interface only to inform the user.
|
||||
|
||||
3. Clicking "Start Detection" here initiates detection based on the selected branch and creates a new detection entry in the list.
|
||||
|
||||
|
||||
## List Display
|
||||
|
||||

|
||||
|
||||
<center>List Display</center>
|
||||
|
||||
Page Description:
|
||||
|
||||
1. When the detection list exceeds one row, a branch name filter dropdown is provided to the left of the "New Analysis" button. The dropdown options are the set of branches present in the list. For example, if the repository has branches 1, 2, 3, 4, 5 and this list only contains branches 3 and 4, then the dropdown will only show branches 3 and 4.
|
||||
|
||||
2. When a newly created analysis task is in the detection process, a percentage progress bar is displayed in the detection status column to show the current progress.
|
||||
|
||||
3. Clicking the "Rescan" button will bring up a new analysis dialog. This dialog retains all previously configured branch information, and the detection branch cannot be modified (the branch dropdown selection is grayed out). After confirming, a new detection record will be added.
|
||||
|
||||
|
||||
## Result Display
|
||||
|
||||

|
||||
|
||||
<center>Result Display</center>
|
||||
|
||||
Page Description:
|
||||
|
||||
1. When a user clicks the "View" button in the "Actions" column of a code detection entry, the result display page will expand on the current page. When the user clicks the "View" button again, the result display page will collapse. When the user clicks the "View" button for another detection record, the result display page for that record will expand, and the currently expanded result display page will collapse.
|
||||
|
||||
2. When the detection status is "Failed" or the detection is currently "In Progress", the "View" button will be grayed out and cannot be clicked.
|
||||
|
||||
3. The result display page uses the existing code traceability page, embedded into GitLink without the need for redesign.
|
||||
|
||||
|
||||
## User Operation Flow
|
||||
|
||||
.png)
|
||||
|
||||
<center>User Operation Flow</center>
|
||||
|
||||
|
|
@ -0,0 +1,31 @@
|
|||
---
|
||||
sidebar_label: '组织创建及设置'
|
||||
sidebar_position: 2
|
||||
---
|
||||
# Organization Creation
|
||||
|
||||
On the *https://www.gitlink.org.cn* page, click the "+" icon on the top navigation bar to create a new organization.
|
||||
|
||||

|
||||
|
||||
On the creation page, enter the **Organization Account**, **Organization Name**, **Organization Description**, **Location**, **Visibility**, and **Organization Avatar**, then click the "**Create Organization**" button to complete the organization creation.
|
||||
|
||||

|
||||
|
||||
## Organization Account
|
||||
|
||||

|
||||
|
||||
**Note**: Only alphanumeric characters, underscores, and hyphens are allowed, starting with a letter or number, with a length of 4 to 20 characters.
|
||||
|
||||
## Organization Name and Description
|
||||
|
||||

|
||||
|
||||
**Note**: These are required fields and must not be left empty.
|
||||
|
||||
## Visibility
|
||||
|
||||

|
||||
|
||||
**Note**: Visibility presets include three types of organizations: Public, Restricted (visible only to logged-in users), and Private (visible only to organization members).
|
||||
|
|
@ -0,0 +1,31 @@
|
|||
---
|
||||
sidebar_label: '组织团队管理'
|
||||
sidebar_position: 3
|
||||
---
|
||||
# Organization Team Management
|
||||
|
||||
## Creating an Organization Team
|
||||
Click the "New Team" button on the organization information page to create a team belonging to the organization (the platform creates an "Owners" team by default, with the organization creator as its member).
|
||||
|
||||
On the team creation page, enter the team identifier, team name, team description, project permissions, and repository permissions, then click "New Team" to complete the team creation.
|
||||
|
||||

|
||||
|
||||
## Viewing an Organization Team
|
||||
|
||||
Click on a team name on the organization information page to view the team's detailed information. The page includes the team's name, description, and other information, as well as a list of members and projects associated with the team.
|
||||
|
||||

|
||||
|
||||
## Managing an Organization Team
|
||||
|
||||
Click the "Team Settings" button on the team information page to manage the team.
|
||||
|
||||
- Basic Settings: Modify basic project information, such as name and description.
|
||||

|
||||
|
||||
- Team Member Management: Add new members to or remove existing members from the team.
|
||||

|
||||
|
||||
- Team Project Management: Associate new projects (projects already created by the organization) with the team or remove associated projects.
|
||||

|
||||
|
|
@ -0,0 +1,21 @@
|
|||
---
|
||||
sidebar_label: '组织成员管理'
|
||||
sidebar_position: 4
|
||||
---
|
||||
# Member Management
|
||||
|
||||
In the **Repository Settings** of a project you manage, under **Member Management**, you can access the member management interface.
|
||||
|
||||

|
||||
|
||||
## Member Search and Addition
|
||||
In the member management interface, you can search for and add organization members.
|
||||
|
||||

|
||||
|
||||
## Member Invitation Permission Settings
|
||||
Administrators can configure the permissions for inviting members.
|
||||

|
||||
Additionally, you can also copy an invitation link to more conveniently invite members to join the project.
|
||||
|
||||
**Note**: This feature is only visible to administrators.
|
||||
|
|
@ -0,0 +1,28 @@
|
|||
---
|
||||
sidebar_label: '组织简介'
|
||||
sidebar_position: 1
|
||||
---
|
||||
|
||||
# Organization Introduction
|
||||
|
||||
An organization is a shared account where business and open-source projects can collaborate across multiple projects simultaneously, with sophisticated security and management features. Multiple individual accounts can collaborate on shared projects by joining the same organization account.
|
||||
|
||||
Your team can collaborate on GitLink by using organization accounts, which serve as containers for shared work and give your work a unique name and brand. At the same time, the platform supports organizations in publishing news and updates on the "Organization Details" page, displaying project overviews, repository details, and more.
|
||||
|
||||

|
||||
|
||||
## As an Organization Owner
|
||||
|
||||
Effectively managing your organization is your mission.
|
||||
|
||||
The organization provides a centralized hub for collaboration and sharing, allowing your team to work together, share resources, and communicate more effectively.
|
||||
|
||||
To simplify access management and enhance collaboration, you can create nested teams that reflect your organizational structure. You can group people based on their roles or projects and assign tasks.
|
||||
|
||||

|
||||
|
||||
The platform also supports organization owners in managing custom settings for data access.
|
||||
|
||||
## As an Organization Member
|
||||
|
||||
You can collaborate with an unlimited number of people across multiple projects through the organization. Together with like-minded individuals, through division of labor and coordinated effort, you can participate in the development process, publish issues, or handle tasks.
|
||||
|
|
@ -0,0 +1,11 @@
|
|||
---
|
||||
sidebar_label: '组织项目管理'
|
||||
sidebar_position: 5
|
||||
---
|
||||
## Creating an Organization Project
|
||||
|
||||
Click the "New Project" button on the organization information page to create a hosted project or mirror project belonging to the organization.
|
||||
|
||||

|
||||
|
||||
**Note**: In the "Owner" dropdown options, you can select: Individual, Organization, or Team.
|
||||
|
|
@ -0,0 +1,15 @@
|
|||
---
|
||||
sidebar_label: '模板导入及导出'
|
||||
sidebar_position: 2
|
||||
---
|
||||
|
||||
|
||||
## Template Import and Export Management
|
||||
## 1. Template Import
|
||||
Click the **Import Template** button on the Wiki interface to import local files in TXT, Markdown, and other formats to create a Wiki document.
|
||||

|
||||
## 2. Template Export
|
||||
Click the **Export** button on the Wiki interface to export documents in Markdown, HTML, PDF, and other formats.
|
||||

|
||||
|
||||
|
||||
Some files were not shown because too many files have changed in this diff Show More
Loading…
Reference in New Issue